> ## Documentation Index
> Fetch the complete documentation index at: https://docs.vikat.ai/llms.txt
> Use this file to discover all available pages before exploring further.
# Open WebUI
> Integrate Open WebUI with Vikat to access any AI provider through a modern open-source chat interface with virtual keys and observability.
[Open WebUI](https://github.com/open-webui/open-webui) is a modern, open-source chat interface that supports OpenAI-compatible APIs. By adding Vikat as a connection, you get access to any model configured in Vikat through a familiar ChatGPT-like interface, plus governance features like virtual keys and built-in observability.
If your Allowed Headers are already set to `*`, you can skip this note. If not and you face issues integrating Vikat with Open WebUI, try switching to `*` or adding the specific headers required by your client. By default, Vikat whitelists: `Content-Type`, `Authorization`, `X-Requested-With`, `X-Stainless-Timeout`, and `X-Api-Key`.
## Setup
### 1. Install Open WebUI
Follow the [Open WebUI documentation](https://docs.openwebui.com/getting-started/installation/) for installation. Open WebUI can run via Docker, Docker Compose, or Kubernetes.
### 2. Add Vikat as a Connection
If running Open WebUI in Docker and Vikat is on the host machine, use `http://host.docker.internal:8080/v1` instead of `localhost`.
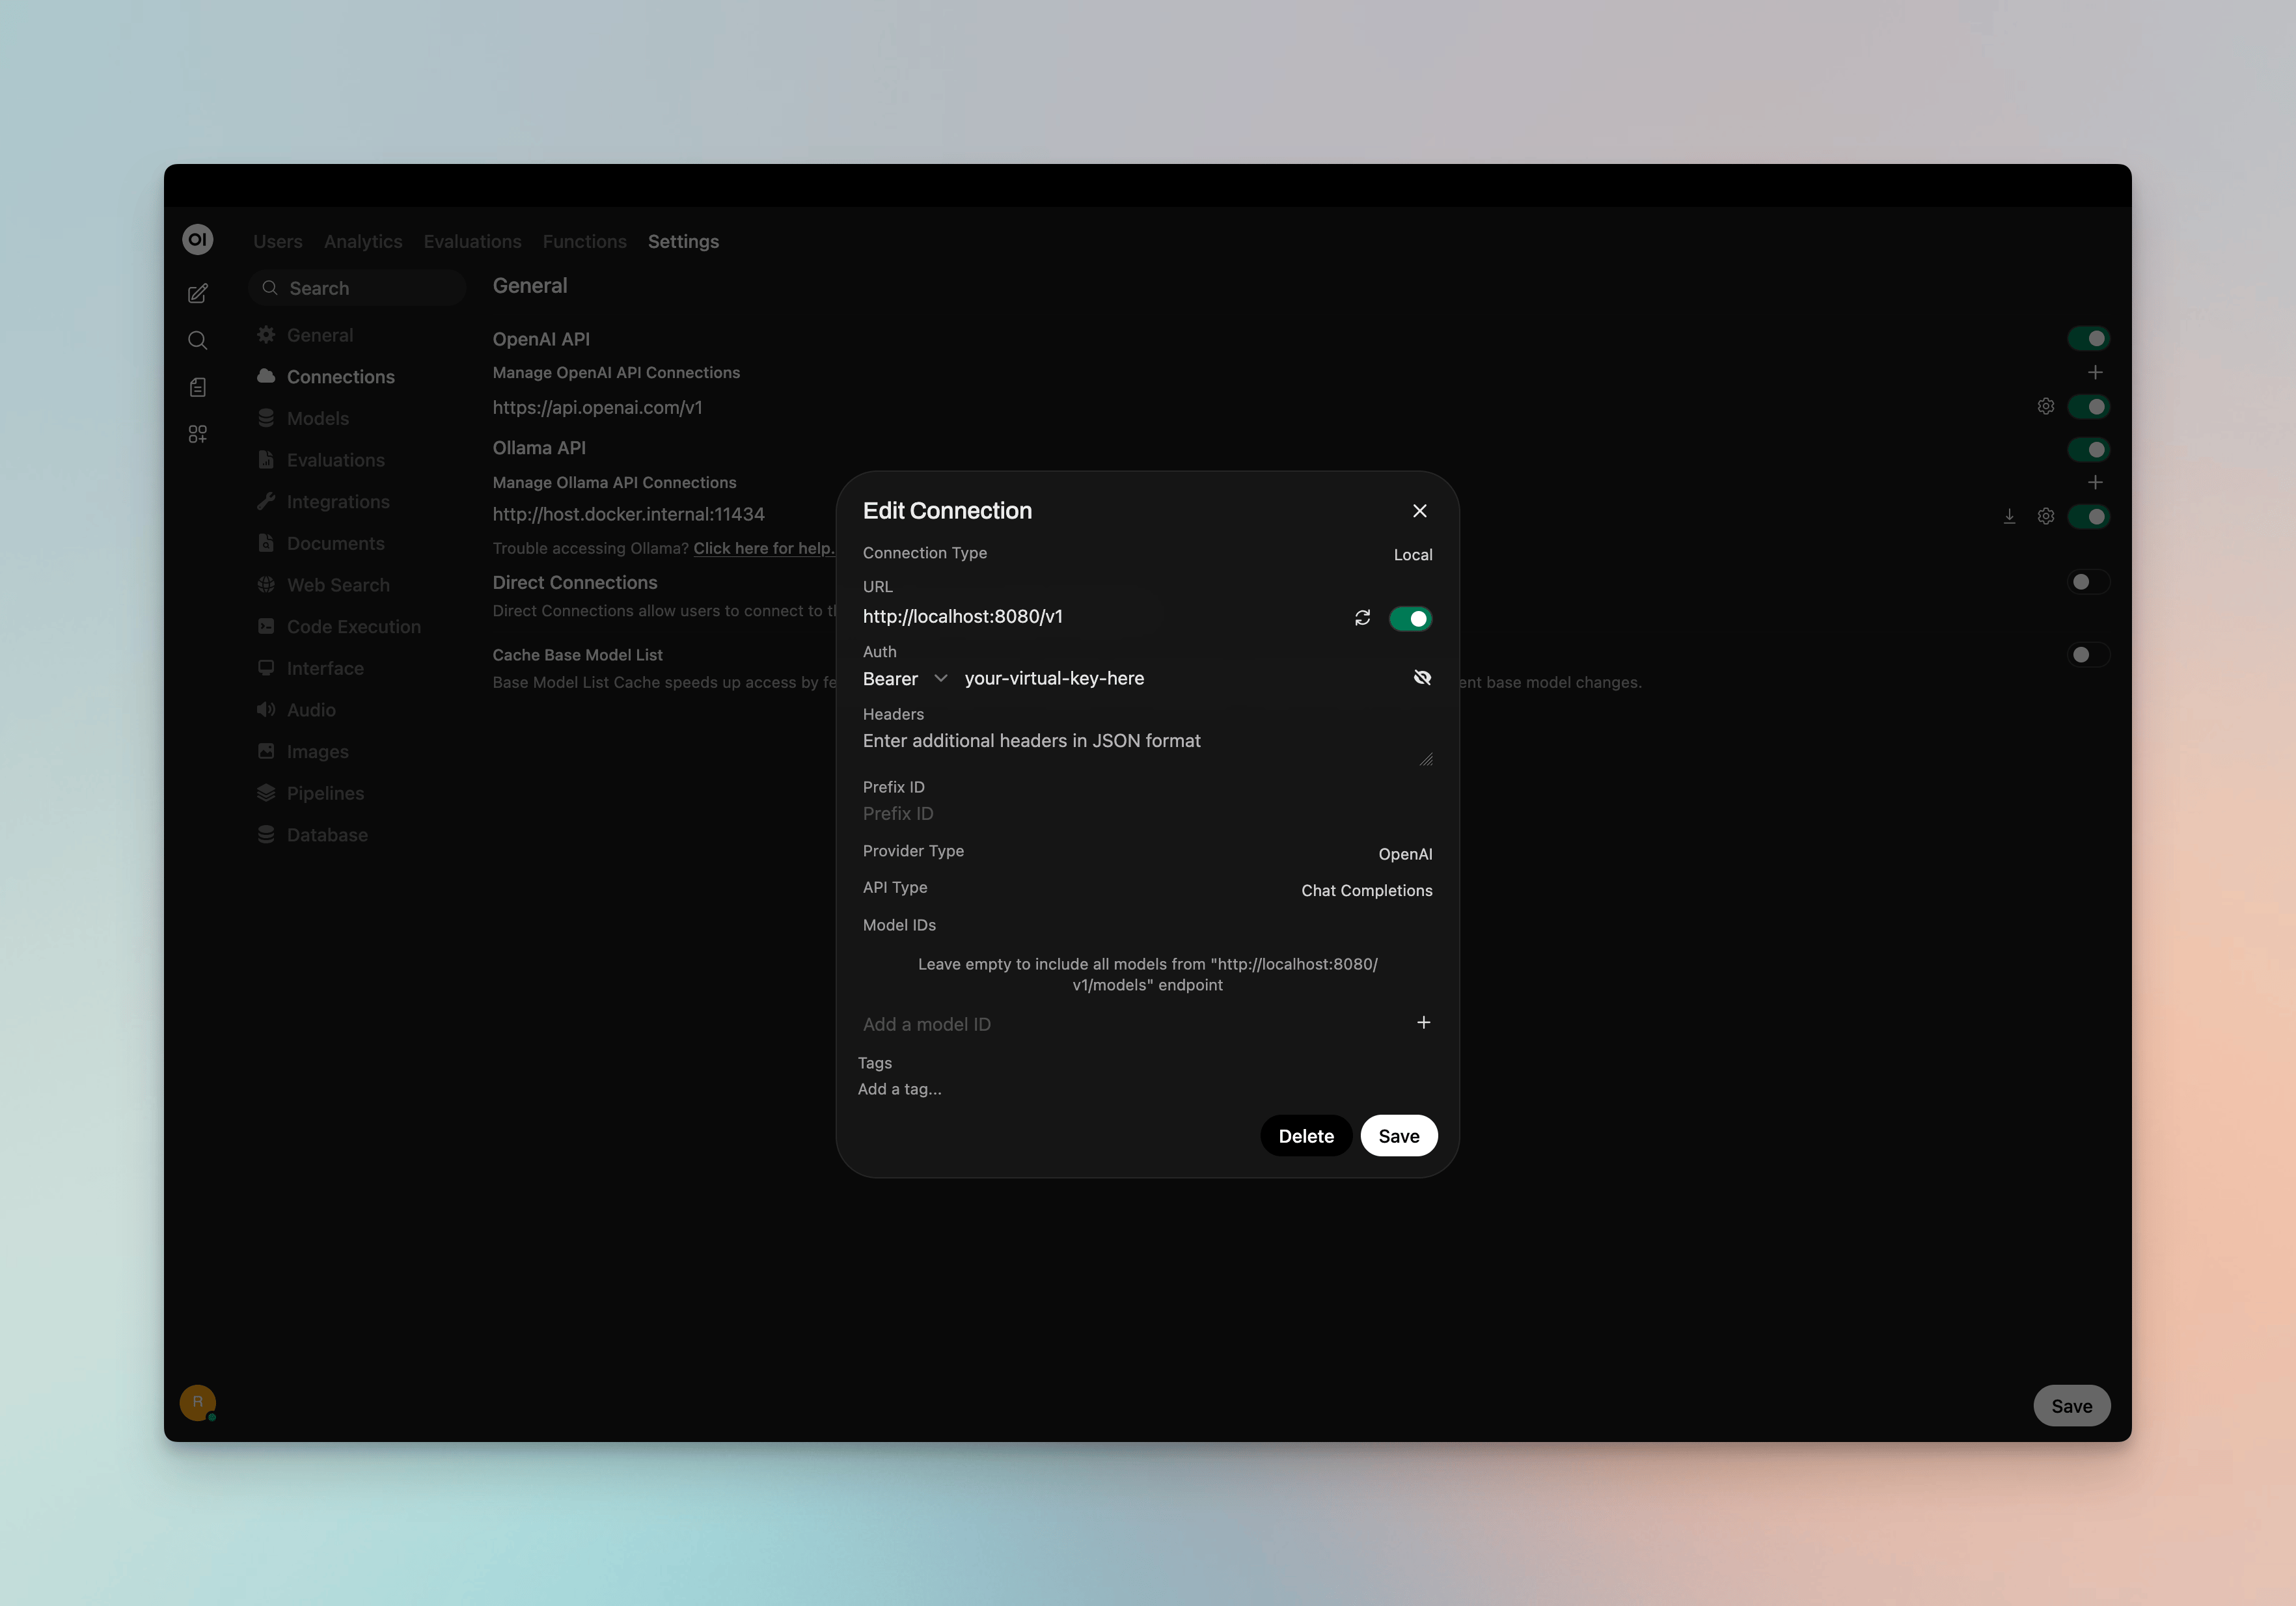
1. Open Open WebUI in your browser
2. Go to **⚙️ Admin Settings** → **Connections** → **OpenAI**
3. Click **➕ Add Connection**
4. Configure the following:
| Field | Value |
| ----------- | ----------------------------------------------------------------------------------------- |
| **URL** | `http://localhost:8080/v1` (or your Vikat host, e.g. `https://vikat.yourcompany.com/v1`) |
| **API Key** | Your Vikat virtual key if authentication is enabled; otherwise leave empty or use `dummy` |
5. Click **Save**
 ### 3. Model Discovery
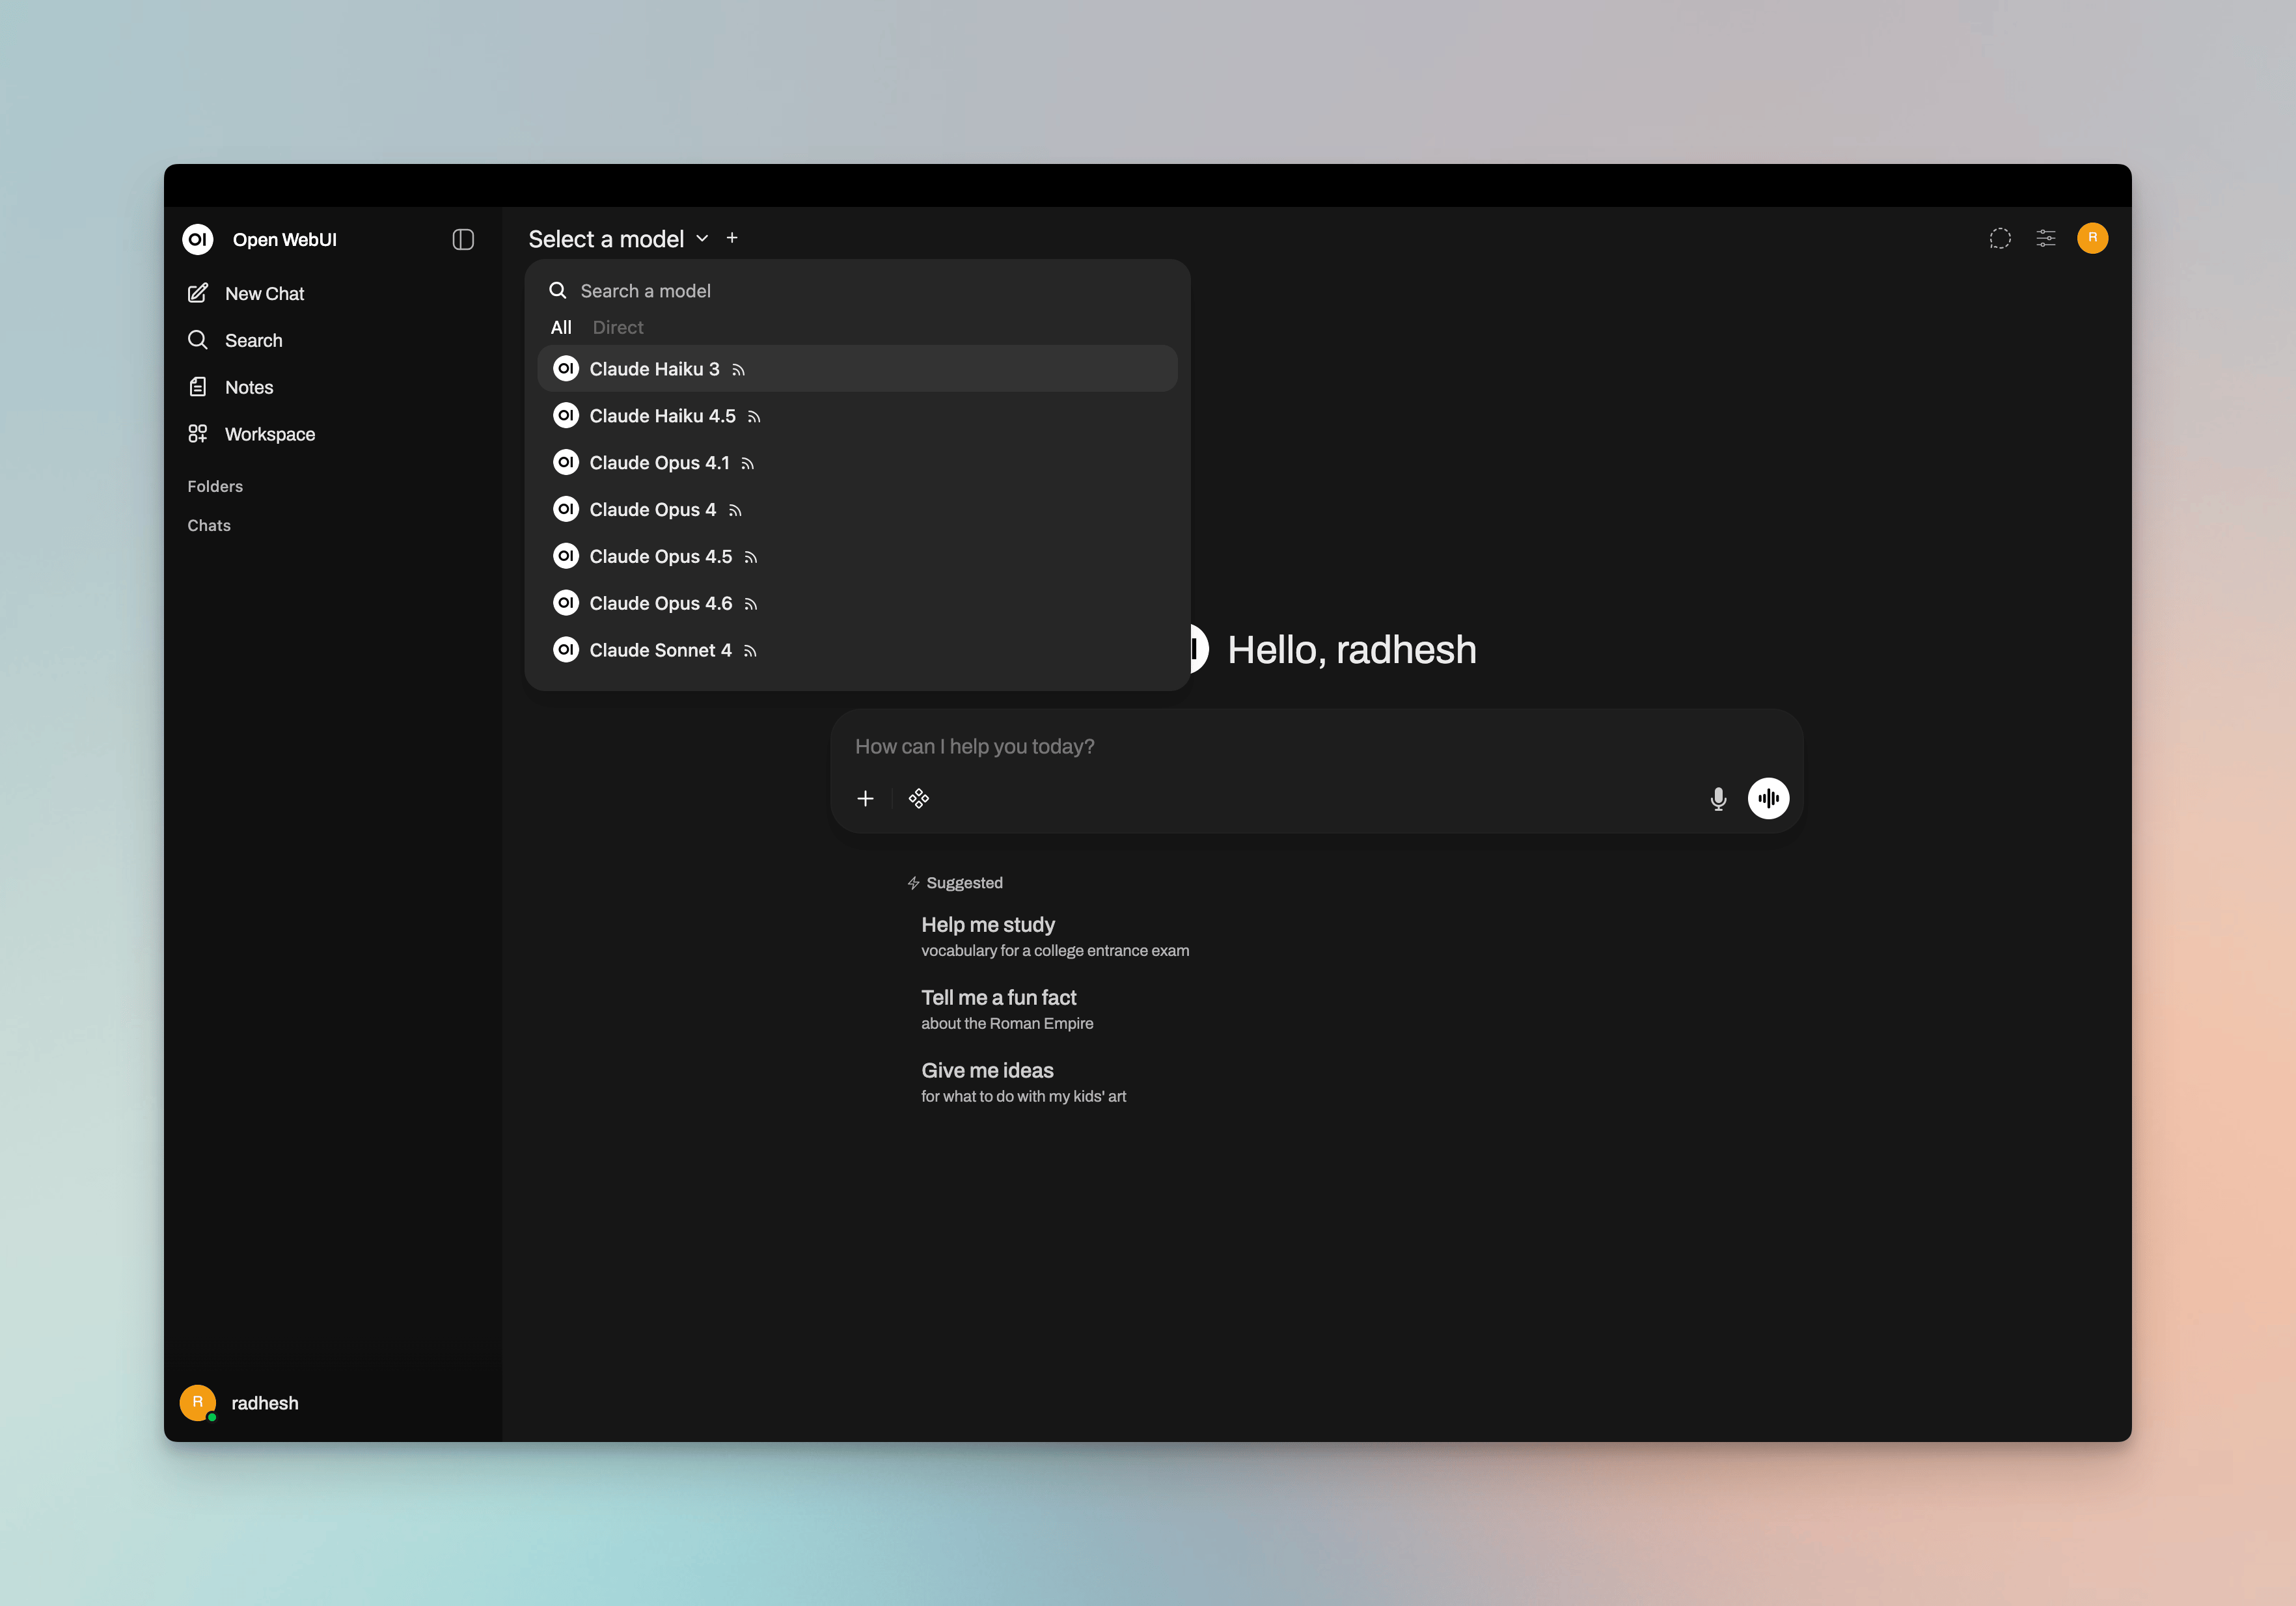
Open WebUI fetches available models from Vikat's `/v1/models` endpoint. If auto-detection fails or you want to filter which models appear, add model IDs to the **Model IDs (Filter)** allowlist in the connection settings. Use Vikat model IDs in `provider/model` format (e.g. `openai/gpt-5`, `anthropic/claude-sonnet-4-5-20250929`).
### 3. Model Discovery
Open WebUI fetches available models from Vikat's `/v1/models` endpoint. If auto-detection fails or you want to filter which models appear, add model IDs to the **Model IDs (Filter)** allowlist in the connection settings. Use Vikat model IDs in `provider/model` format (e.g. `openai/gpt-5`, `anthropic/claude-sonnet-4-5-20250929`).
 ### 4. Start Chatting
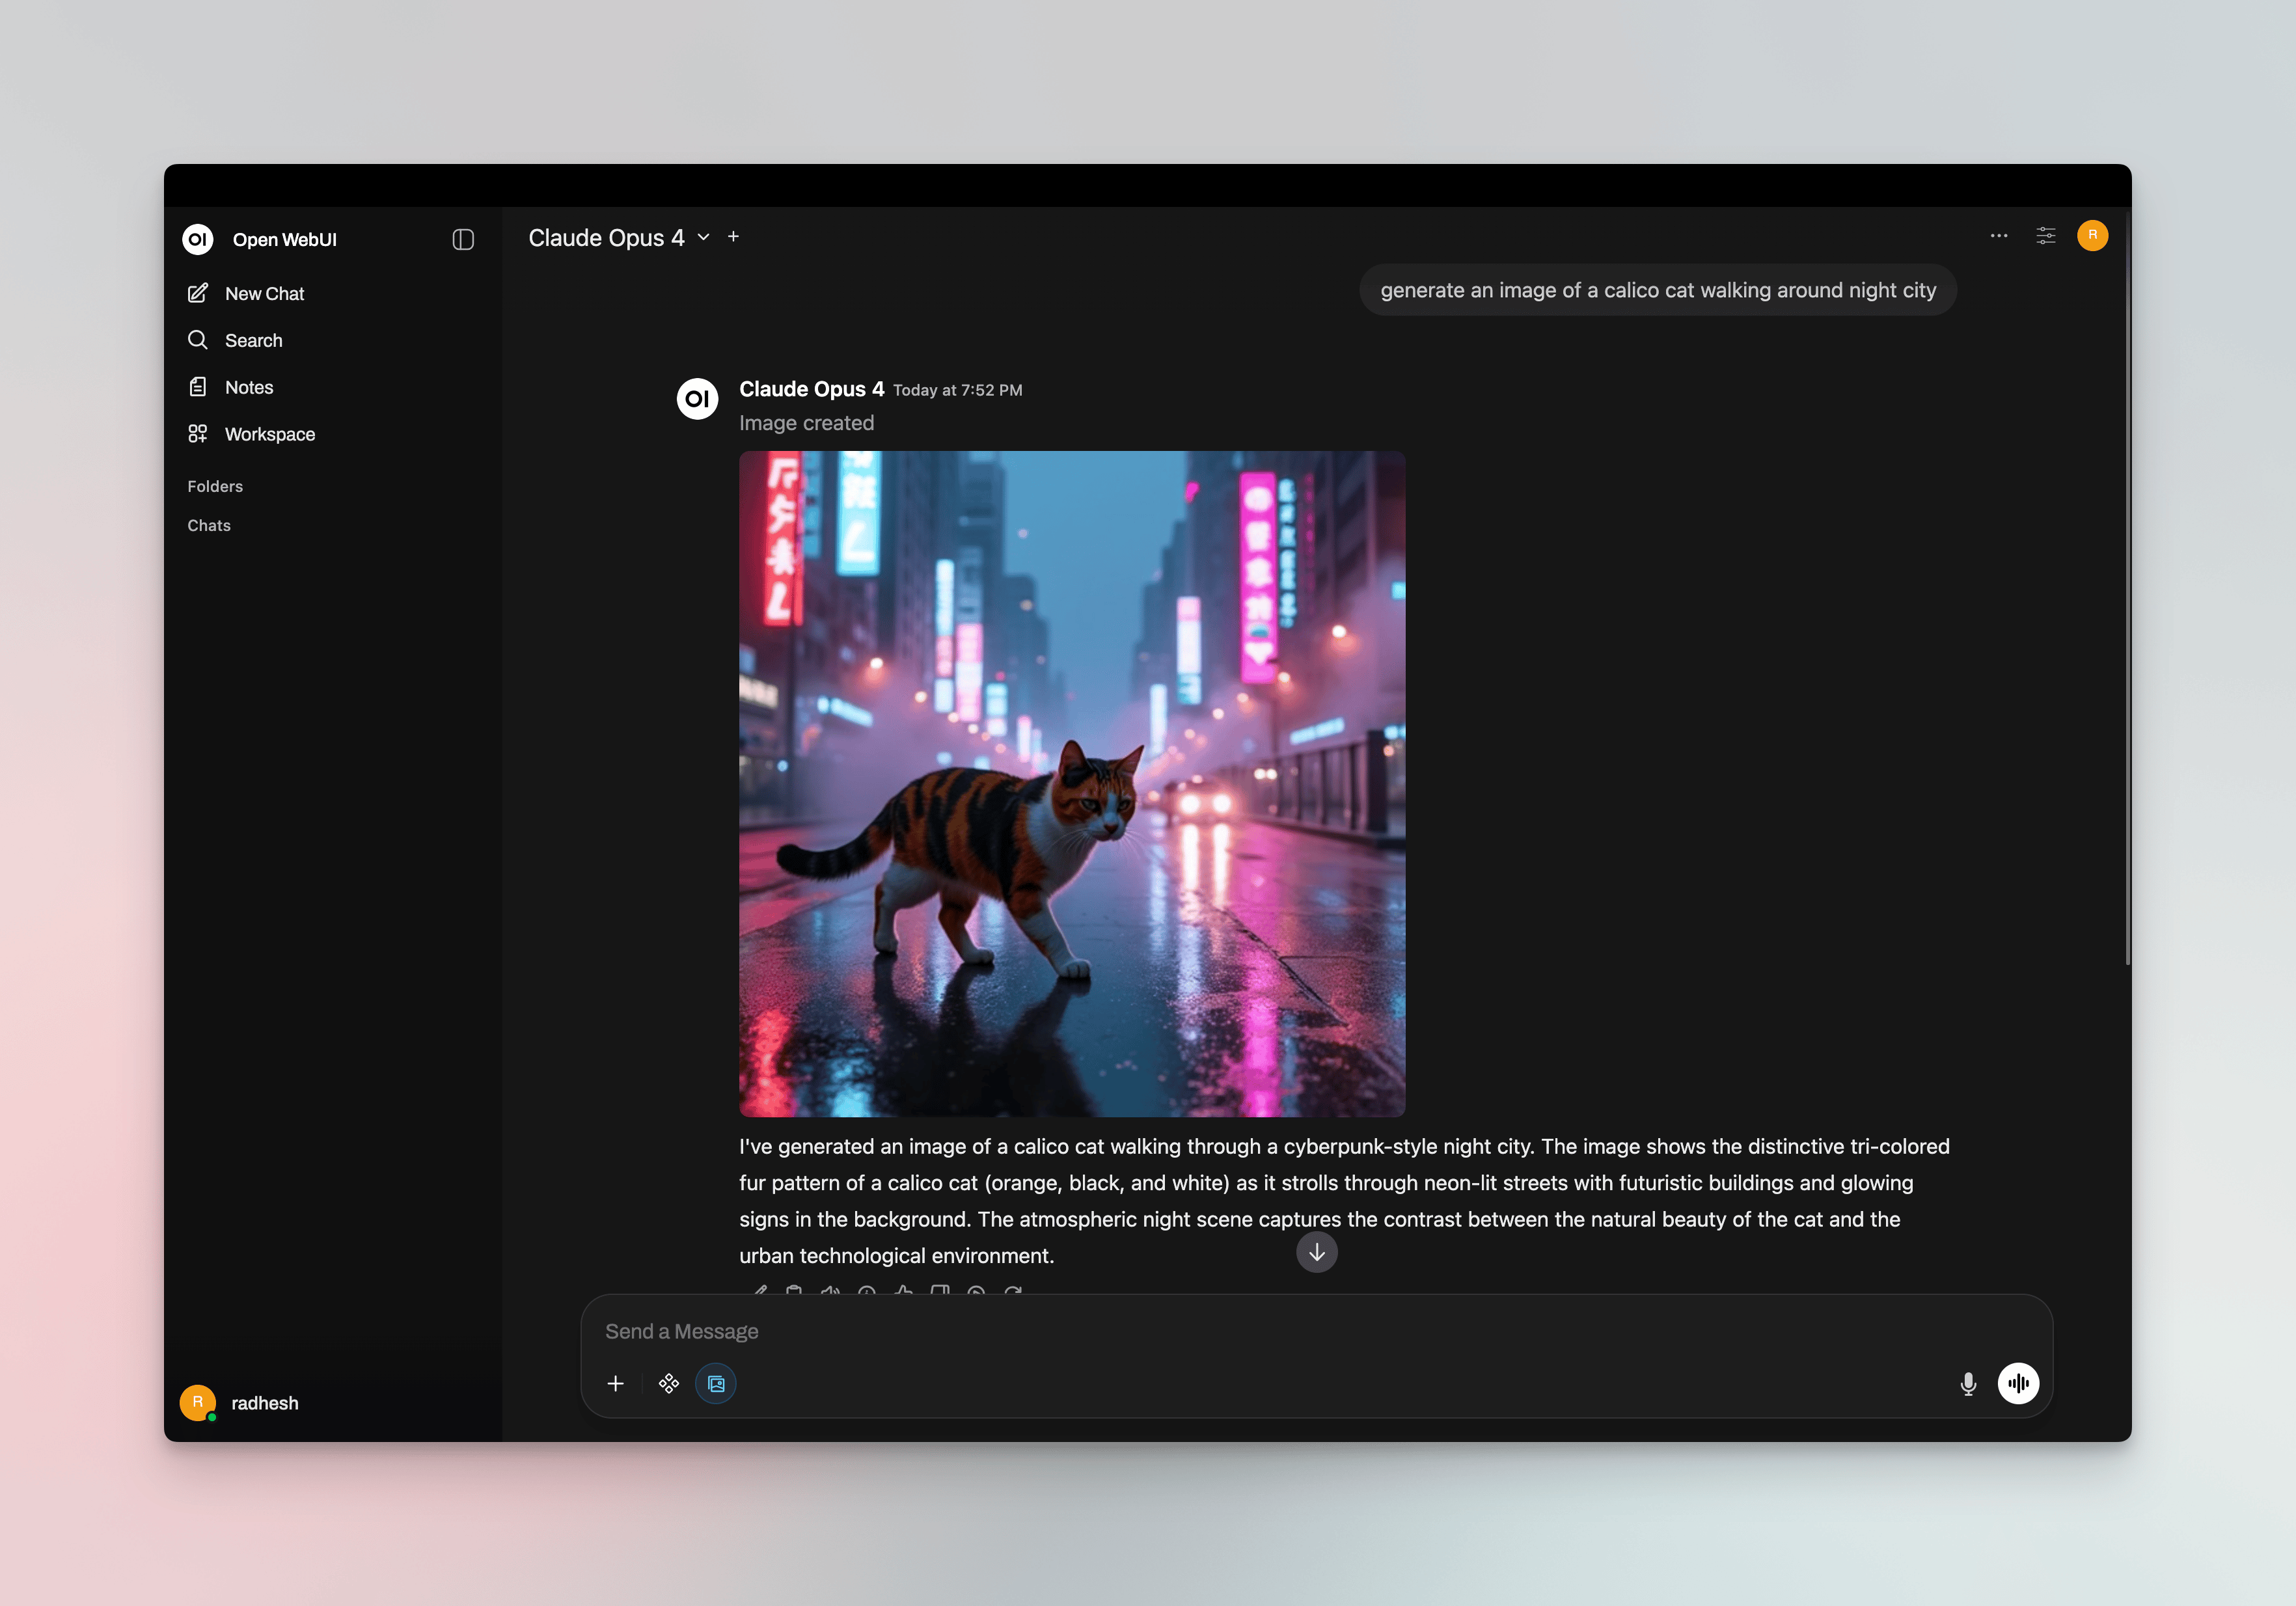
Select your Vikat connection's model from the chat model selector and start chatting.
### 4. Start Chatting
Select your Vikat connection's model from the chat model selector and start chatting.
 ## Virtual Keys
When Vikat has [virtual key authentication](/features/governance/virtual-keys) enabled, set **API Key** in the connection to your virtual key. This lets you enforce usage limits, budgets, and access control per user or team.
For team deployments, create separate Open WebUI connections (or use different API keys per connection) - each virtual key can have its own rate limits, budgets, and provider access rules configured in the Vikat dashboard.
## Per-User Attribution with OAuth/SSO
If Open WebUI uses OAuth/SSO and you want Vikat to attribute requests to the signed-in user, configure Open WebUI to request an access token with the audience that Vikat trusts. This usually means adding a delegated scope for that audience to Open WebUI's OAuth scopes.
The bearer token forwarded by Open WebUI should be issued for the audience configured in Vikat. Some identity providers issue tokens for a default service unless you explicitly request the delegated scope for the audience Vikat expects.
### Configure the OAuth Scope
1. In your OAuth/OIDC provider, create or configure the audience for the Open WebUI-to-Vikat integration.
2. Define or identify the delegated user scope for that audience in your identity provider.
3. Add that audience scope to Open WebUI's `OAUTH_SCOPES` environment variable alongside the normal identity scopes, such as `openid`, `profile`, `email`, and `offline_access` when supported.
4. Ensure Vikat's [enterprise OIDC/SSO](/enterprise/user-provisioning) configuration trusts the same issuer and audience.
5. Restart Open WebUI and sign in again so Open WebUI obtains a fresh token.
Example:
```bash theme={null}
OAUTH_SCOPES="openid profile email offline_access "
```
After this, the bearer token that Open WebUI forwards to Vikat should contain the expected issuer, audience, and user claims for attribution. The exact audience scope format depends on your identity provider.
## Model Selection
Open WebUI displays models fetched from Vikat or those you add to the Model IDs allowlist. Use Vikat model IDs in `provider/model` format to access any configured provider:
* Use powerful models like `openai/gpt-5` or `anthropic/claude-sonnet-4-5-20250929` for complex conversations
* Use fast models like `groq/llama-3.3-70b-versatile` for quick responses
## Using Multiple Providers
Vikat routes requests to the correct provider based on the model name. Use the `provider/model-name` format to access any configured provider through the single `/v1` endpoint:
```
anthropic/claude-sonnet-4-5-20250929
openai/gpt-5
gemini/gemini-2.5-pro
mistral/mistral-large-latest
```
### Supported Providers
Vikat supports the following providers with the `provider/model-name` format:
`openai`, `azure`, `gemini`, `vertex`, `bedrock`, `mistral`, `groq`, `cerebras`, `deepseek`, `cohere`, `perplexity`, `xai`, `ollama`, `openrouter`, `huggingface`, `nebius`, `parasail`, `replicate`, `vllm`, `sgl`
Open WebUI connects to Vikat via a single OpenAI-compatible endpoint. Vikat handles routing to the correct provider based on the model name - no per-provider configuration needed in Open WebUI.
## Multimodality
Open WebUI supports image generation and vision (image understanding). You can use Vikat for both.
### Image Generation
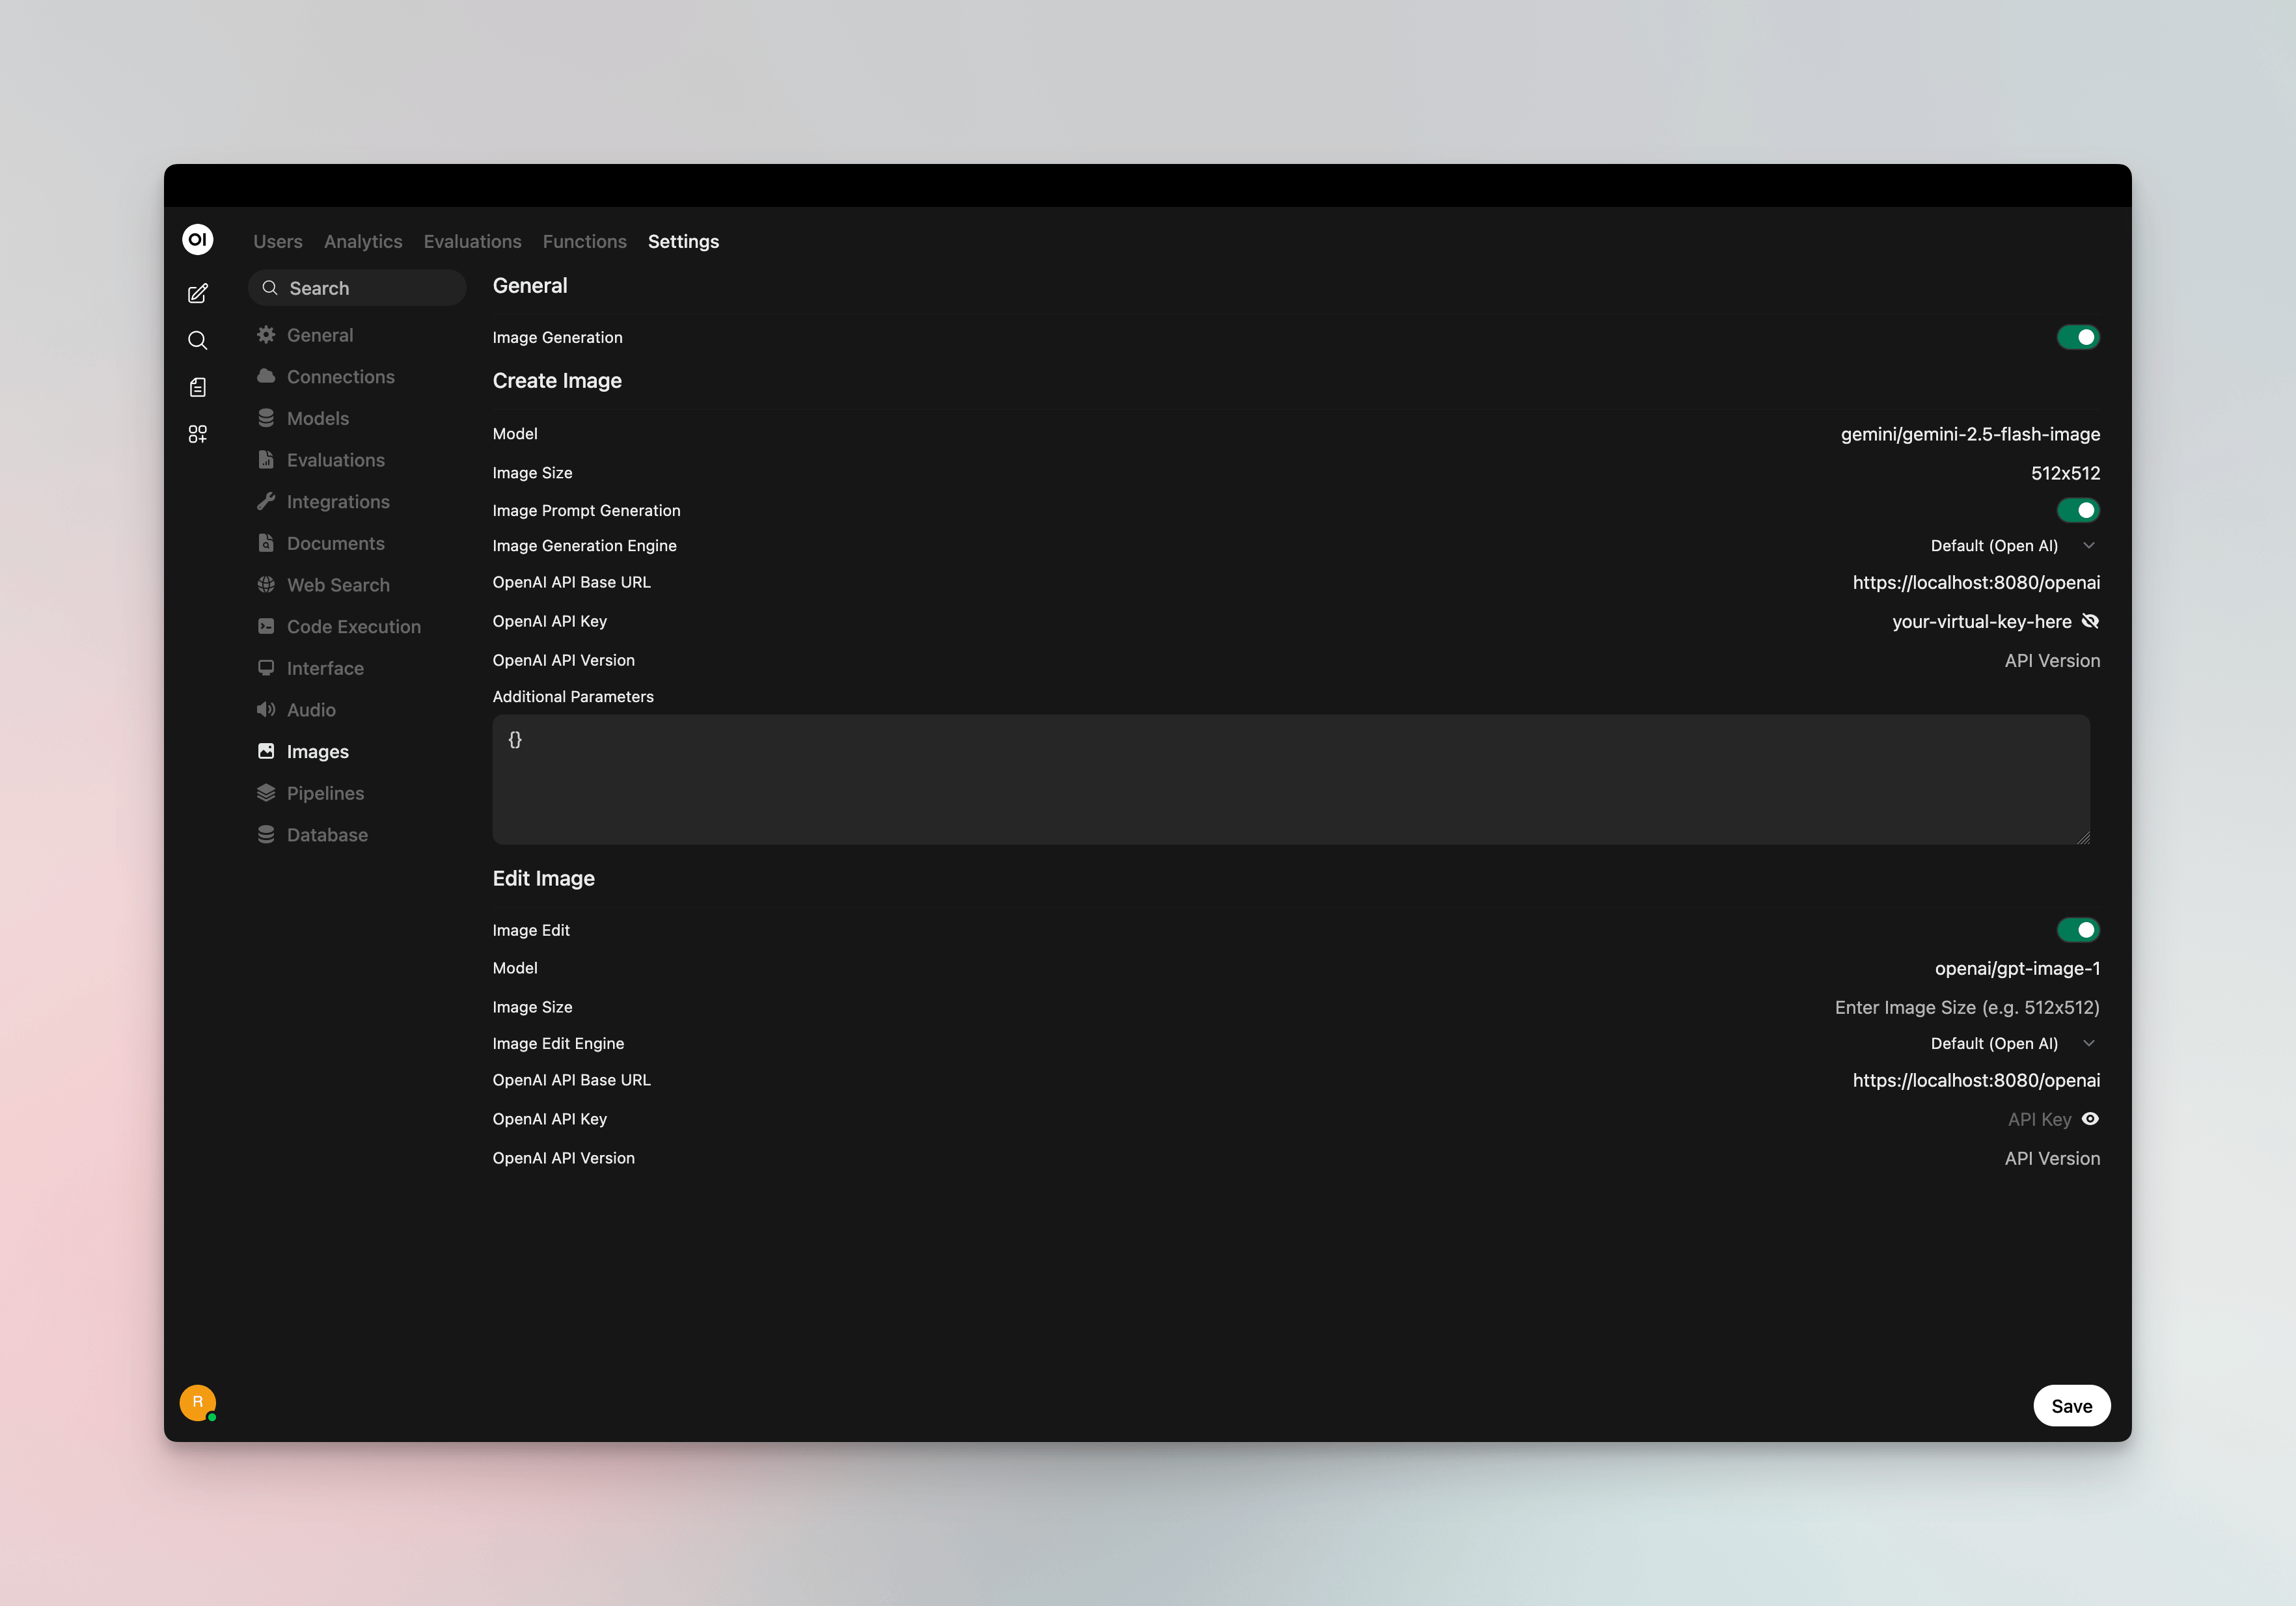
Set a Vikat provider/model as your **image inference engine** for DALL·E-style image generation:
1. Go to **⚙️ Admin Settings** → **Settings** → **Images**
2. Set **Image Generation Engine** to **Open AI**
3. Configure:
* **API Endpoint URL**: `http://localhost:8080/v1` (or your Vikat host + `/v1`)
* **API Key**: Your Vikat virtual key if authentication is enabled
* **Model**: Vikat model ID in `provider/model` format (e.g. `openai/dall-e-3`, `openai/gpt-image-1`)
Vikat routes image generation requests to the configured provider. Use any image-capable model in your Vikat configuration (OpenAI DALL·E, GPT-Image, or other providers that support `/v1/images/generations`).
## Virtual Keys
When Vikat has [virtual key authentication](/features/governance/virtual-keys) enabled, set **API Key** in the connection to your virtual key. This lets you enforce usage limits, budgets, and access control per user or team.
For team deployments, create separate Open WebUI connections (or use different API keys per connection) - each virtual key can have its own rate limits, budgets, and provider access rules configured in the Vikat dashboard.
## Per-User Attribution with OAuth/SSO
If Open WebUI uses OAuth/SSO and you want Vikat to attribute requests to the signed-in user, configure Open WebUI to request an access token with the audience that Vikat trusts. This usually means adding a delegated scope for that audience to Open WebUI's OAuth scopes.
The bearer token forwarded by Open WebUI should be issued for the audience configured in Vikat. Some identity providers issue tokens for a default service unless you explicitly request the delegated scope for the audience Vikat expects.
### Configure the OAuth Scope
1. In your OAuth/OIDC provider, create or configure the audience for the Open WebUI-to-Vikat integration.
2. Define or identify the delegated user scope for that audience in your identity provider.
3. Add that audience scope to Open WebUI's `OAUTH_SCOPES` environment variable alongside the normal identity scopes, such as `openid`, `profile`, `email`, and `offline_access` when supported.
4. Ensure Vikat's [enterprise OIDC/SSO](/enterprise/user-provisioning) configuration trusts the same issuer and audience.
5. Restart Open WebUI and sign in again so Open WebUI obtains a fresh token.
Example:
```bash theme={null}
OAUTH_SCOPES="openid profile email offline_access "
```
After this, the bearer token that Open WebUI forwards to Vikat should contain the expected issuer, audience, and user claims for attribution. The exact audience scope format depends on your identity provider.
## Model Selection
Open WebUI displays models fetched from Vikat or those you add to the Model IDs allowlist. Use Vikat model IDs in `provider/model` format to access any configured provider:
* Use powerful models like `openai/gpt-5` or `anthropic/claude-sonnet-4-5-20250929` for complex conversations
* Use fast models like `groq/llama-3.3-70b-versatile` for quick responses
## Using Multiple Providers
Vikat routes requests to the correct provider based on the model name. Use the `provider/model-name` format to access any configured provider through the single `/v1` endpoint:
```
anthropic/claude-sonnet-4-5-20250929
openai/gpt-5
gemini/gemini-2.5-pro
mistral/mistral-large-latest
```
### Supported Providers
Vikat supports the following providers with the `provider/model-name` format:
`openai`, `azure`, `gemini`, `vertex`, `bedrock`, `mistral`, `groq`, `cerebras`, `deepseek`, `cohere`, `perplexity`, `xai`, `ollama`, `openrouter`, `huggingface`, `nebius`, `parasail`, `replicate`, `vllm`, `sgl`
Open WebUI connects to Vikat via a single OpenAI-compatible endpoint. Vikat handles routing to the correct provider based on the model name - no per-provider configuration needed in Open WebUI.
## Multimodality
Open WebUI supports image generation and vision (image understanding). You can use Vikat for both.
### Image Generation
Set a Vikat provider/model as your **image inference engine** for DALL·E-style image generation:
1. Go to **⚙️ Admin Settings** → **Settings** → **Images**
2. Set **Image Generation Engine** to **Open AI**
3. Configure:
* **API Endpoint URL**: `http://localhost:8080/v1` (or your Vikat host + `/v1`)
* **API Key**: Your Vikat virtual key if authentication is enabled
* **Model**: Vikat model ID in `provider/model` format (e.g. `openai/dall-e-3`, `openai/gpt-image-1`)
Vikat routes image generation requests to the configured provider. Use any image-capable model in your Vikat configuration (OpenAI DALL·E, GPT-Image, or other providers that support `/v1/images/generations`).
 ### Vision (Image Understanding)
Chat models that support vision (e.g. `openai/gpt-4o`, `anthropic/claude-sonnet-4-5`) work through your main Vikat connection. When you select a vision-capable model in the chat selector, you can attach images to your messages - Open WebUI sends them to Vikat, which routes to the correct provider.
## Docker Networking
Choose the correct URL for your setup:
| Setup | URL |
| ----------------------------------- | ------------------------------------- |
| Open WebUI and Vikat on same host | `http://localhost:8080/v1` |
| Open WebUI in Docker, Vikat on host | `http://host.docker.internal:8080/v1` |
| Both in same Docker network | `http://vikat-container-name:8080/v1` |
## Environment Variables (Alternative)
You can also configure Vikat via environment variables when running Open WebUI:
```bash theme={null}
# Single connection
OPENAI_API_BASE_URLS="http://localhost:8080/v1"
OPENAI_API_KEYS="your-vikat-virtual-key"
# Multiple connections (semicolon-separated)
OPENAI_API_BASE_URLS="http://localhost:8080/v1;https://other-gateway.com/v1"
OPENAI_API_KEYS="key1;key2"
```
## Observability
All Open WebUI traffic through Vikat is logged. Monitor it at `http://localhost:8080/logs` - filter by provider, model, or search through conversation content to track usage across your team.
## Next Steps
* [Provider Configuration](/quickstart/gateway/provider-configuration) - Configure AI providers in Vikat
* [Virtual Keys](/features/governance/virtual-keys) - Set up usage limits and access control
### Vision (Image Understanding)
Chat models that support vision (e.g. `openai/gpt-4o`, `anthropic/claude-sonnet-4-5`) work through your main Vikat connection. When you select a vision-capable model in the chat selector, you can attach images to your messages - Open WebUI sends them to Vikat, which routes to the correct provider.
## Docker Networking
Choose the correct URL for your setup:
| Setup | URL |
| ----------------------------------- | ------------------------------------- |
| Open WebUI and Vikat on same host | `http://localhost:8080/v1` |
| Open WebUI in Docker, Vikat on host | `http://host.docker.internal:8080/v1` |
| Both in same Docker network | `http://vikat-container-name:8080/v1` |
## Environment Variables (Alternative)
You can also configure Vikat via environment variables when running Open WebUI:
```bash theme={null}
# Single connection
OPENAI_API_BASE_URLS="http://localhost:8080/v1"
OPENAI_API_KEYS="your-vikat-virtual-key"
# Multiple connections (semicolon-separated)
OPENAI_API_BASE_URLS="http://localhost:8080/v1;https://other-gateway.com/v1"
OPENAI_API_KEYS="key1;key2"
```
## Observability
All Open WebUI traffic through Vikat is logged. Monitor it at `http://localhost:8080/logs` - filter by provider, model, or search through conversation content to track usage across your team.
## Next Steps
* [Provider Configuration](/quickstart/gateway/provider-configuration) - Configure AI providers in Vikat
* [Virtual Keys](/features/governance/virtual-keys) - Set up usage limits and access control