> ## Documentation Index
> Fetch the complete documentation index at: https://docs.vikat.ai/llms.txt
> Use this file to discover all available pages before exploring further.
# Setup SCIM
> Enable real-time user and group provisioning from Okta to Vikat Enterprise using SCIM 2.0.
SCIM (System for Cross-domain Identity Management) keeps Vikat in sync with Okta in real time — new users are provisioned, deactivated users are suspended, and group memberships are updated without waiting for the next login or background sync.
Complete [SSO using OIDC](./oidc) before setting up SCIM. Okta does not support SCIM on a custom OIDC app, so SCIM runs as a **separate** app alongside your existing OIDC integration.
***
## Step 1: Enable SCIM in Vikat
In your Vikat dashboard, go to **Governance** → **User Provisioning** and open your configured Okta provider.
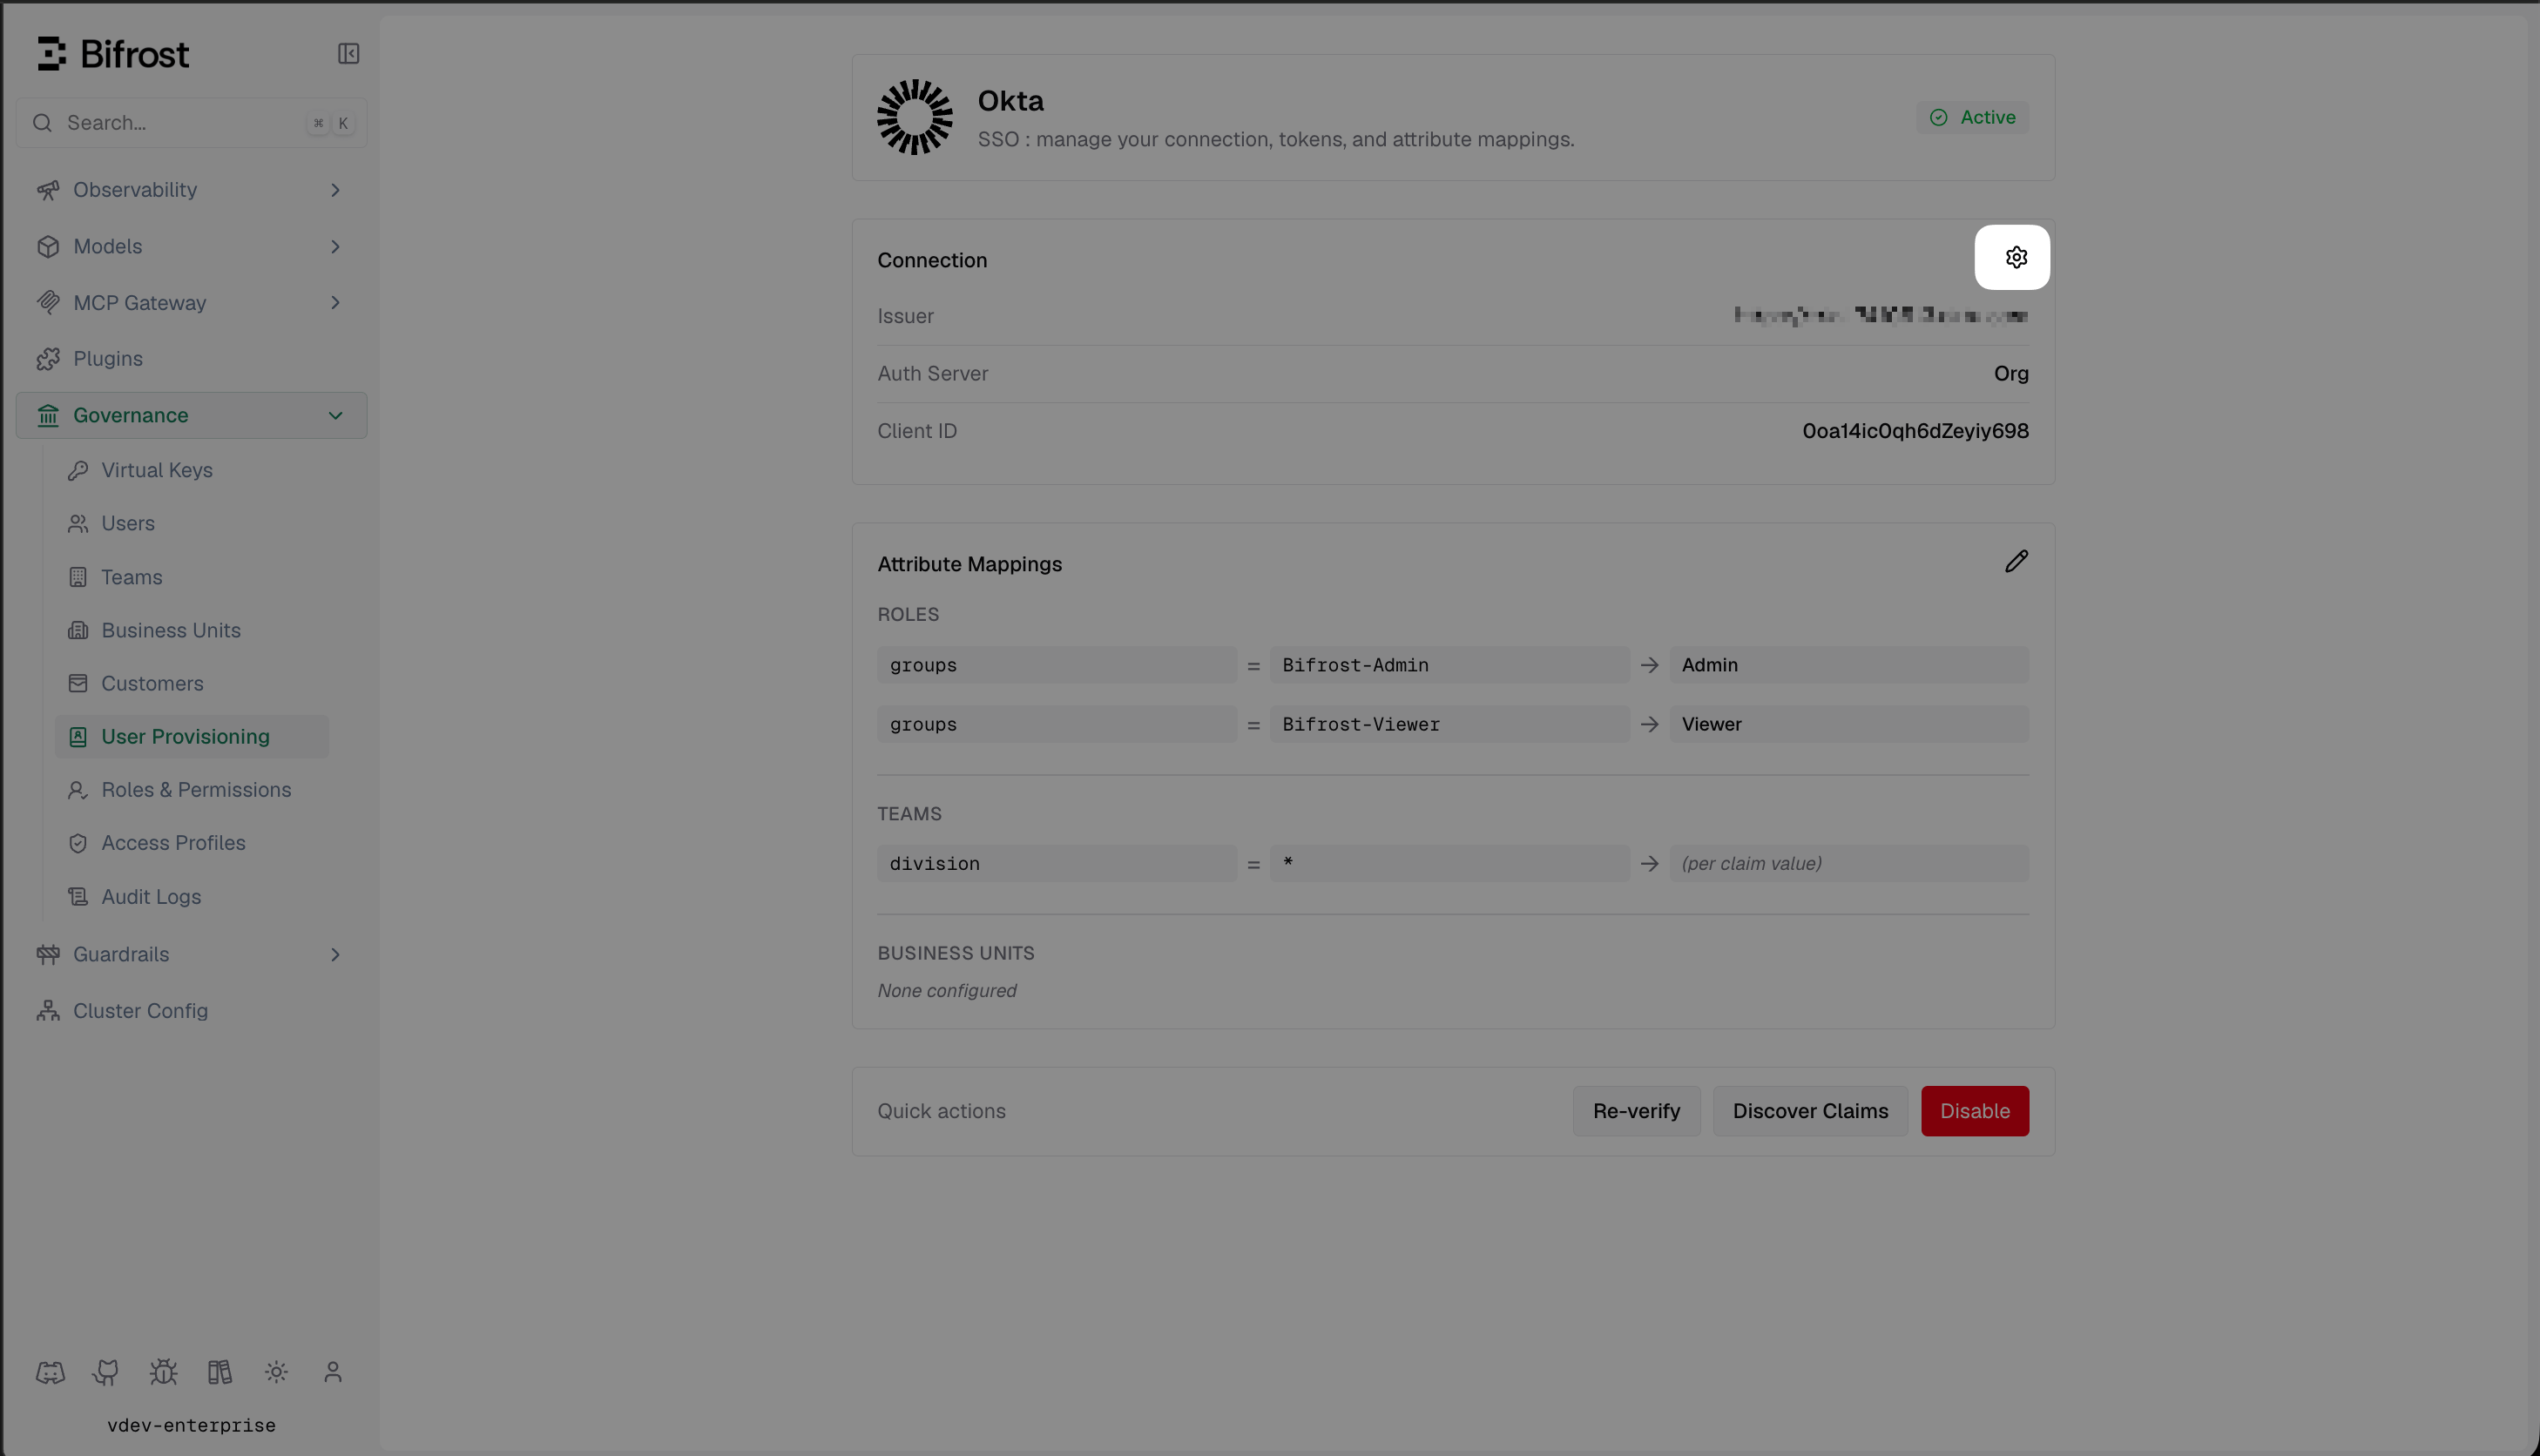 Click the settings icon to open **Provider Configuration**.
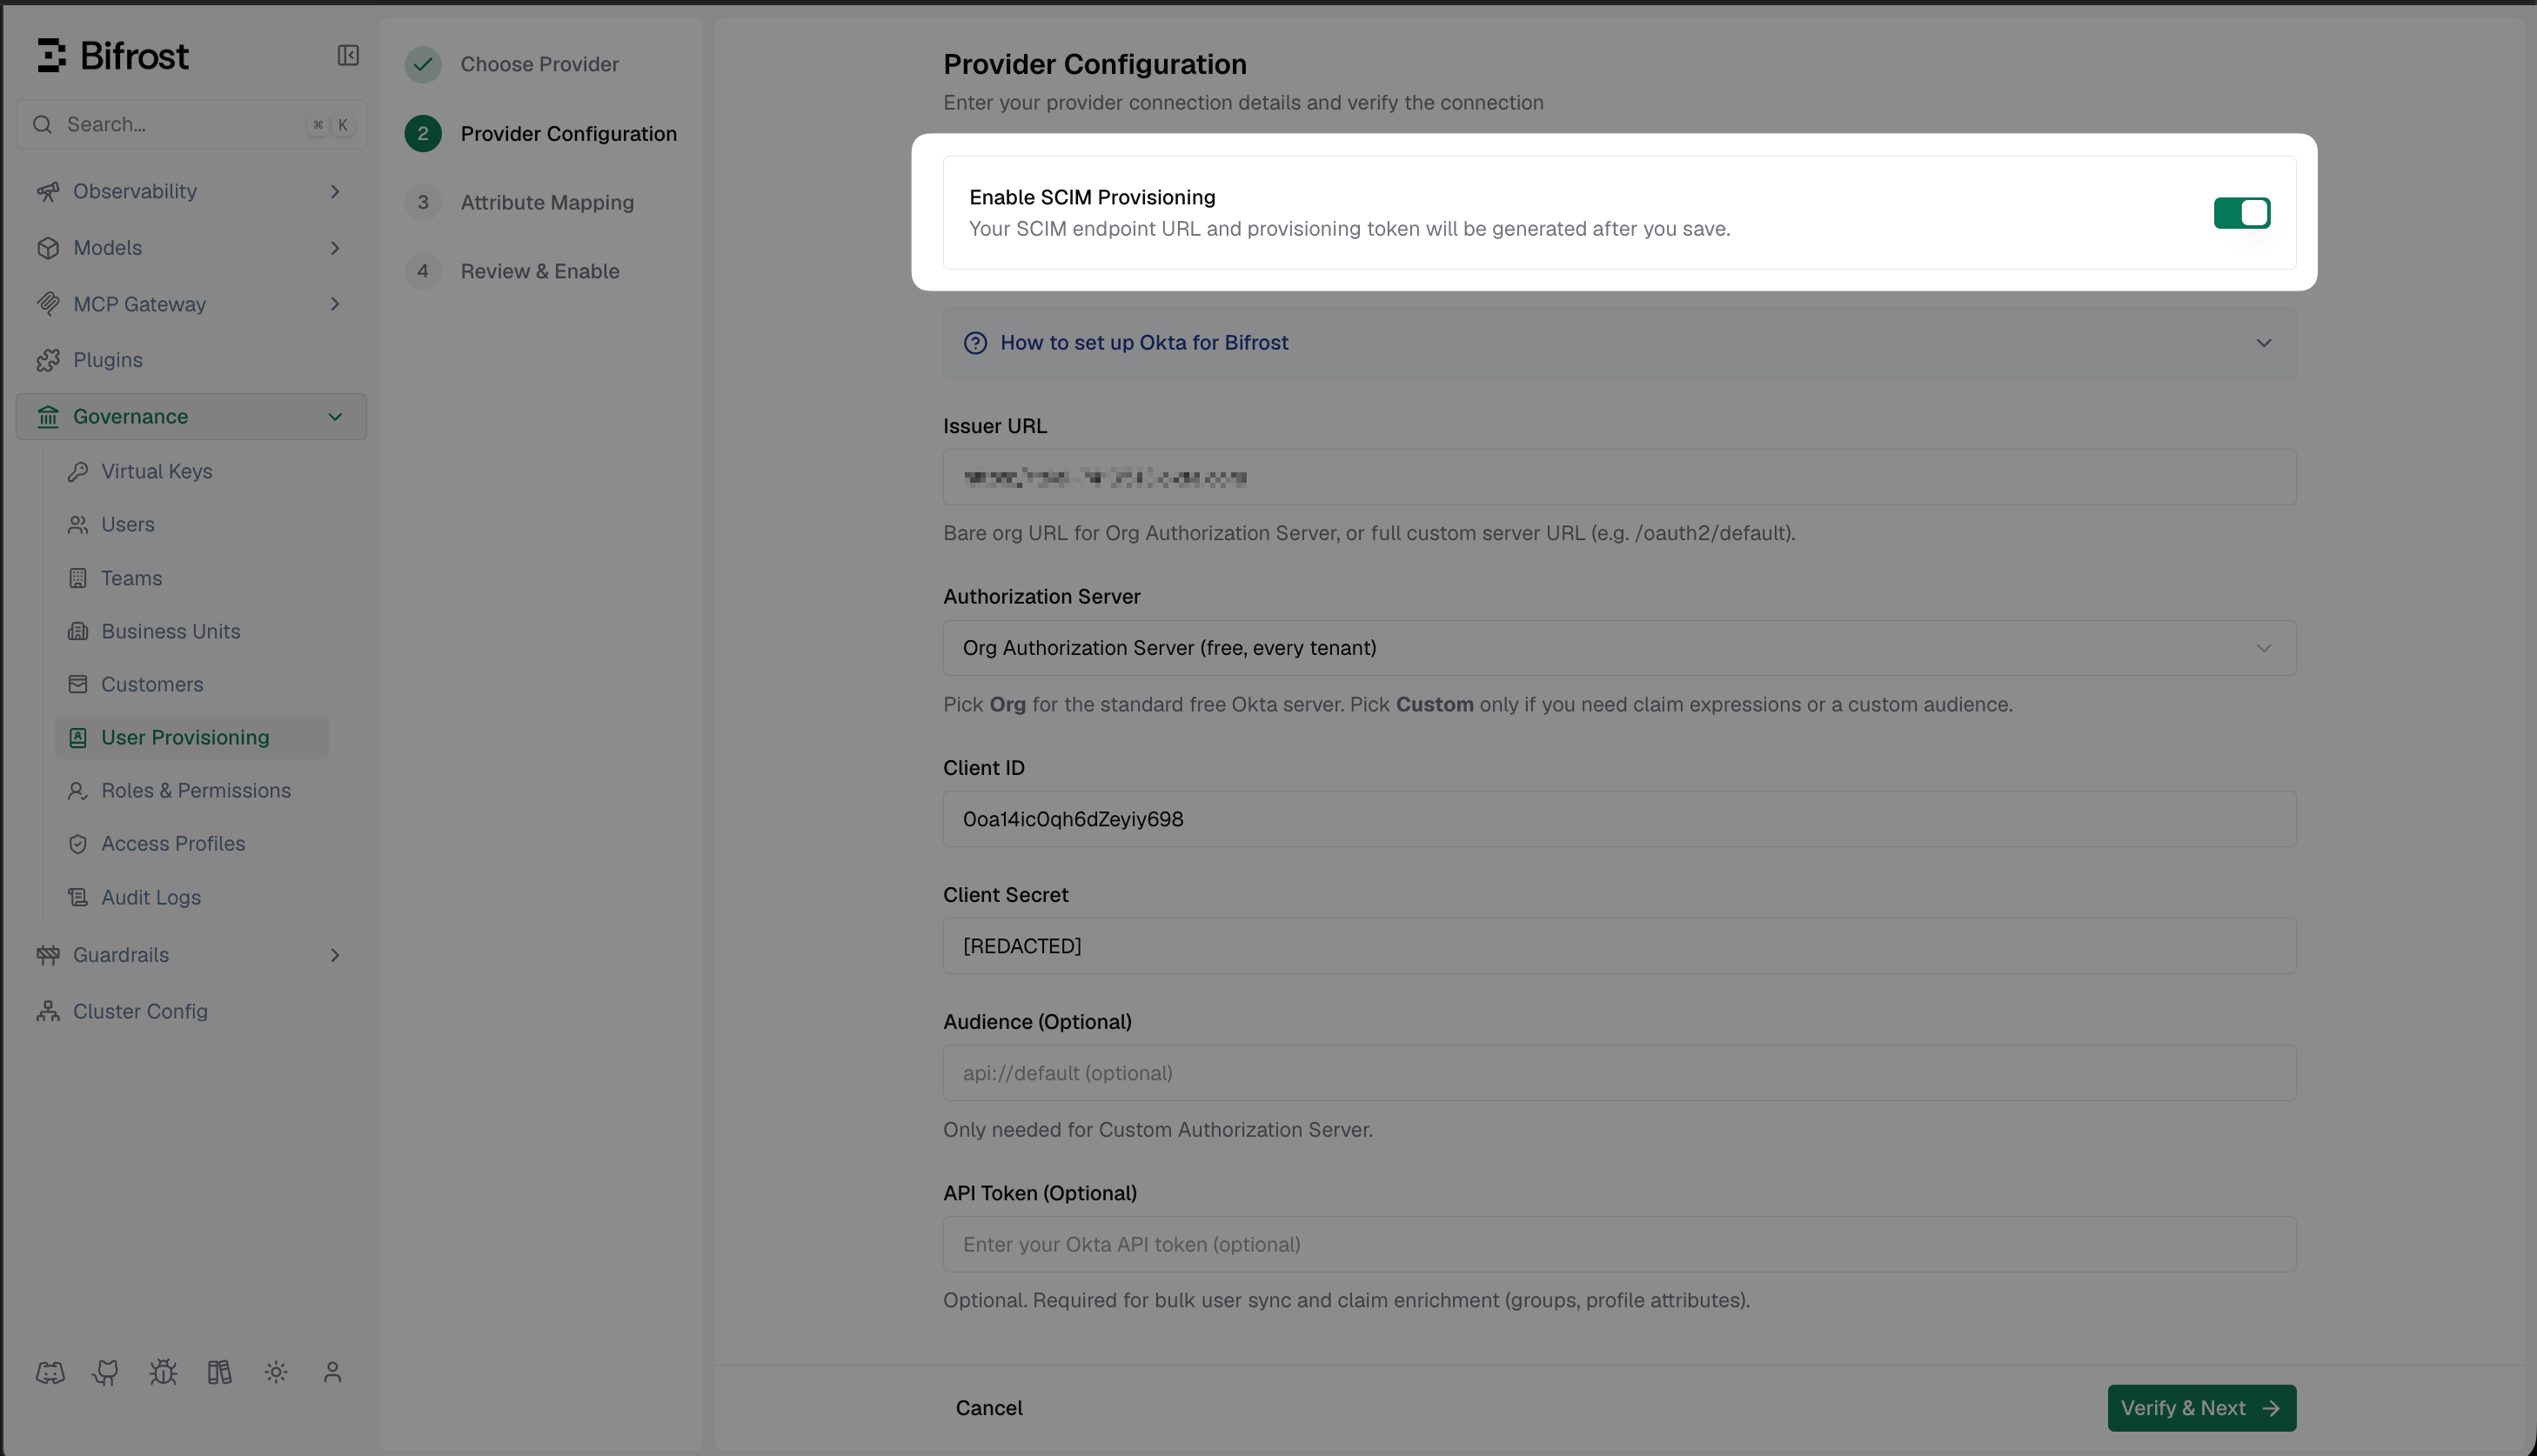
Toggle on **Enable SCIM Provisioning** and click **Save & Enable**.
Click the settings icon to open **Provider Configuration**.
Toggle on **Enable SCIM Provisioning** and click **Save & Enable**.
 After saving, Vikat shows a **Setup Complete** dialog with:
* **SCIM Endpoint URL** — the base URL Okta will send provisioning requests to
* **Provisioning Token** — the bearer token Okta uses to authenticate
Copy both values now — you will need them in [Step 3](#step-3-configure-the-scim-app).
After saving, Vikat shows a **Setup Complete** dialog with:
* **SCIM Endpoint URL** — the base URL Okta will send provisioning requests to
* **Provisioning Token** — the bearer token Okta uses to authenticate
Copy both values now — you will need them in [Step 3](#step-3-configure-the-scim-app).
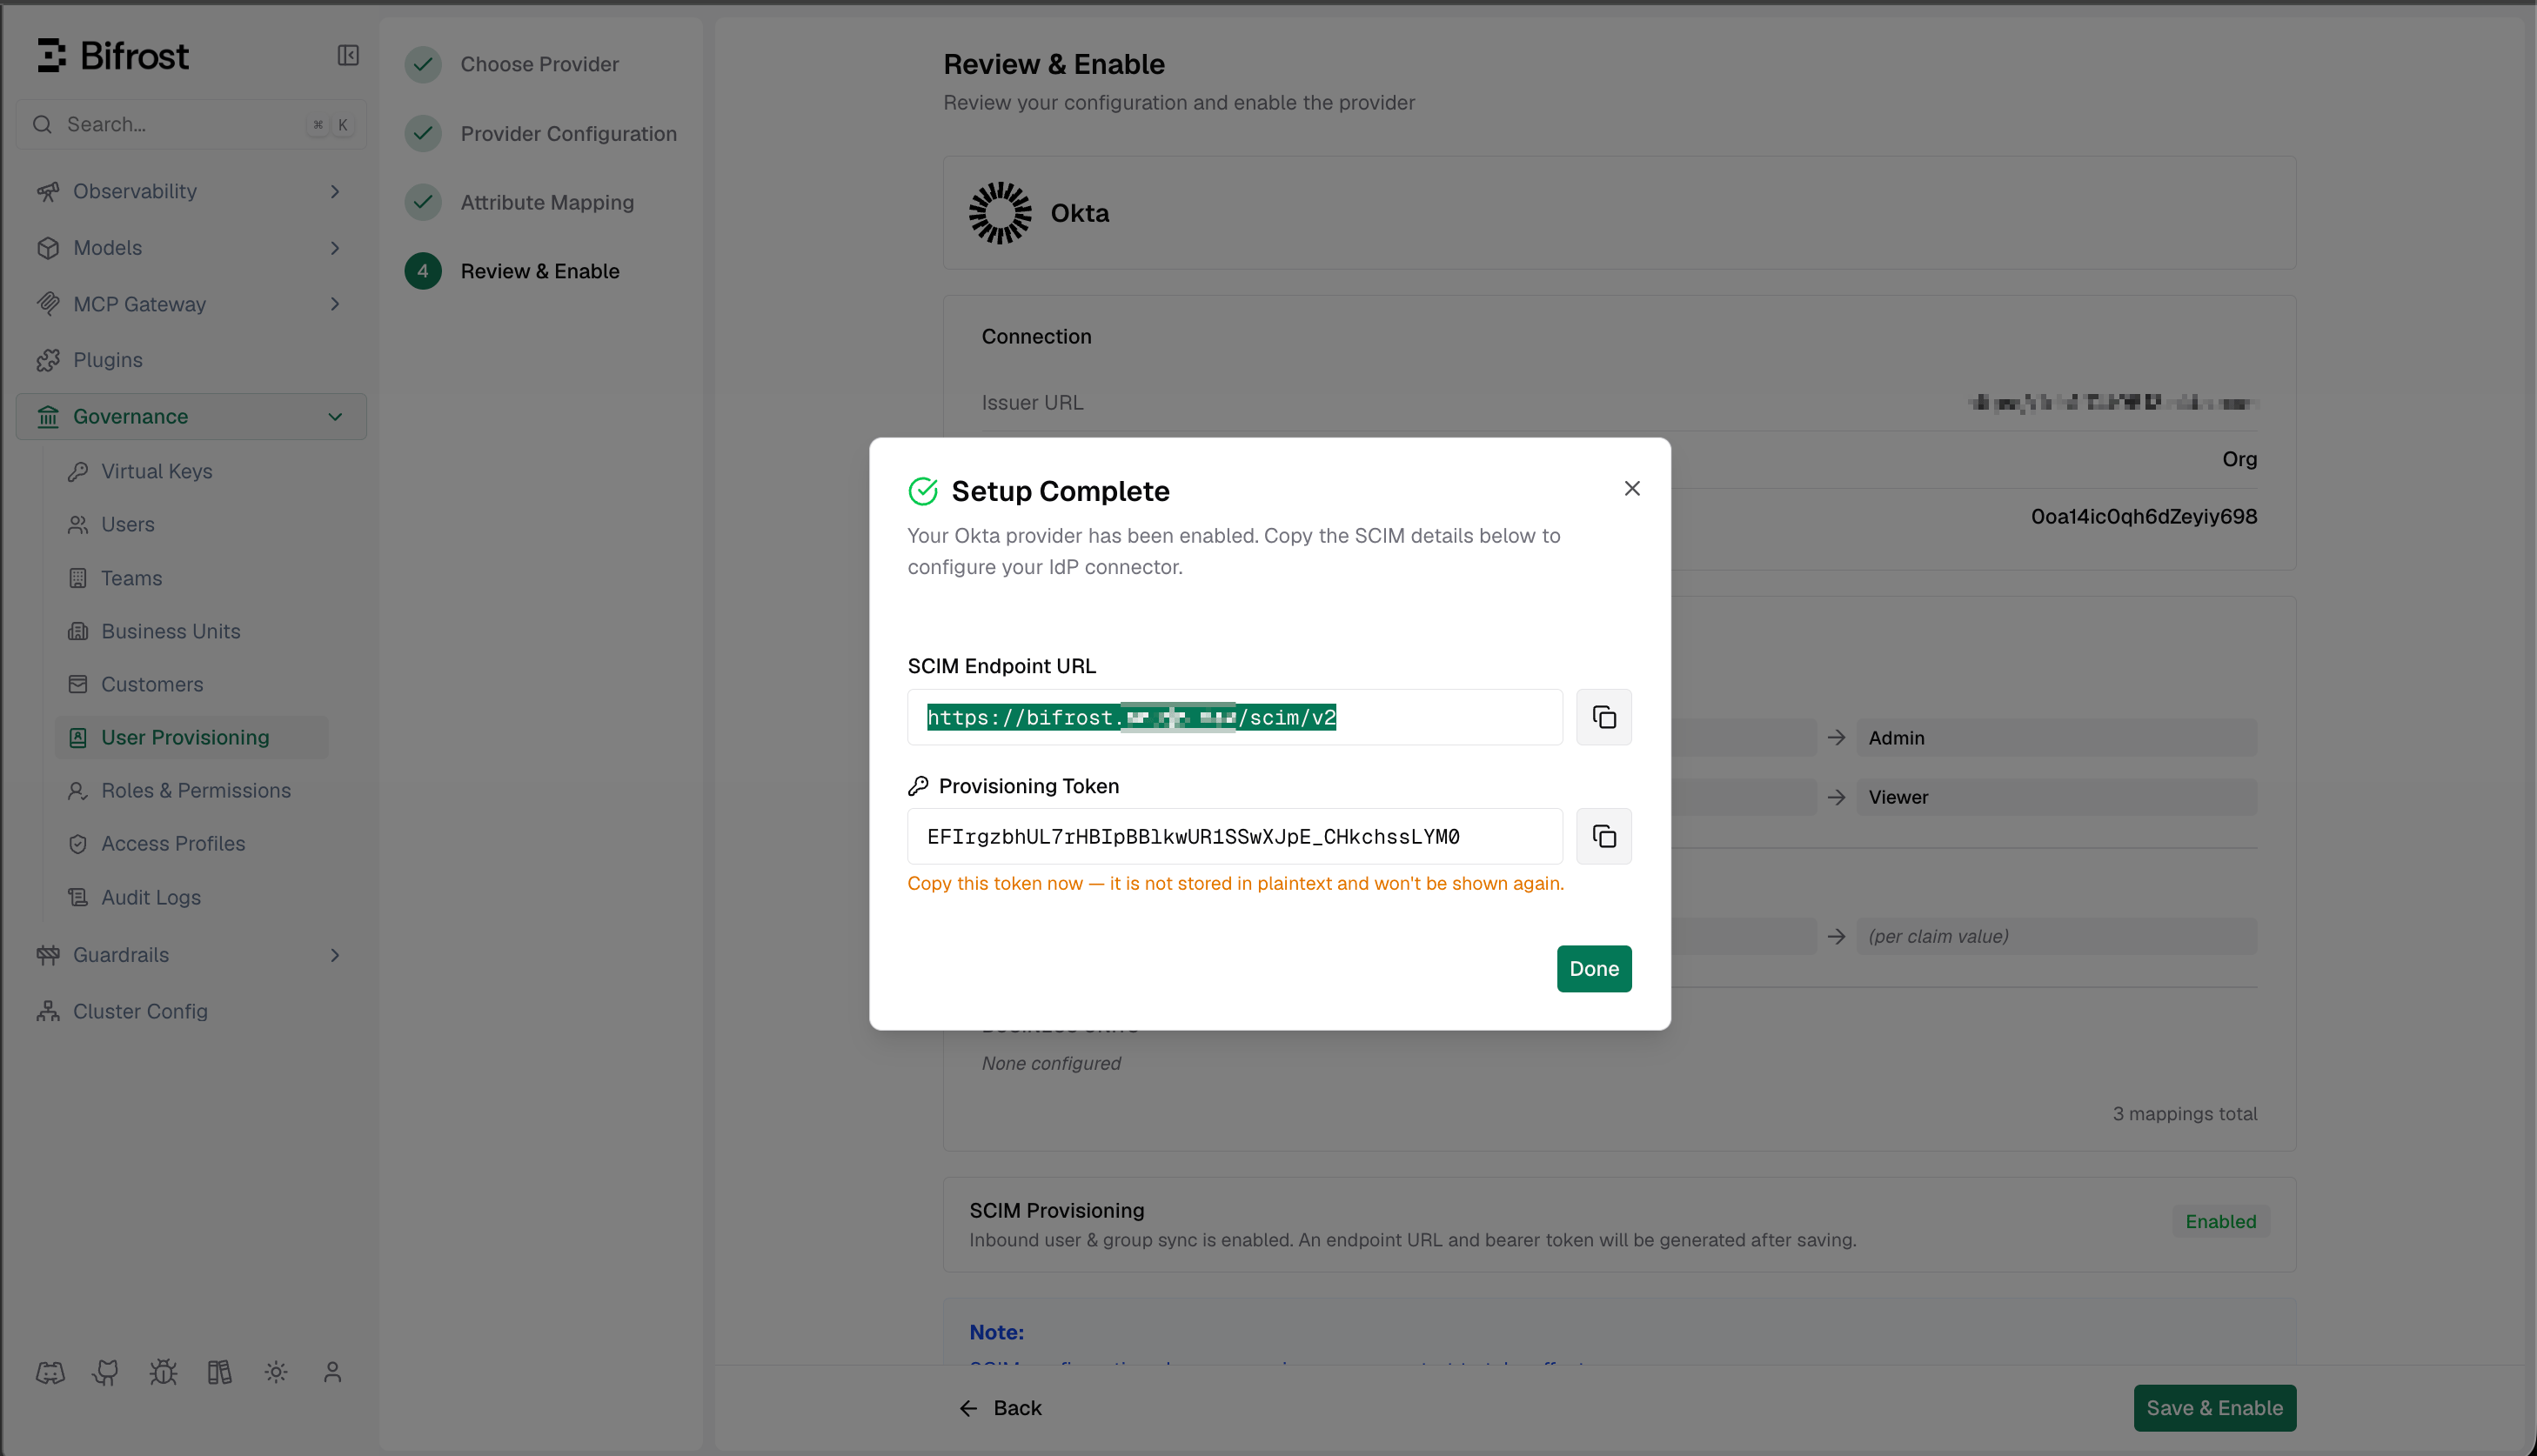 The provisioning token is only shown once. Store it somewhere safe before closing this dialog. You can always rotate it later, but the previous token will immediately become invalid.
***
## Step 2: Create a SCIM App in Okta
In the Okta Admin Console, go to **Applications** → **Applications** and click **Browse App Catalog**.
The provisioning token is only shown once. Store it somewhere safe before closing this dialog. You can always rotate it later, but the previous token will immediately become invalid.
***
## Step 2: Create a SCIM App in Okta
In the Okta Admin Console, go to **Applications** → **Applications** and click **Browse App Catalog**.
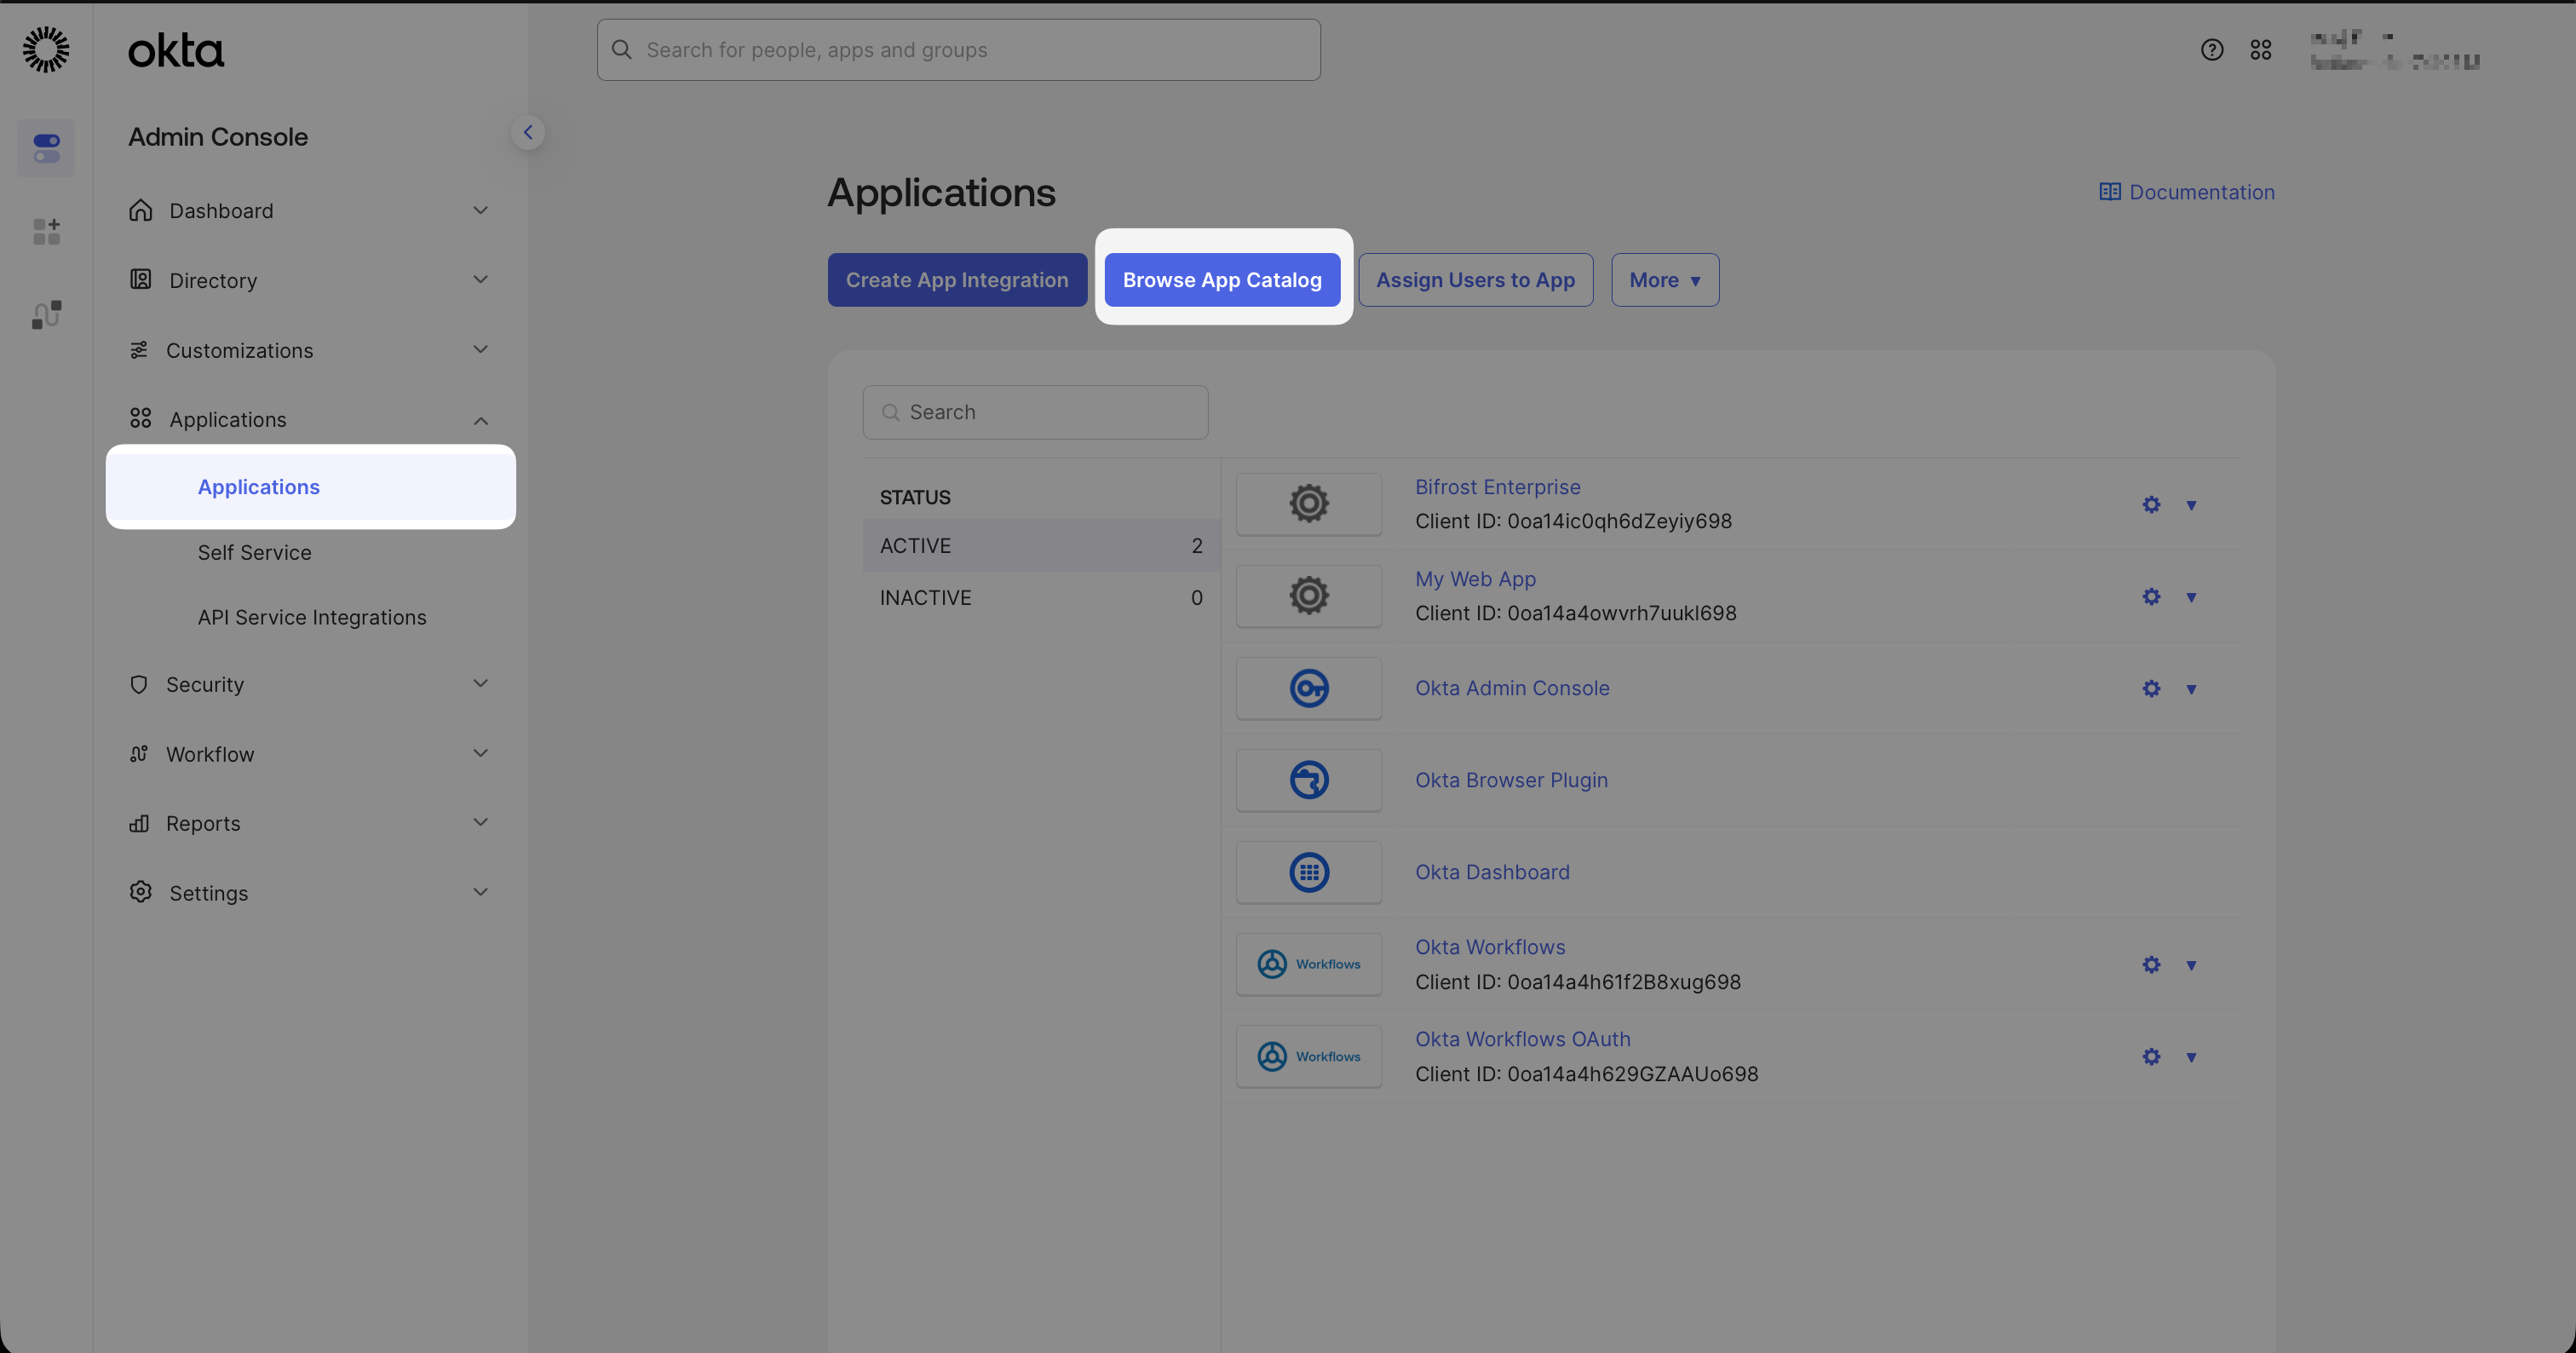 Search for **SCIM 2.0 Test App (Header Auth)** and add it.
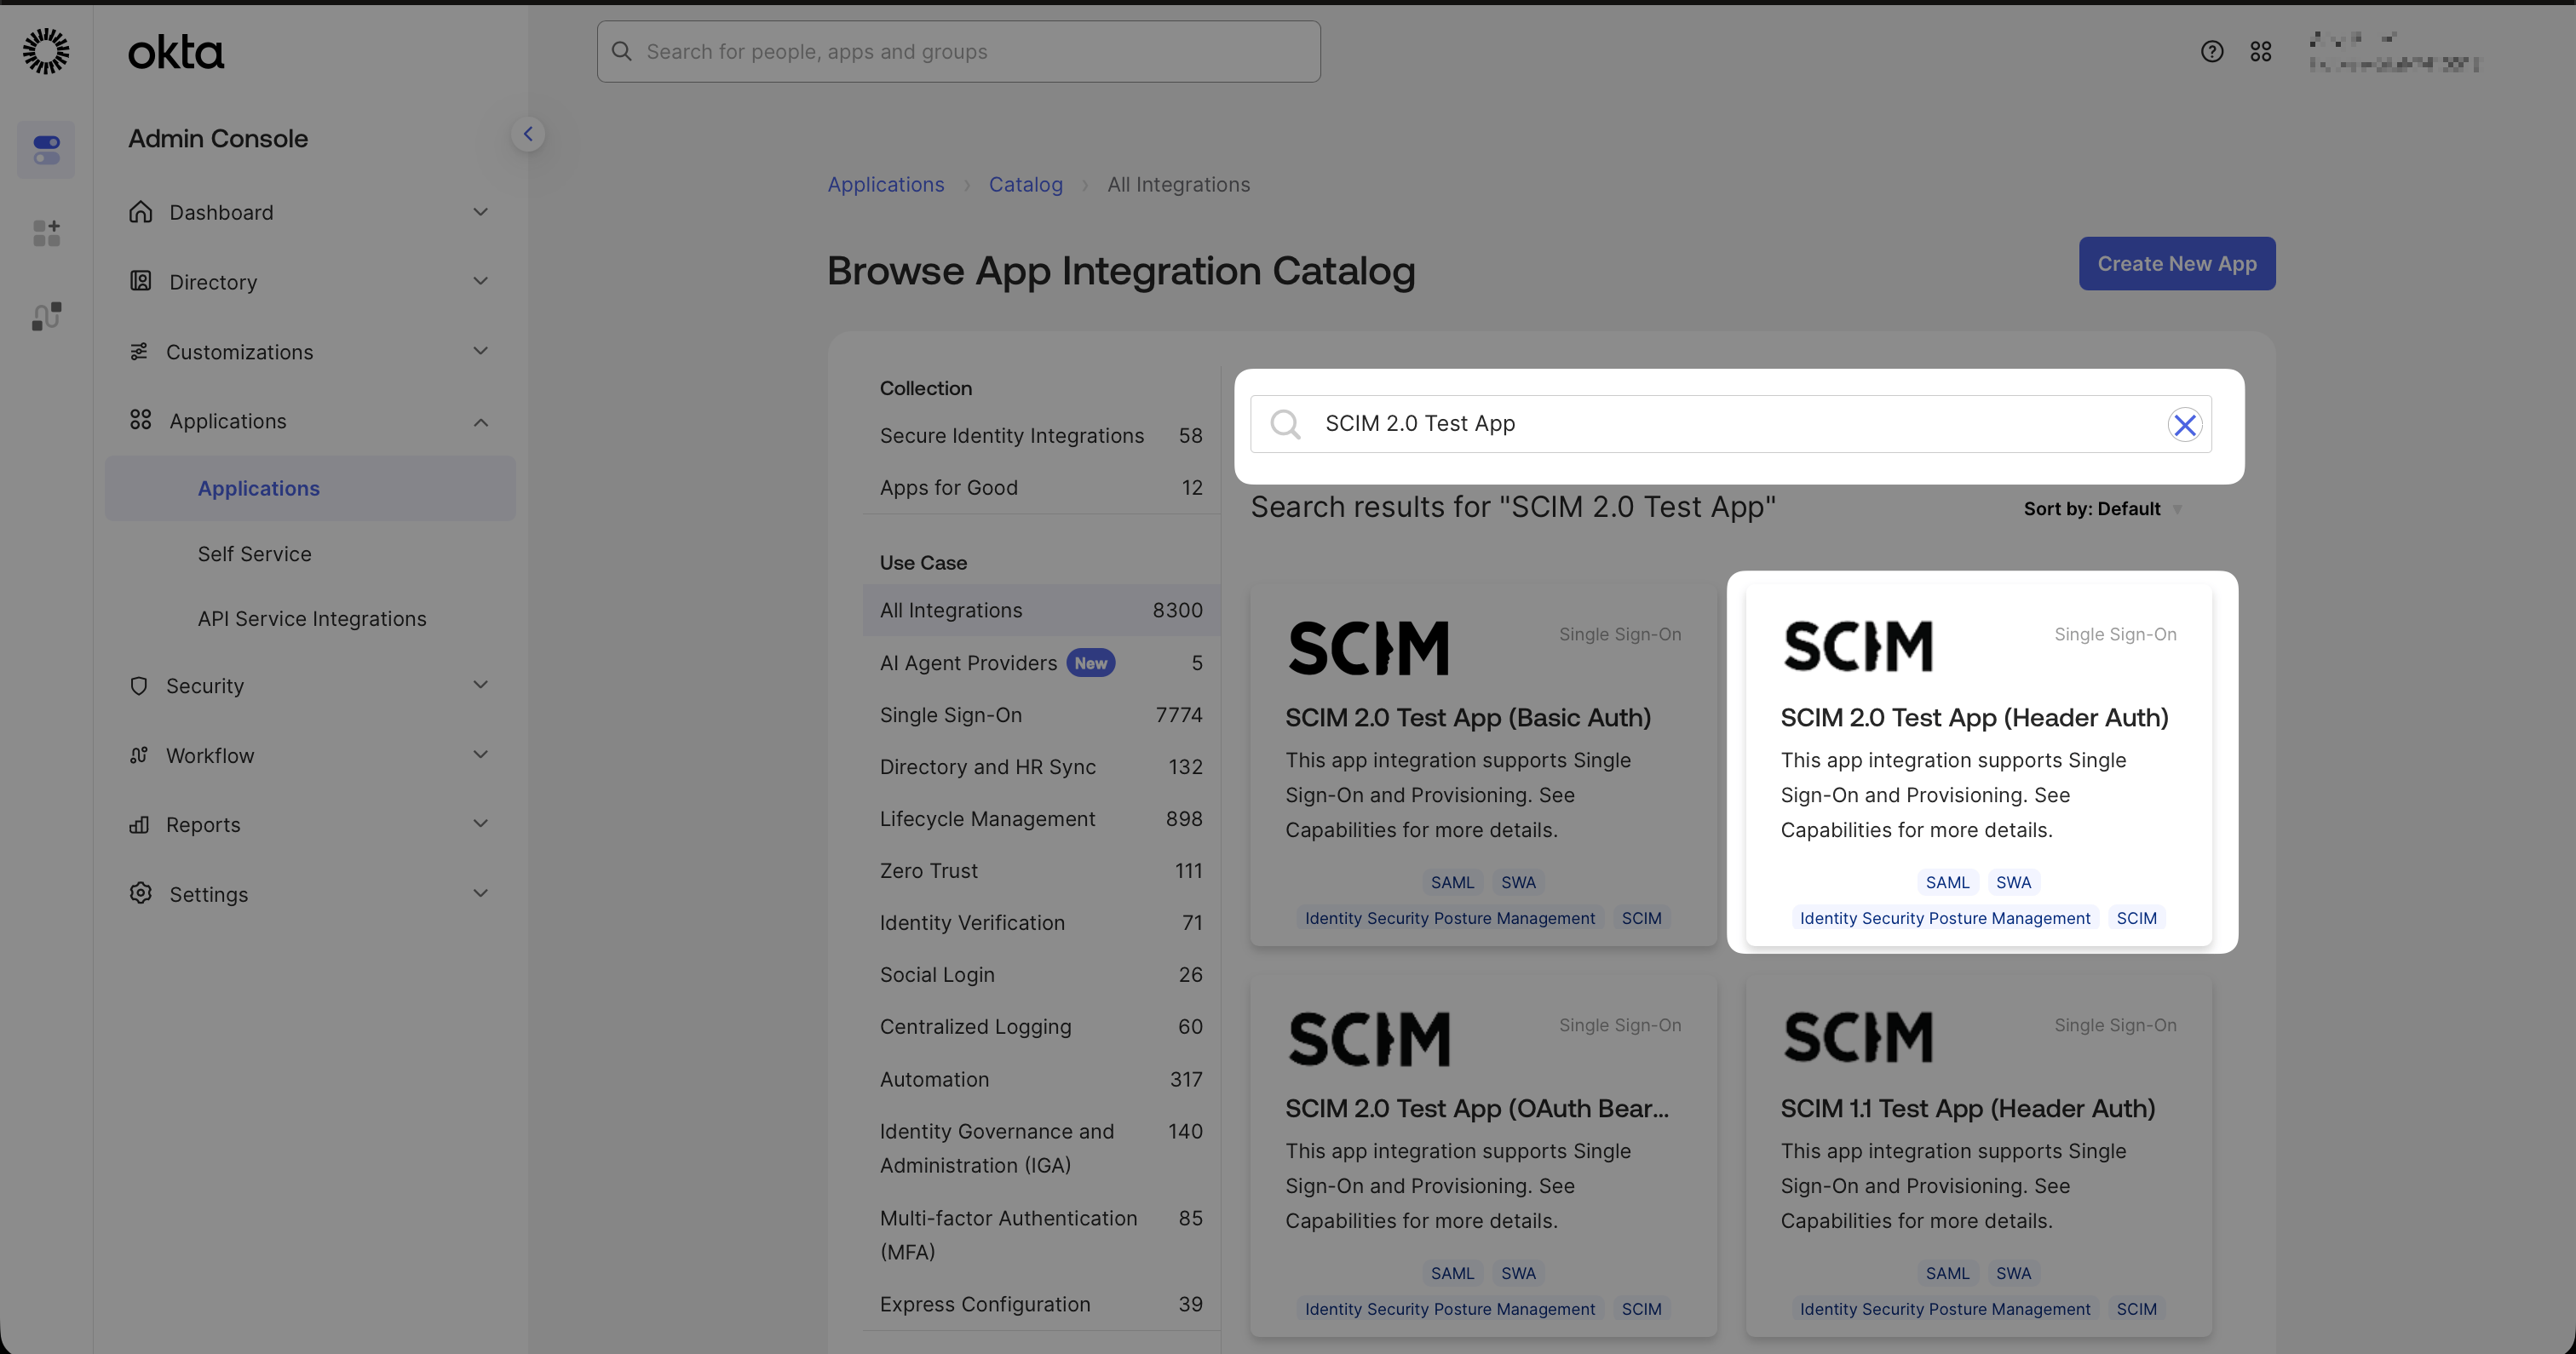 Name the app `Vikat SCIM` (or any label you prefer). On the sign-on options screen, skip everything and click **Done** — this app is used for SCIM provisioning only, not authentication.
***
## Step 3: Configure the SCIM App
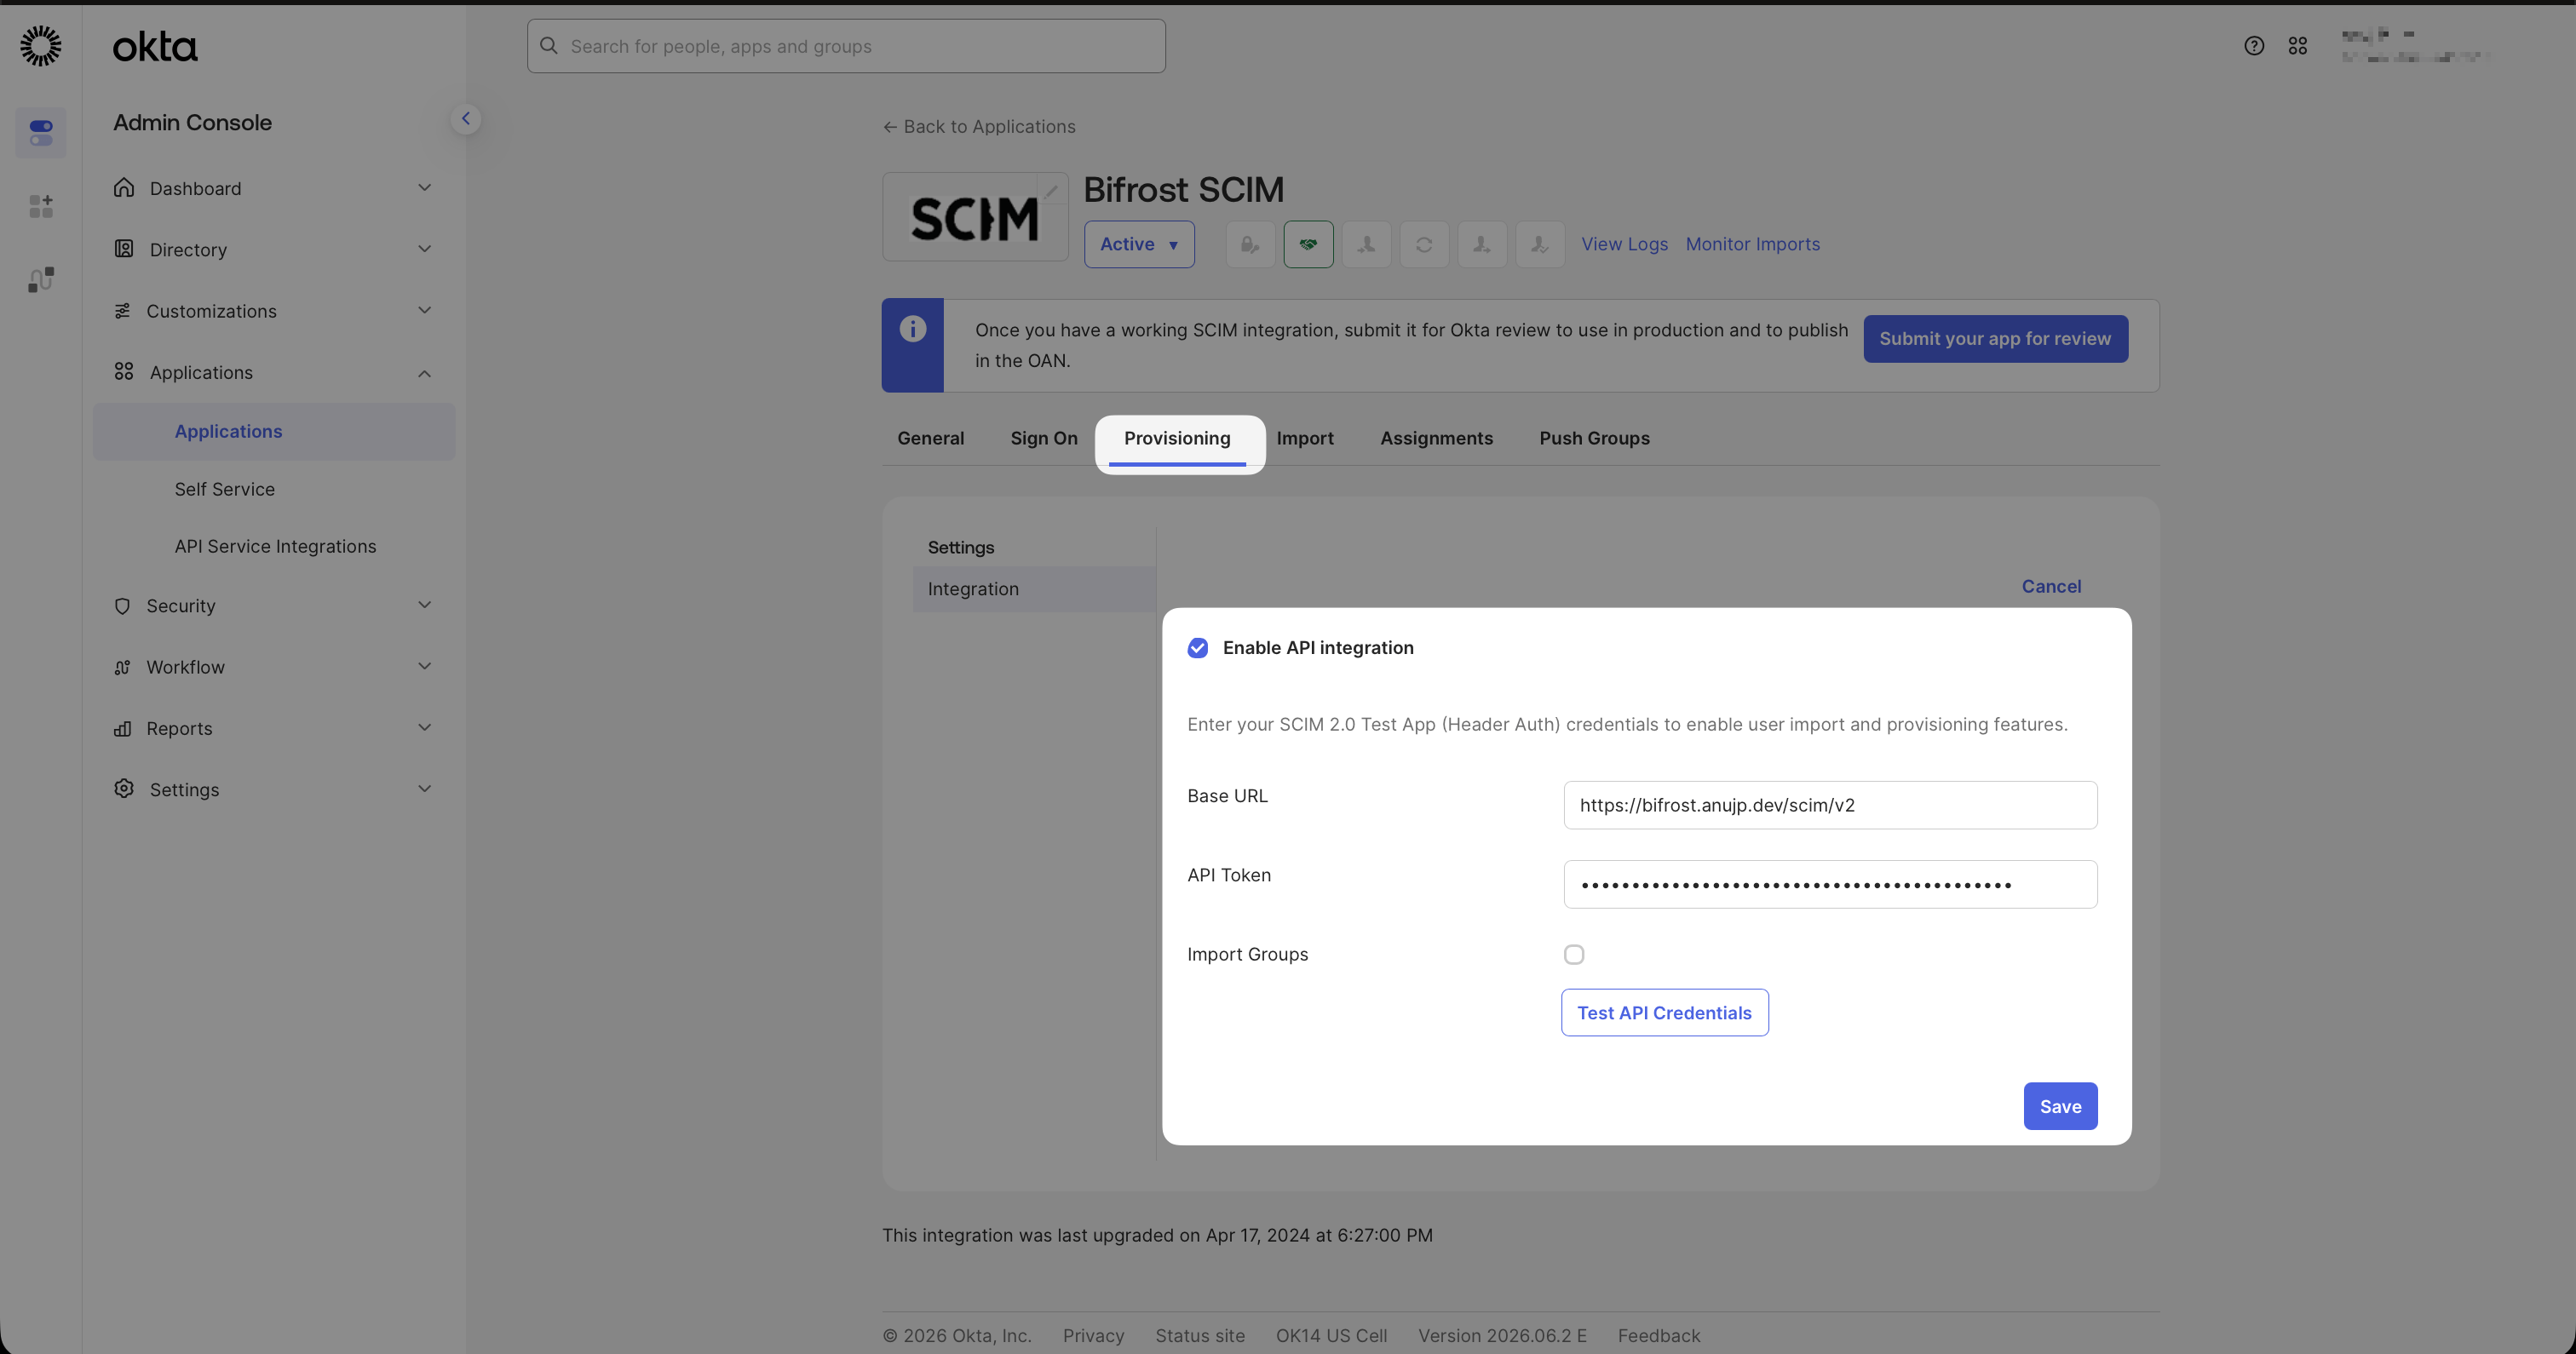
Open the **Vikat SCIM** app and go to the **Provisioning** tab.
Click **Configure API Integration**, check **Enable API Integration**, and enter:
* **SCIM 2.0 Base URL**: the SCIM Endpoint URL from [Step 1](#step-1-enable-scim-in-vikat)
* **API Token**: the Provisioning Token from [Step 1](#step-1-enable-scim-in-vikat)
Click **Test API Credentials** to verify the connection, then **Save**.
Name the app `Vikat SCIM` (or any label you prefer). On the sign-on options screen, skip everything and click **Done** — this app is used for SCIM provisioning only, not authentication.
***
## Step 3: Configure the SCIM App
Open the **Vikat SCIM** app and go to the **Provisioning** tab.
Click **Configure API Integration**, check **Enable API Integration**, and enter:
* **SCIM 2.0 Base URL**: the SCIM Endpoint URL from [Step 1](#step-1-enable-scim-in-vikat)
* **API Token**: the Provisioning Token from [Step 1](#step-1-enable-scim-in-vikat)
Click **Test API Credentials** to verify the connection, then **Save**.
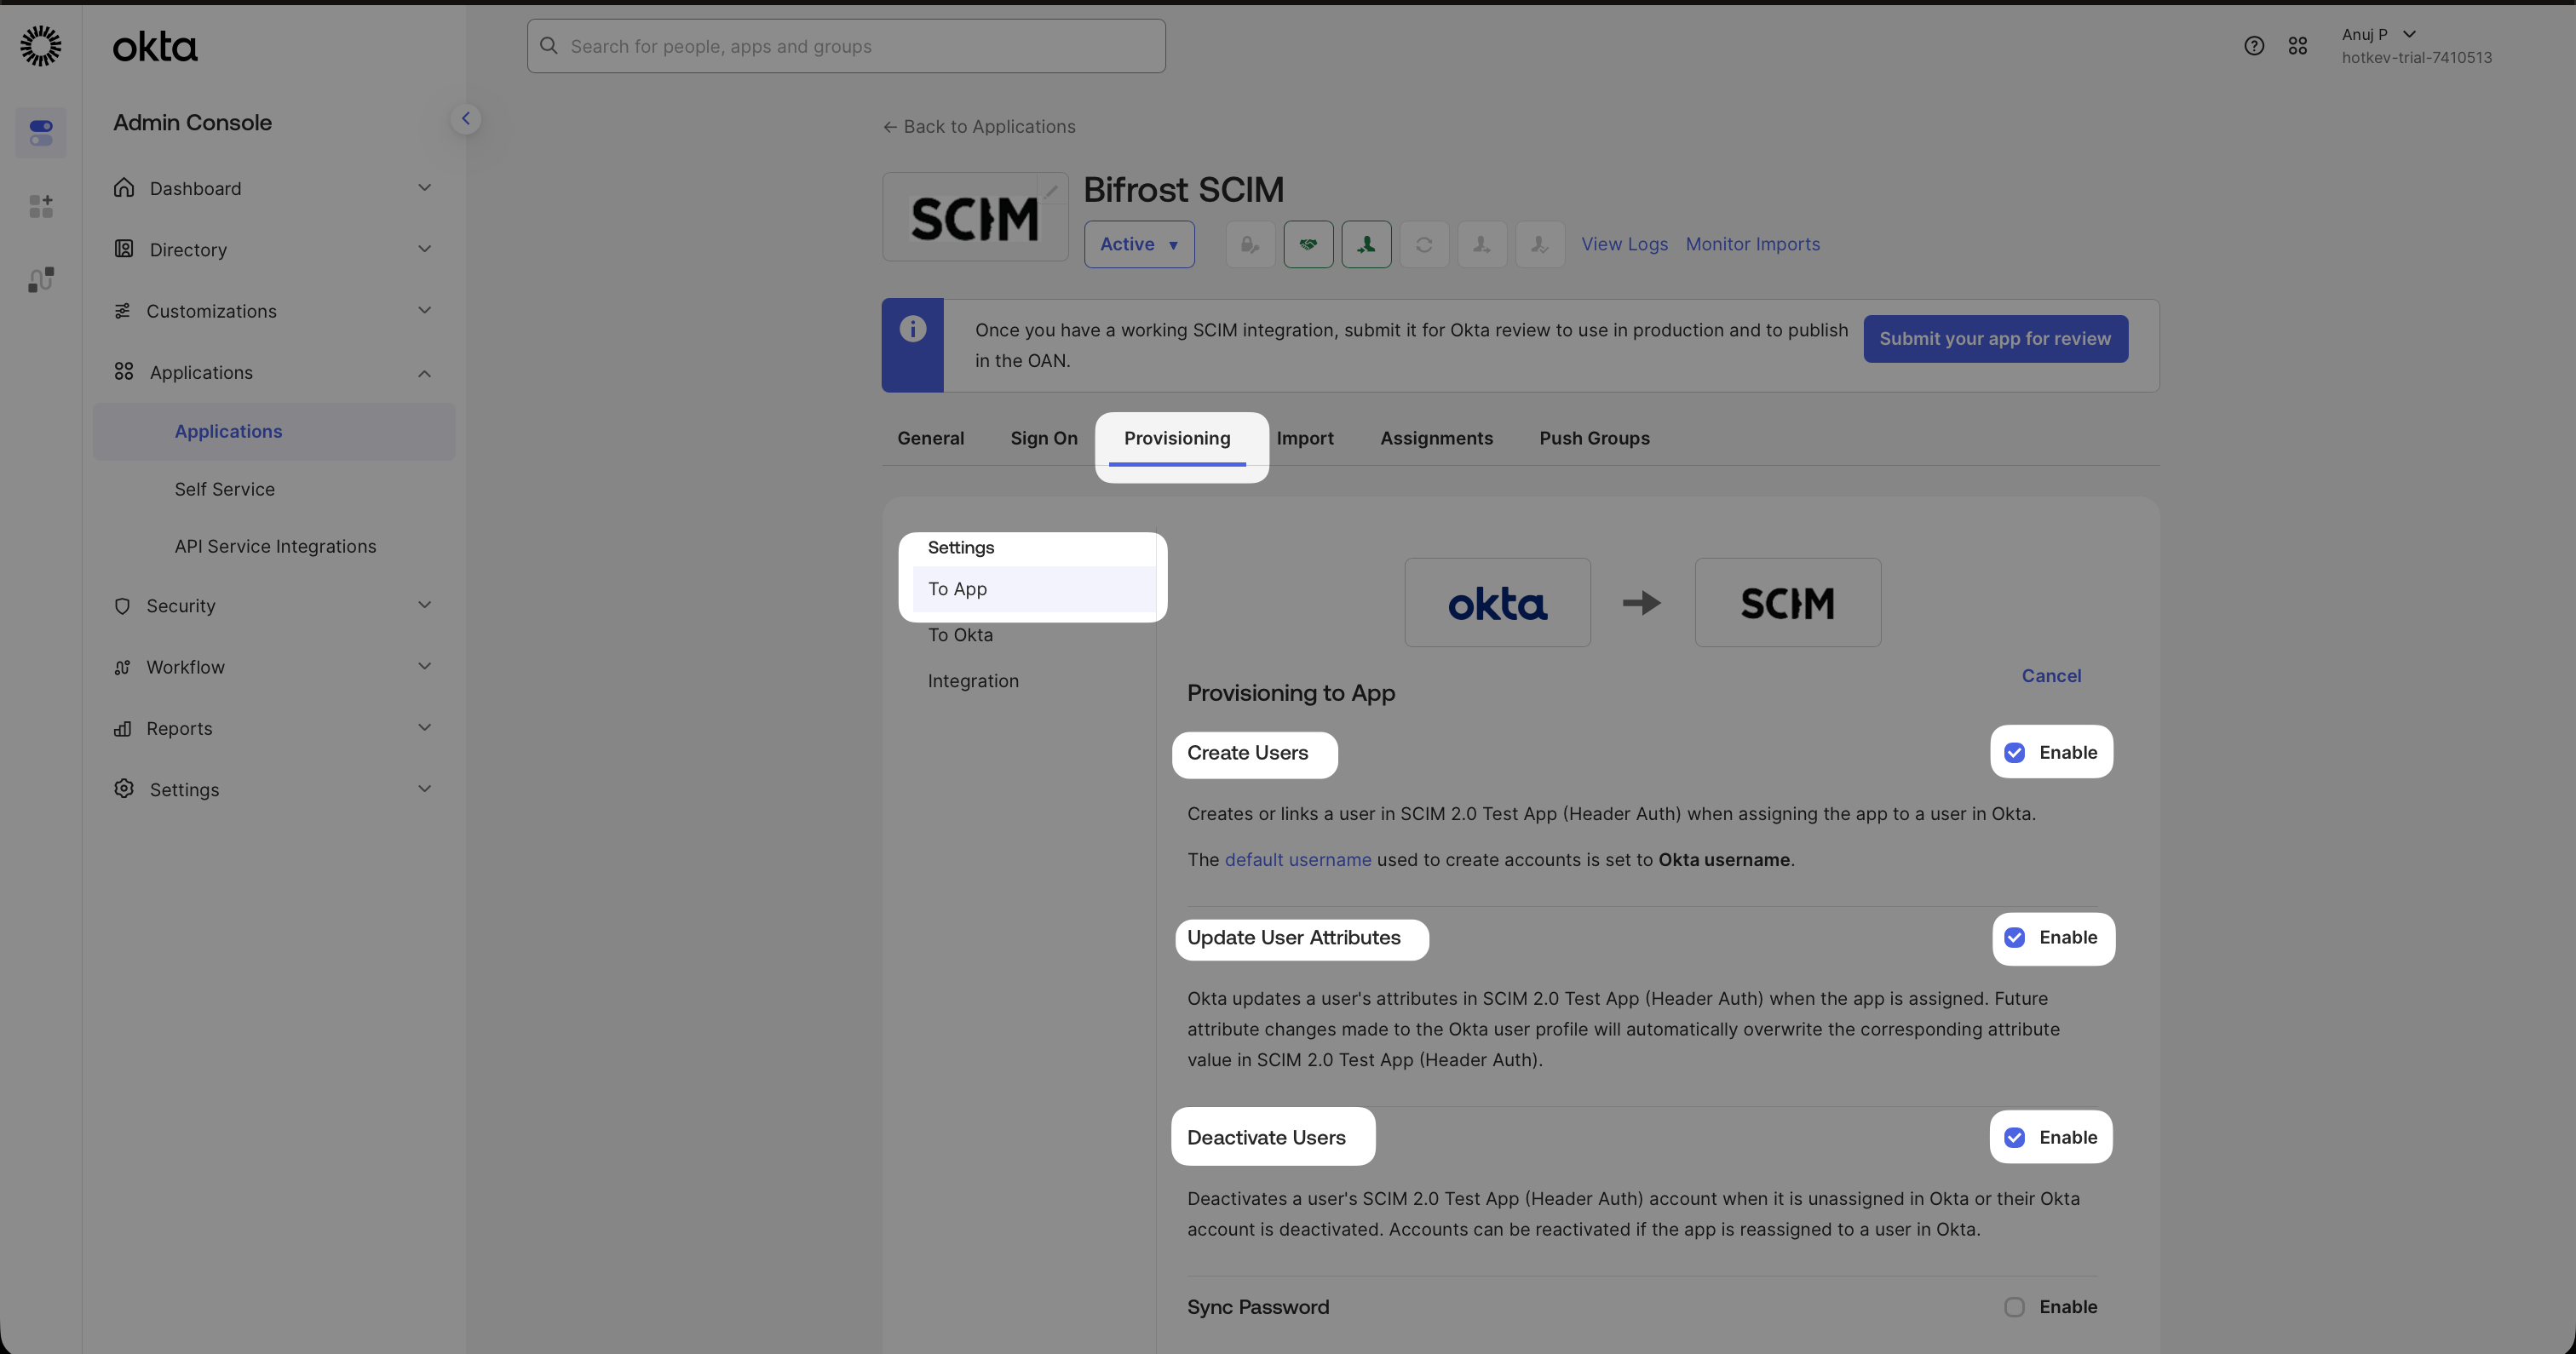
 Still under the **Provisioning** tab, go to **To App** and enable:
* **Create Users**
* **Update User Attributes**
* **Deactivate Users**
Click **Save**.
Still under the **Provisioning** tab, go to **To App** and enable:
* **Create Users**
* **Update User Attributes**
* **Deactivate Users**
Click **Save**.
 Skip this step if you only need to sync standard user fields (name, email, groups).
Custom attributes need to be declared in the SCIM app schema before Okta can include them in provisioning payloads.
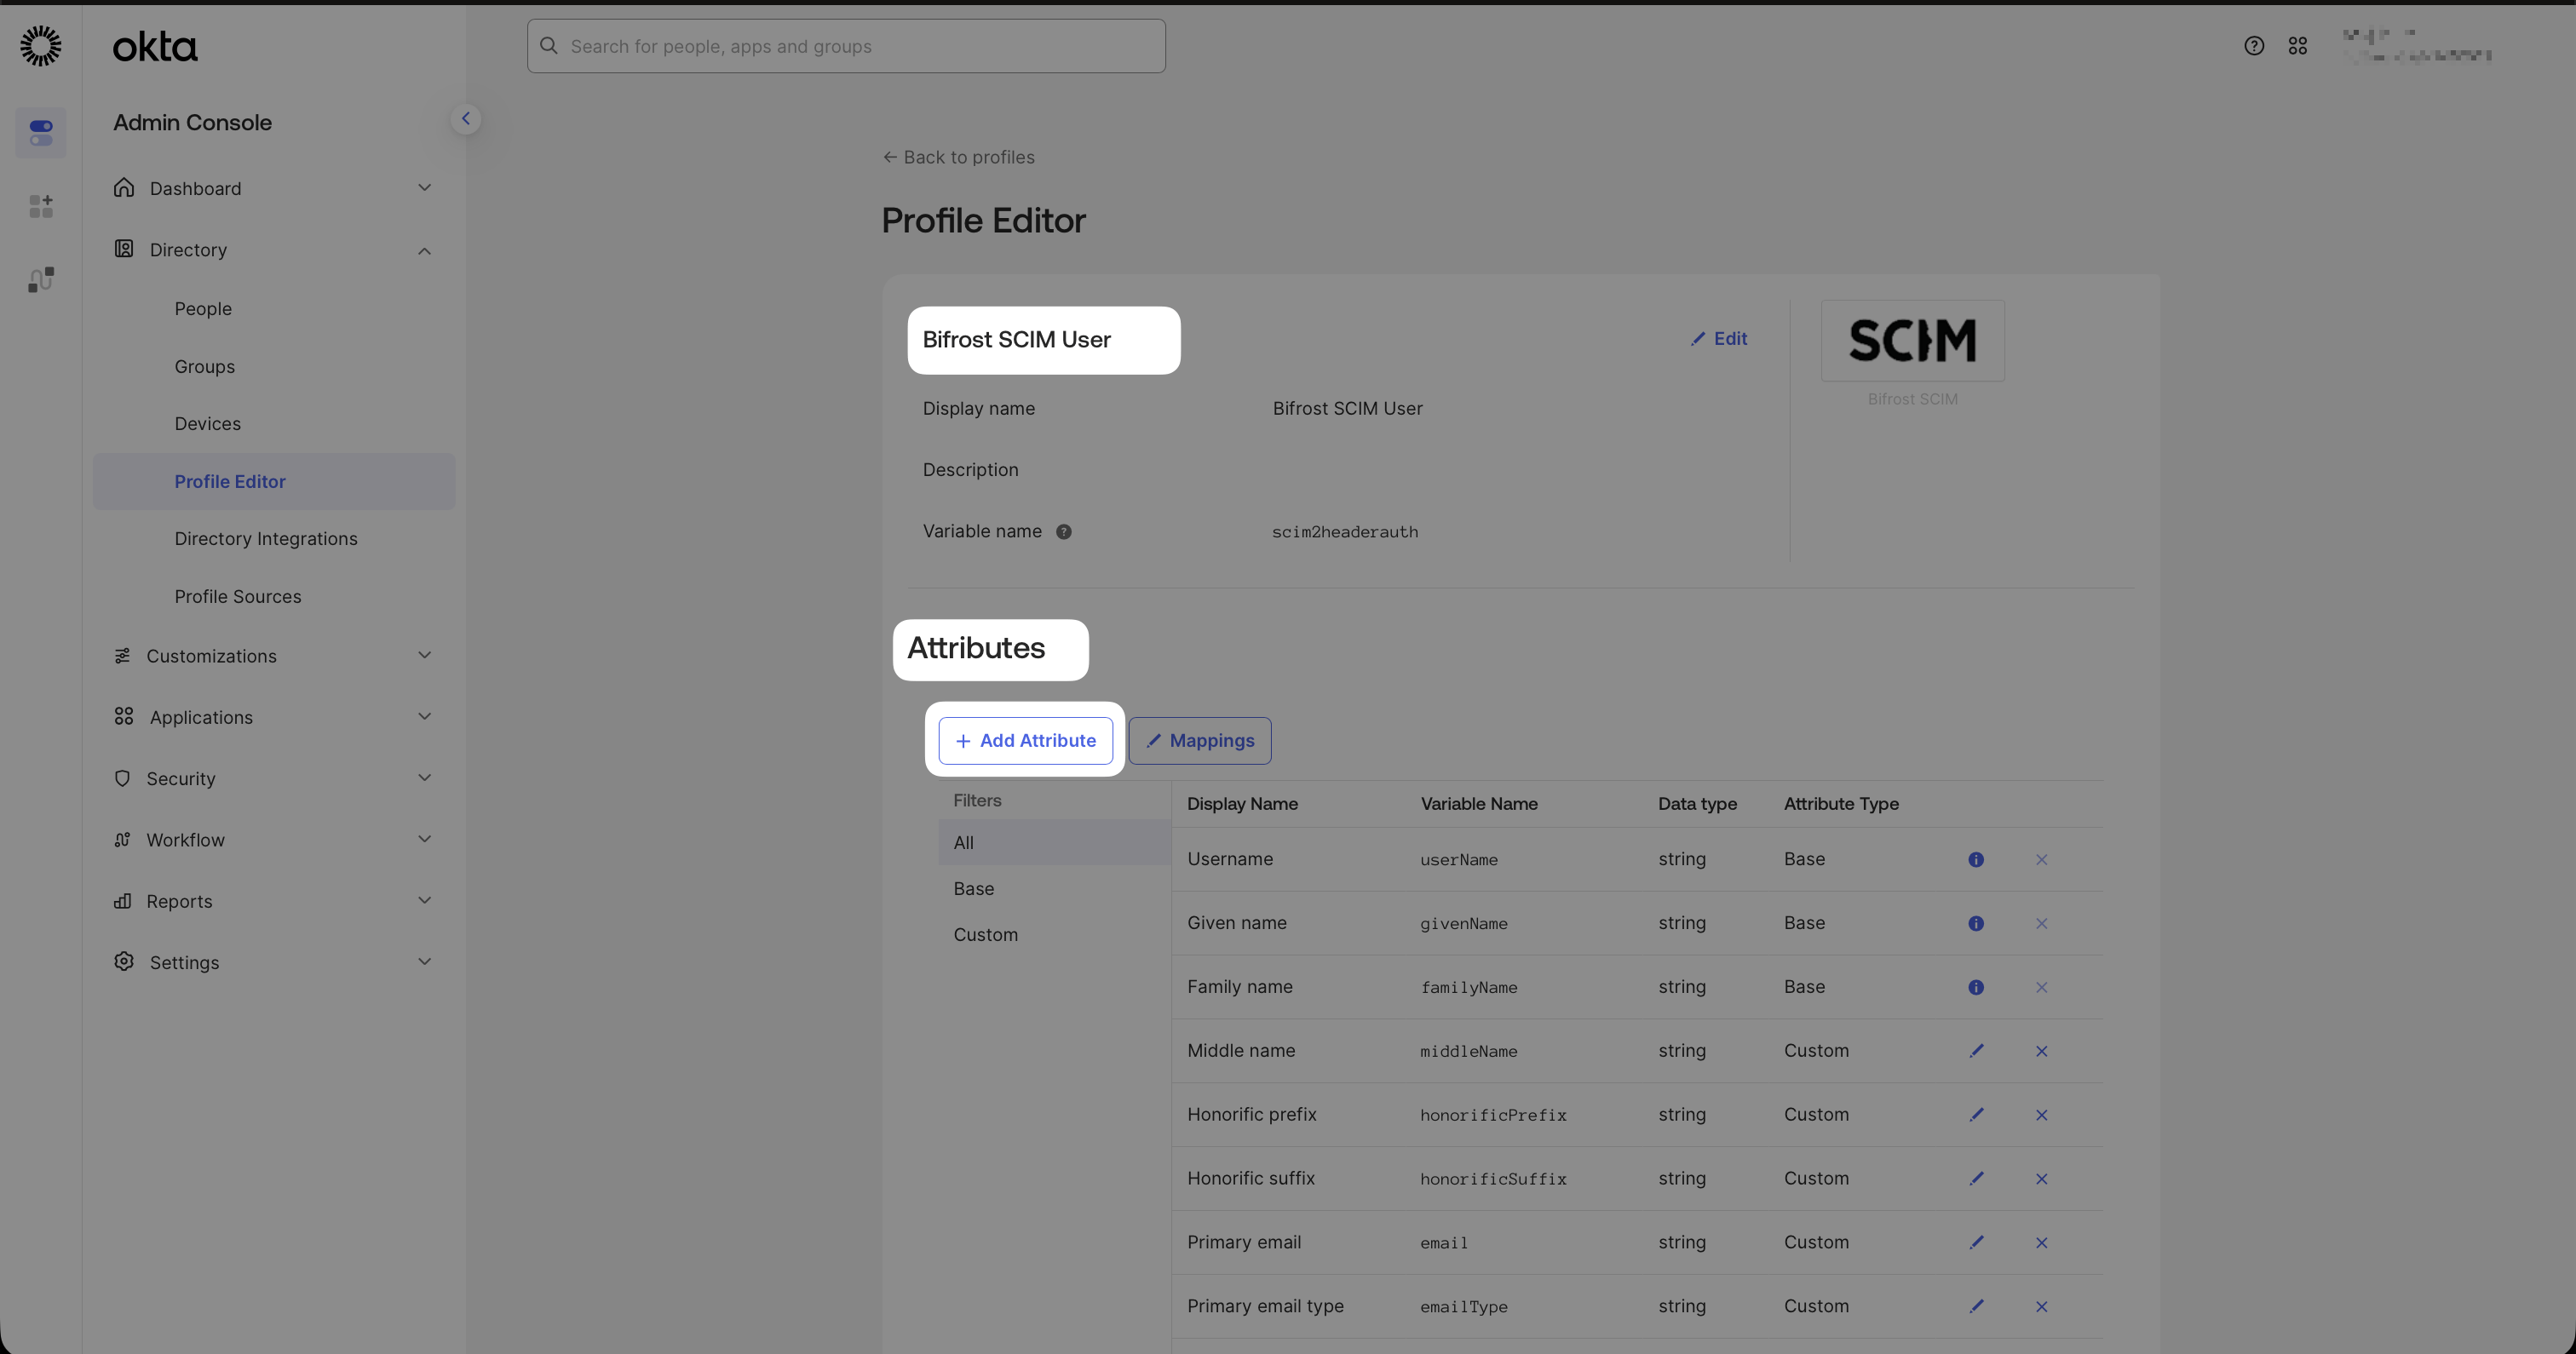
Go to **Directory** → **Profile Editor** and select the **Vikat SCIM** app profile. Click **Add Attribute**.
Skip this step if you only need to sync standard user fields (name, email, groups).
Custom attributes need to be declared in the SCIM app schema before Okta can include them in provisioning payloads.
Go to **Directory** → **Profile Editor** and select the **Vikat SCIM** app profile. Click **Add Attribute**.
 Configure the attribute — for example, for `Employee ID`:
| Field | Value |
| ---------------------- | ------------------------------------------------------------ |
| **Display name** | `Employee ID` |
| **Variable name** | `employeeID` |
| **External name** | `employeeID` |
| **External namespace** | `urn:ietf:params:scim:schemas:extension:enterprise:2.0:User` |
Configure the attribute — for example, for `Employee ID`:
| Field | Value |
| ---------------------- | ------------------------------------------------------------ |
| **Display name** | `Employee ID` |
| **Variable name** | `employeeID` |
| **External name** | `employeeID` |
| **External namespace** | `urn:ietf:params:scim:schemas:extension:enterprise:2.0:User` |
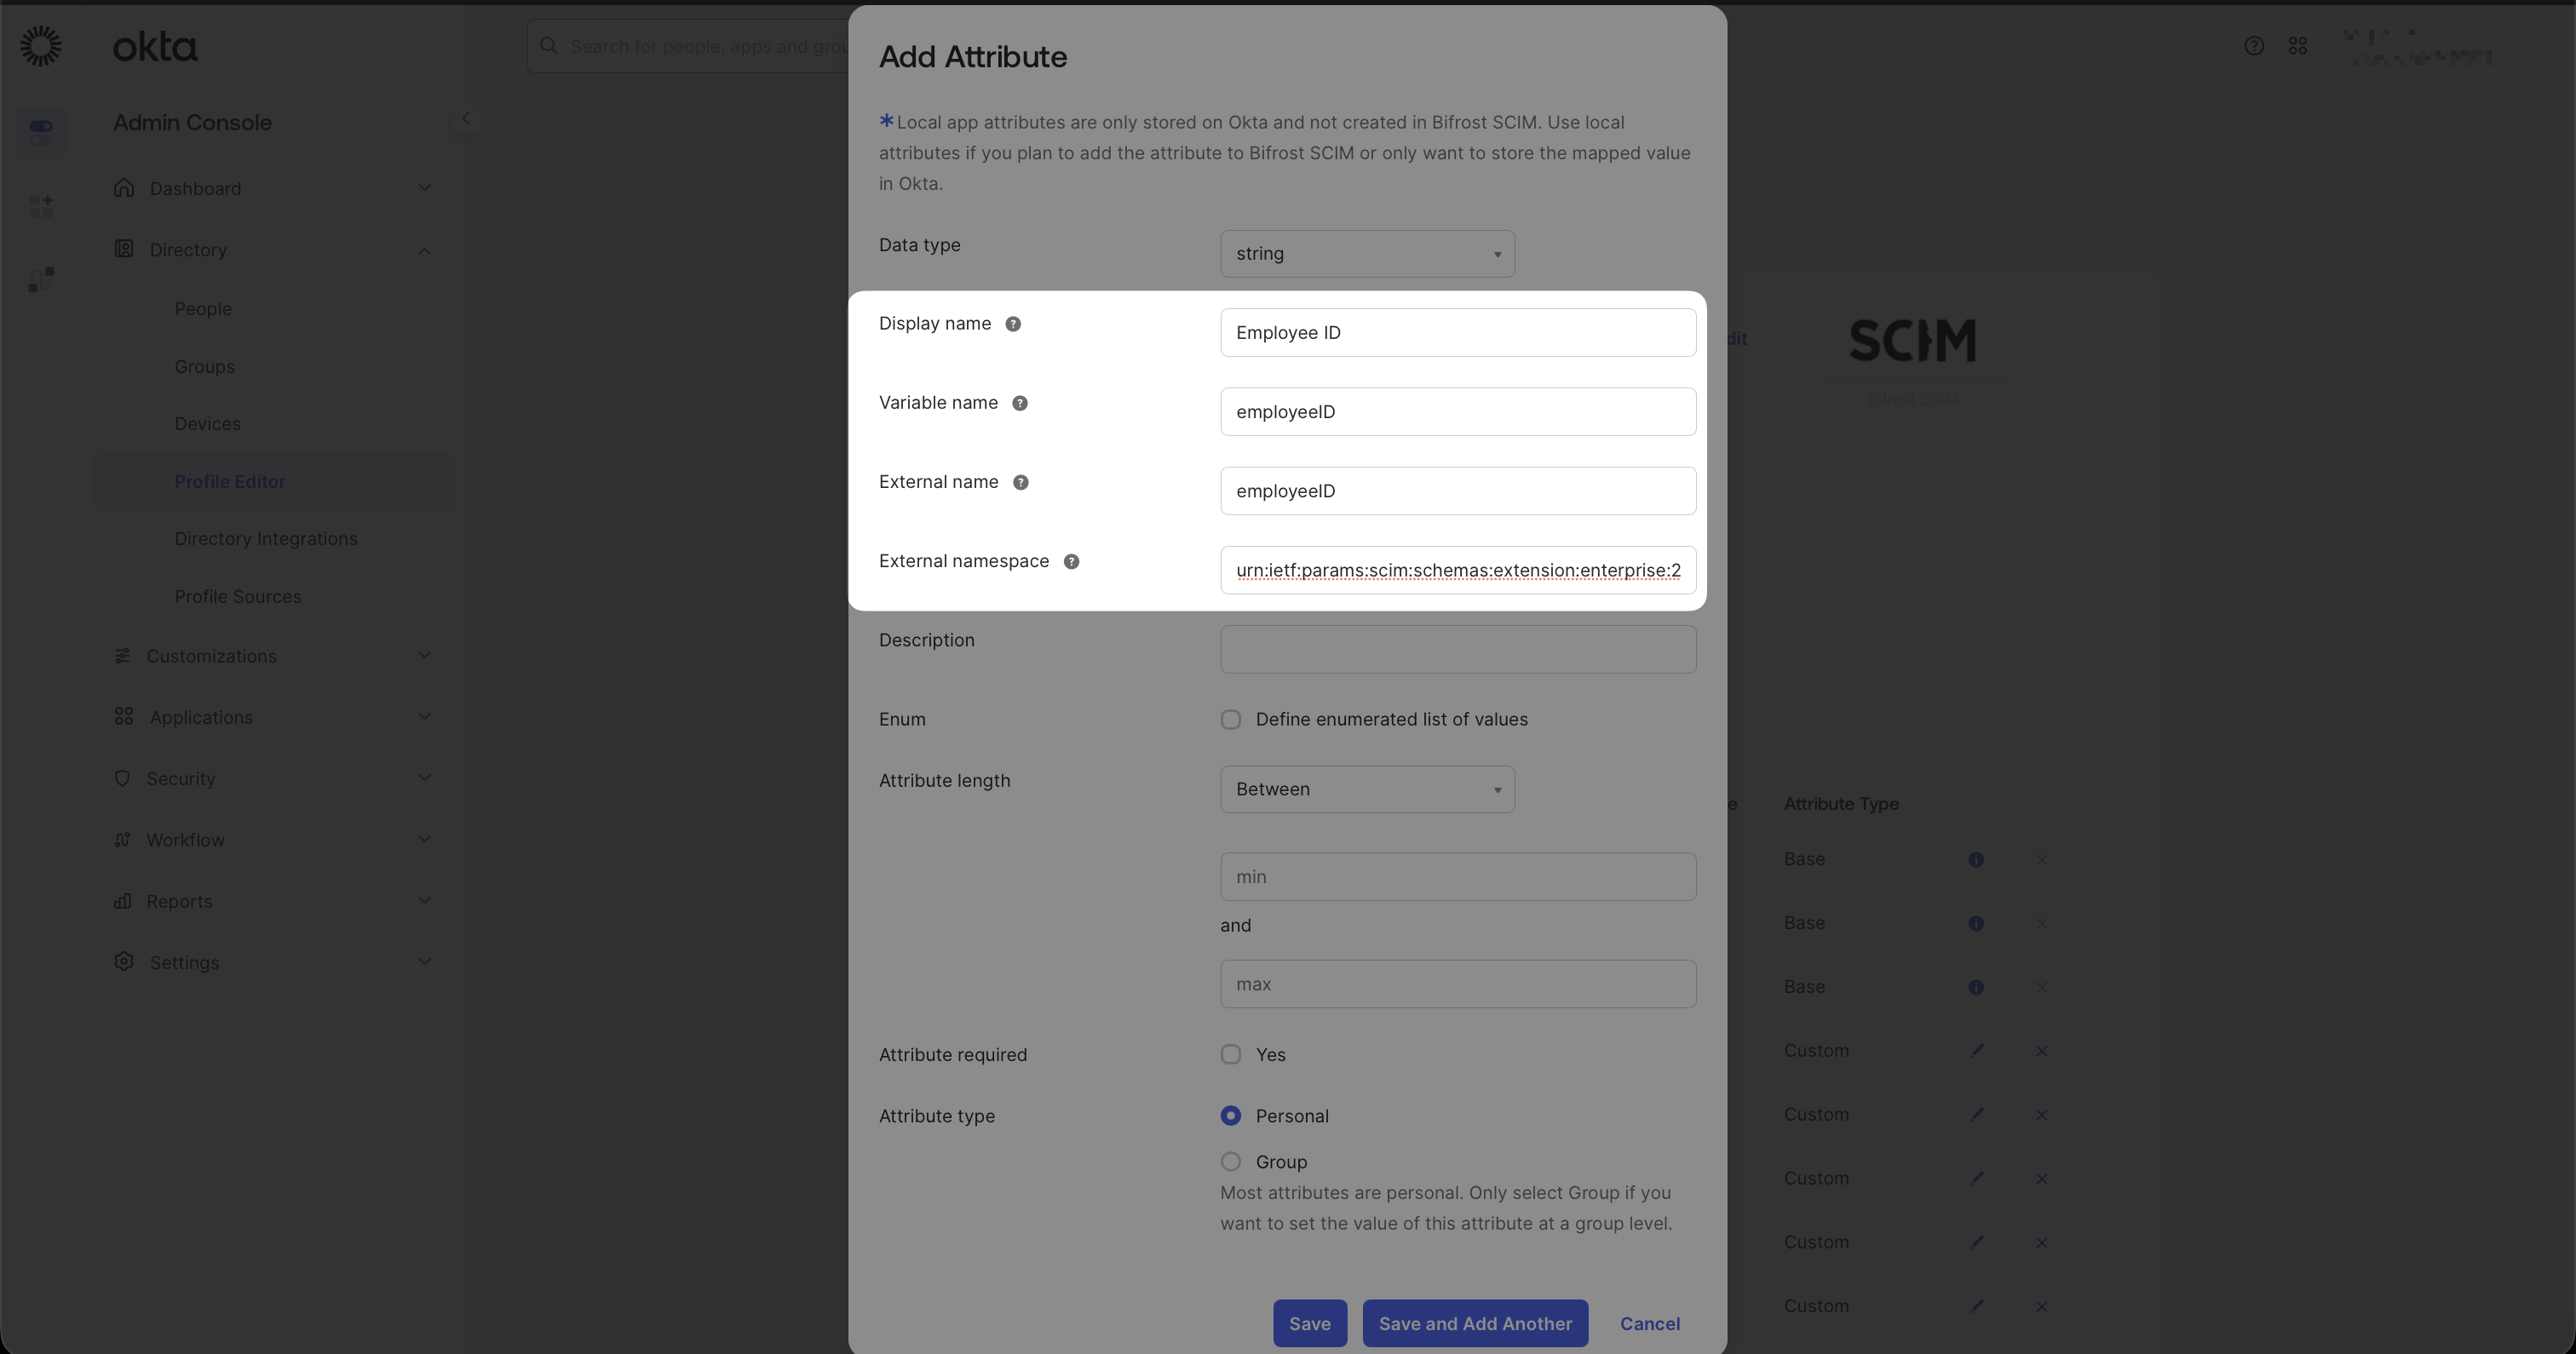 Click **Save**, then click **Mappings** on the Vikat SCIM profile.
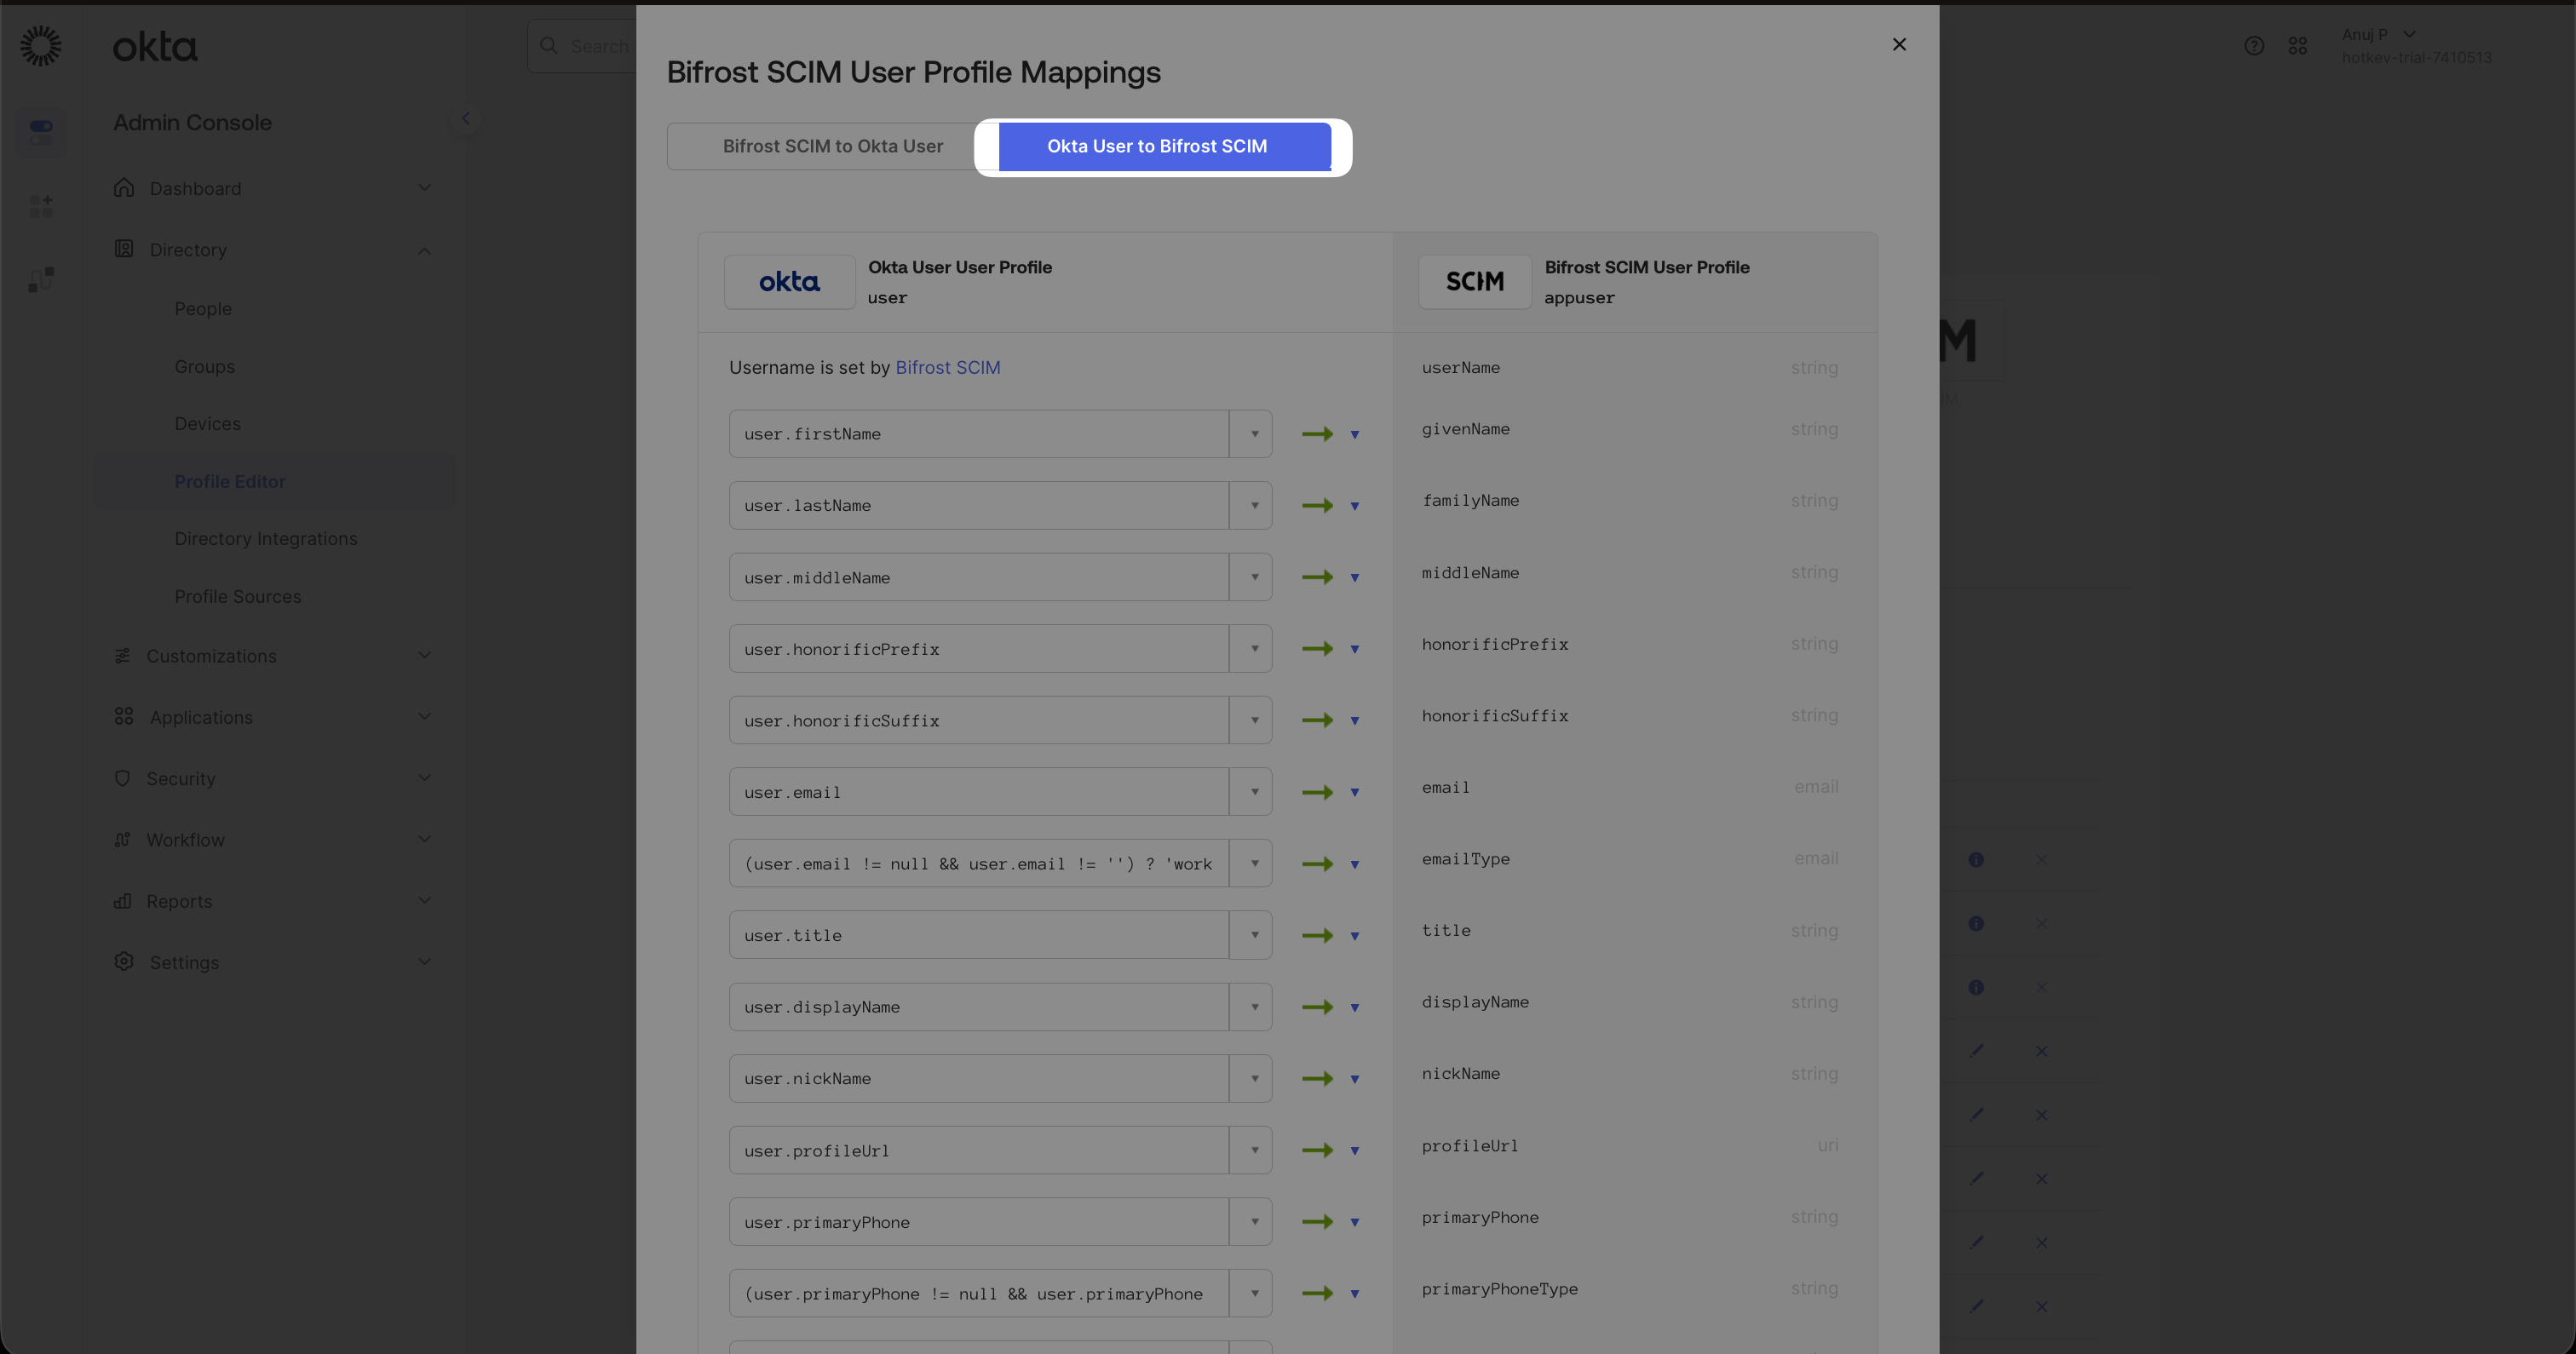
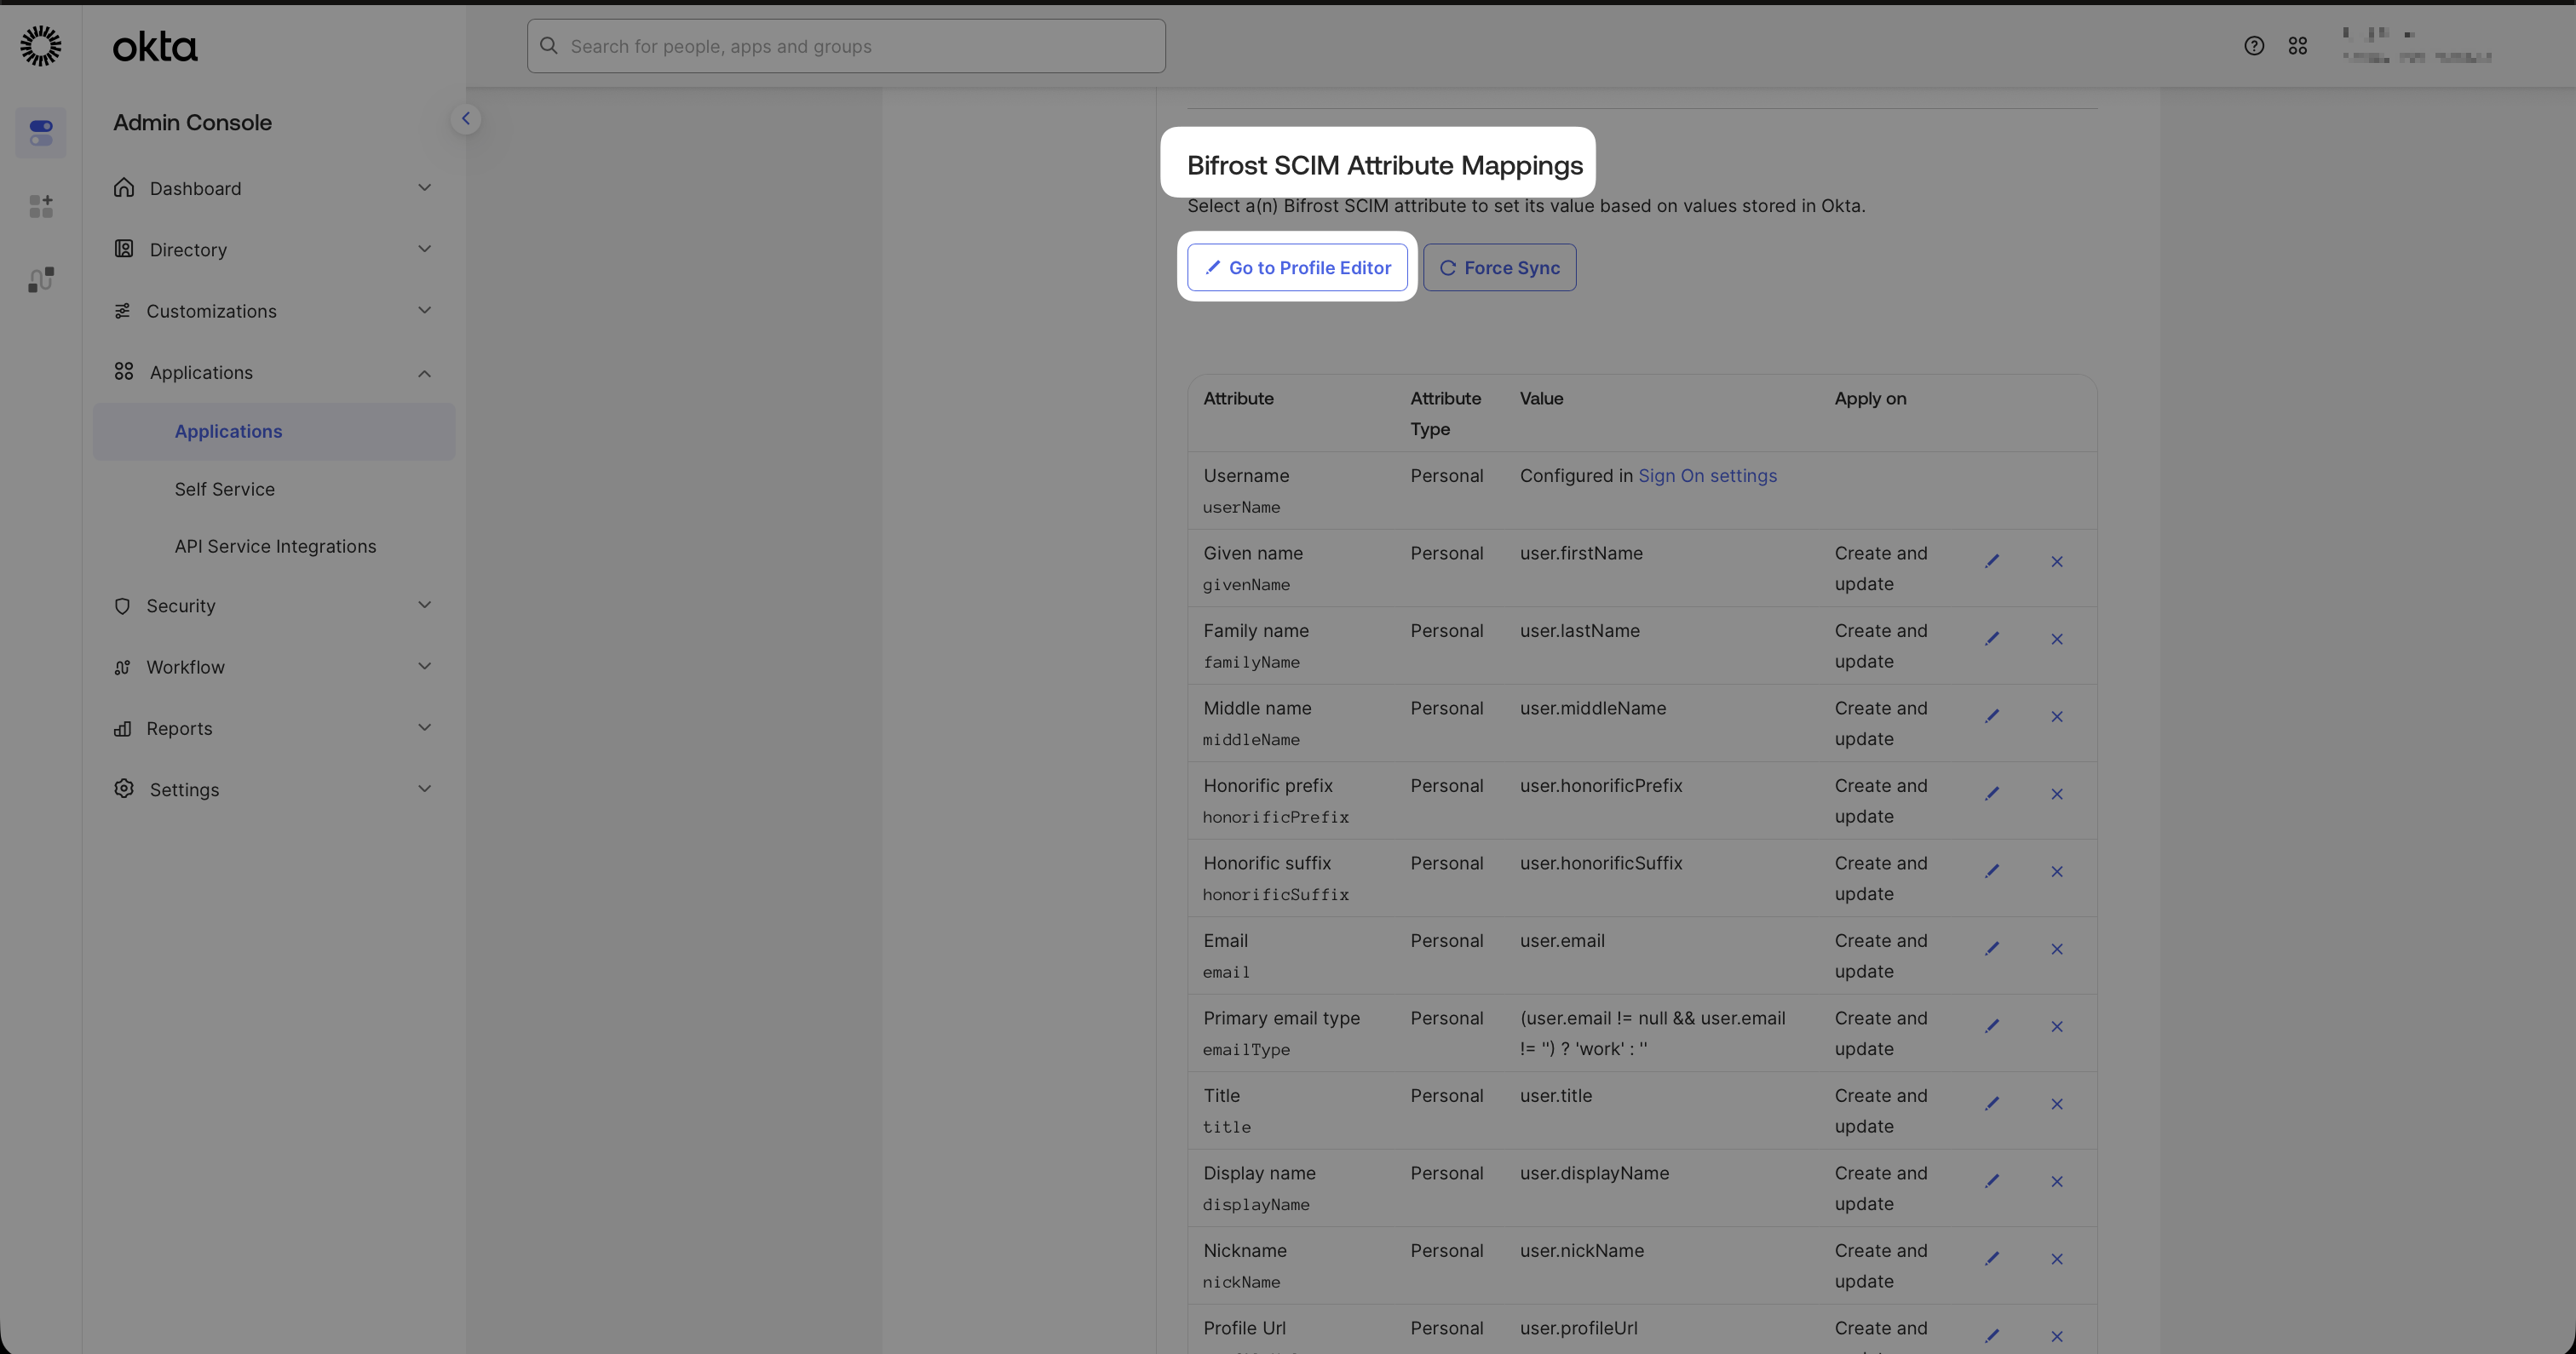 Select the **Okta User → Vikat SCIM** tab.
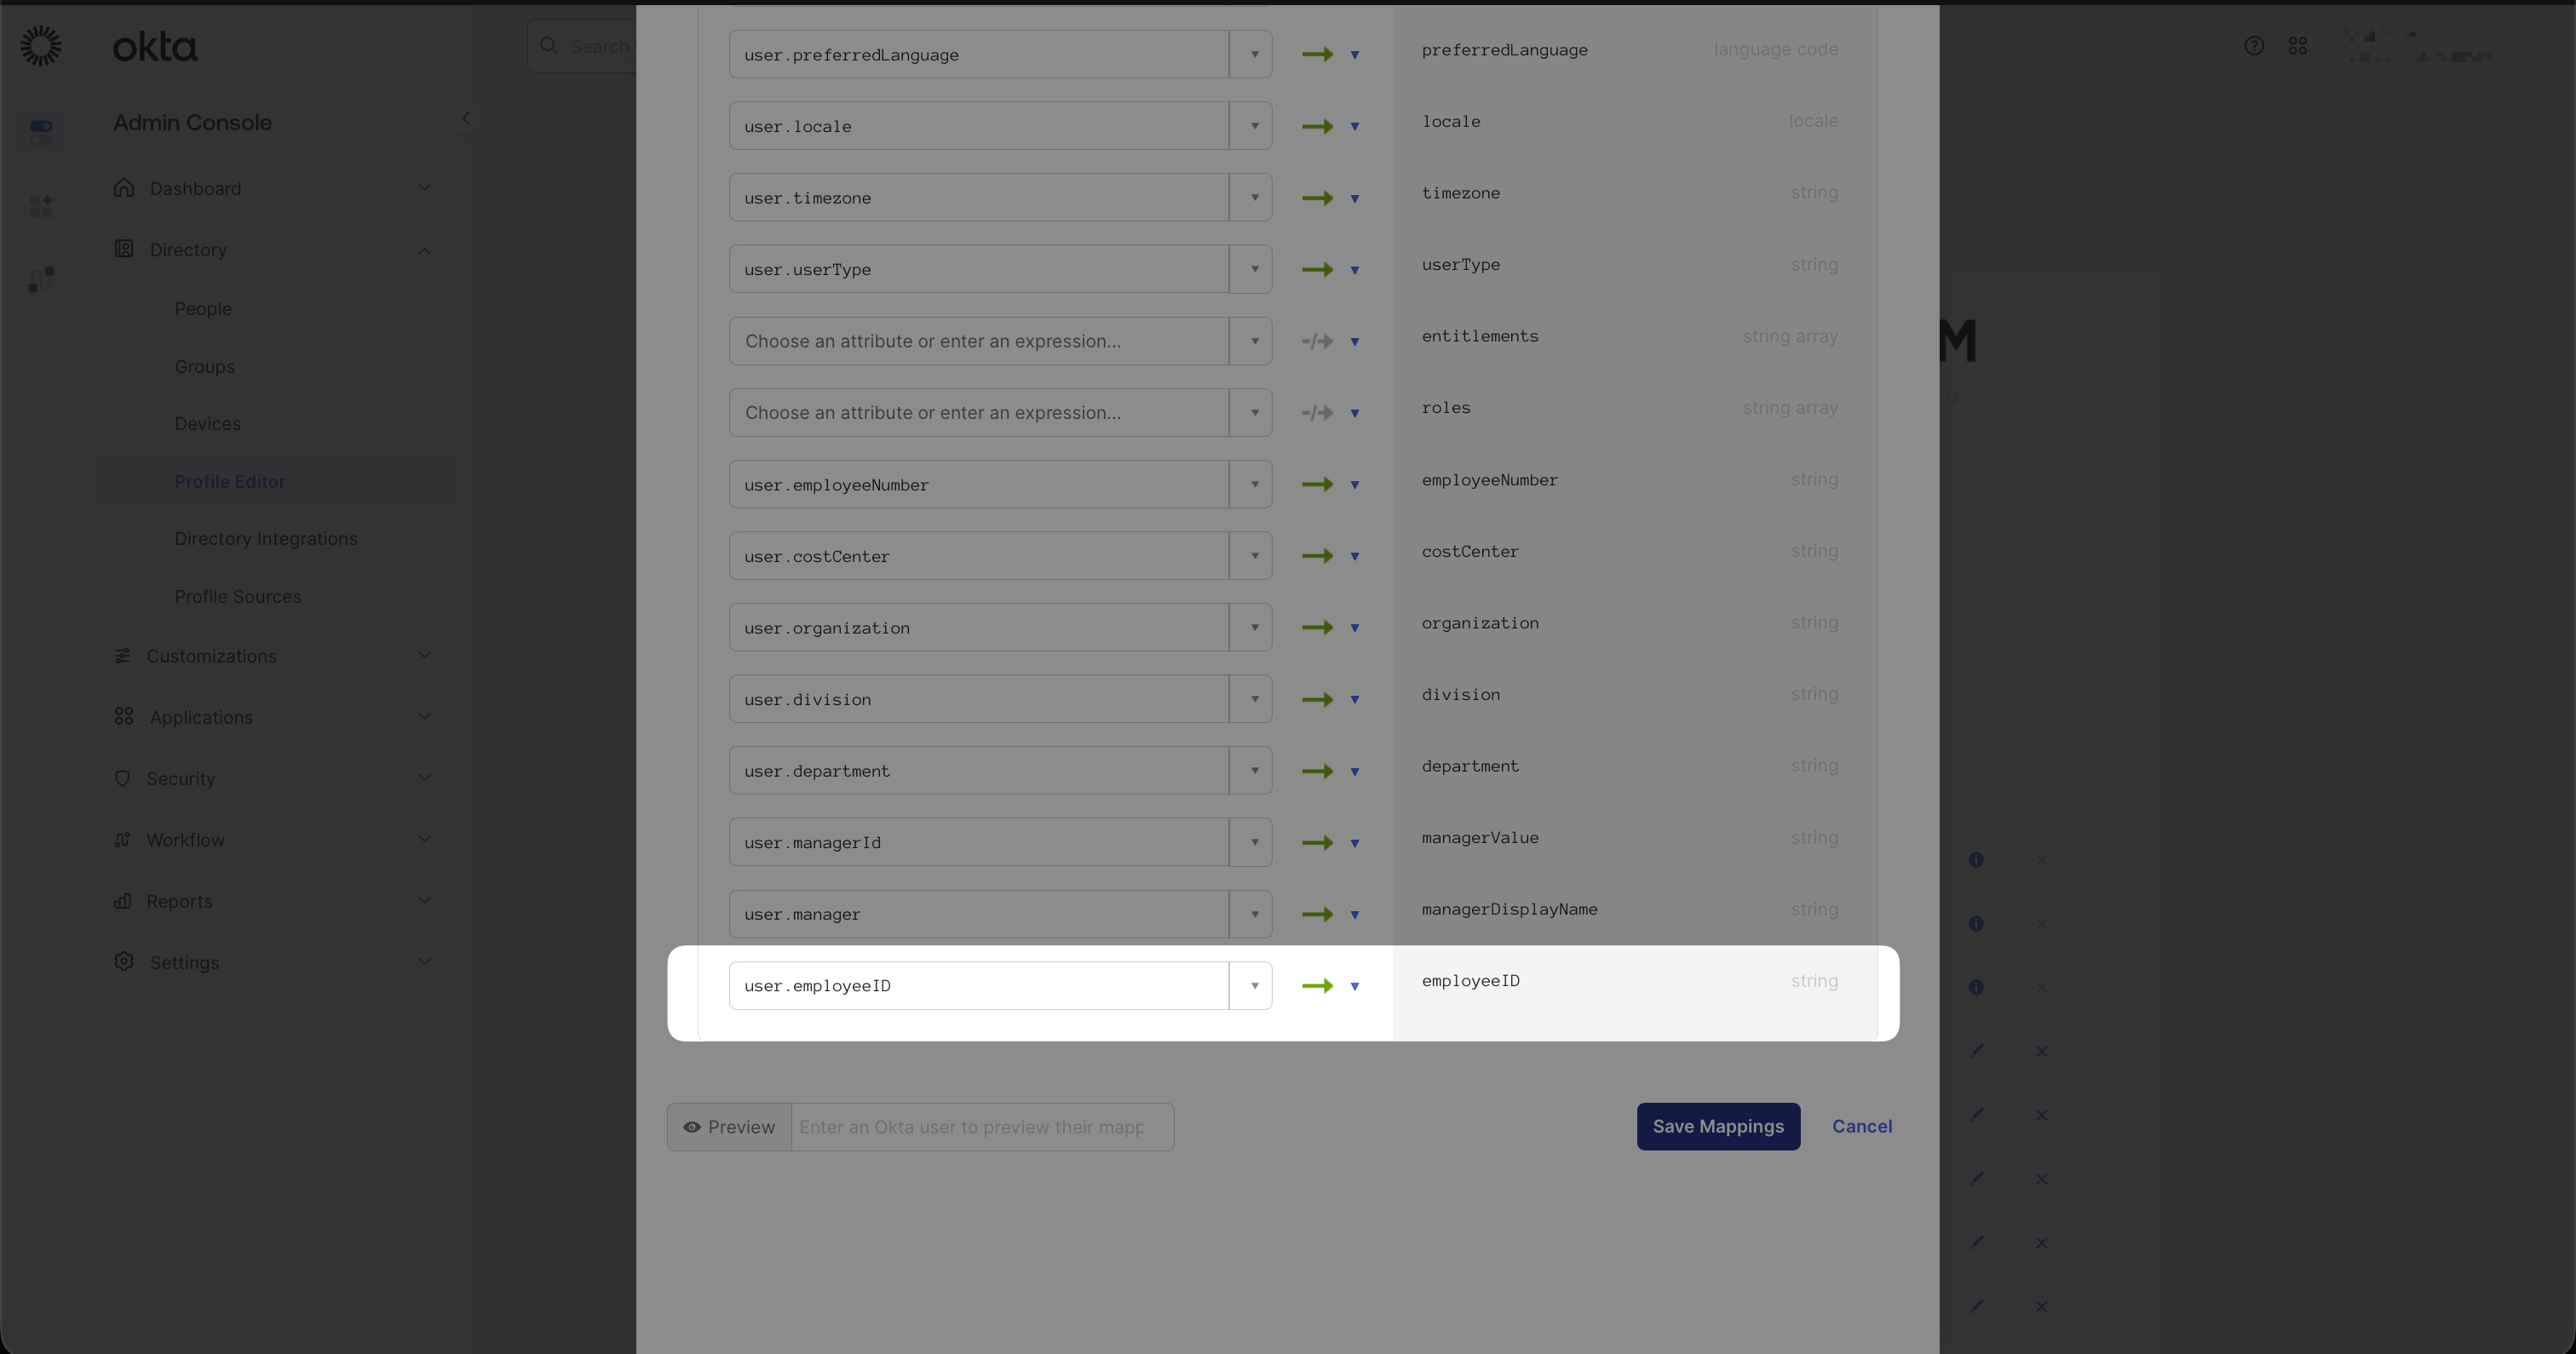
 Scroll to find your attribute and set its source from the Okta user profile — e.g. `user.employeeNumber` → `employeeID`. Click **Save Mappings**.
 Back in Vikat, go to **Attribute Mapping** in the provider setup and add a **SCIM Attribute** entry for `employeeID`. The External name you set in Okta must match this exactly.
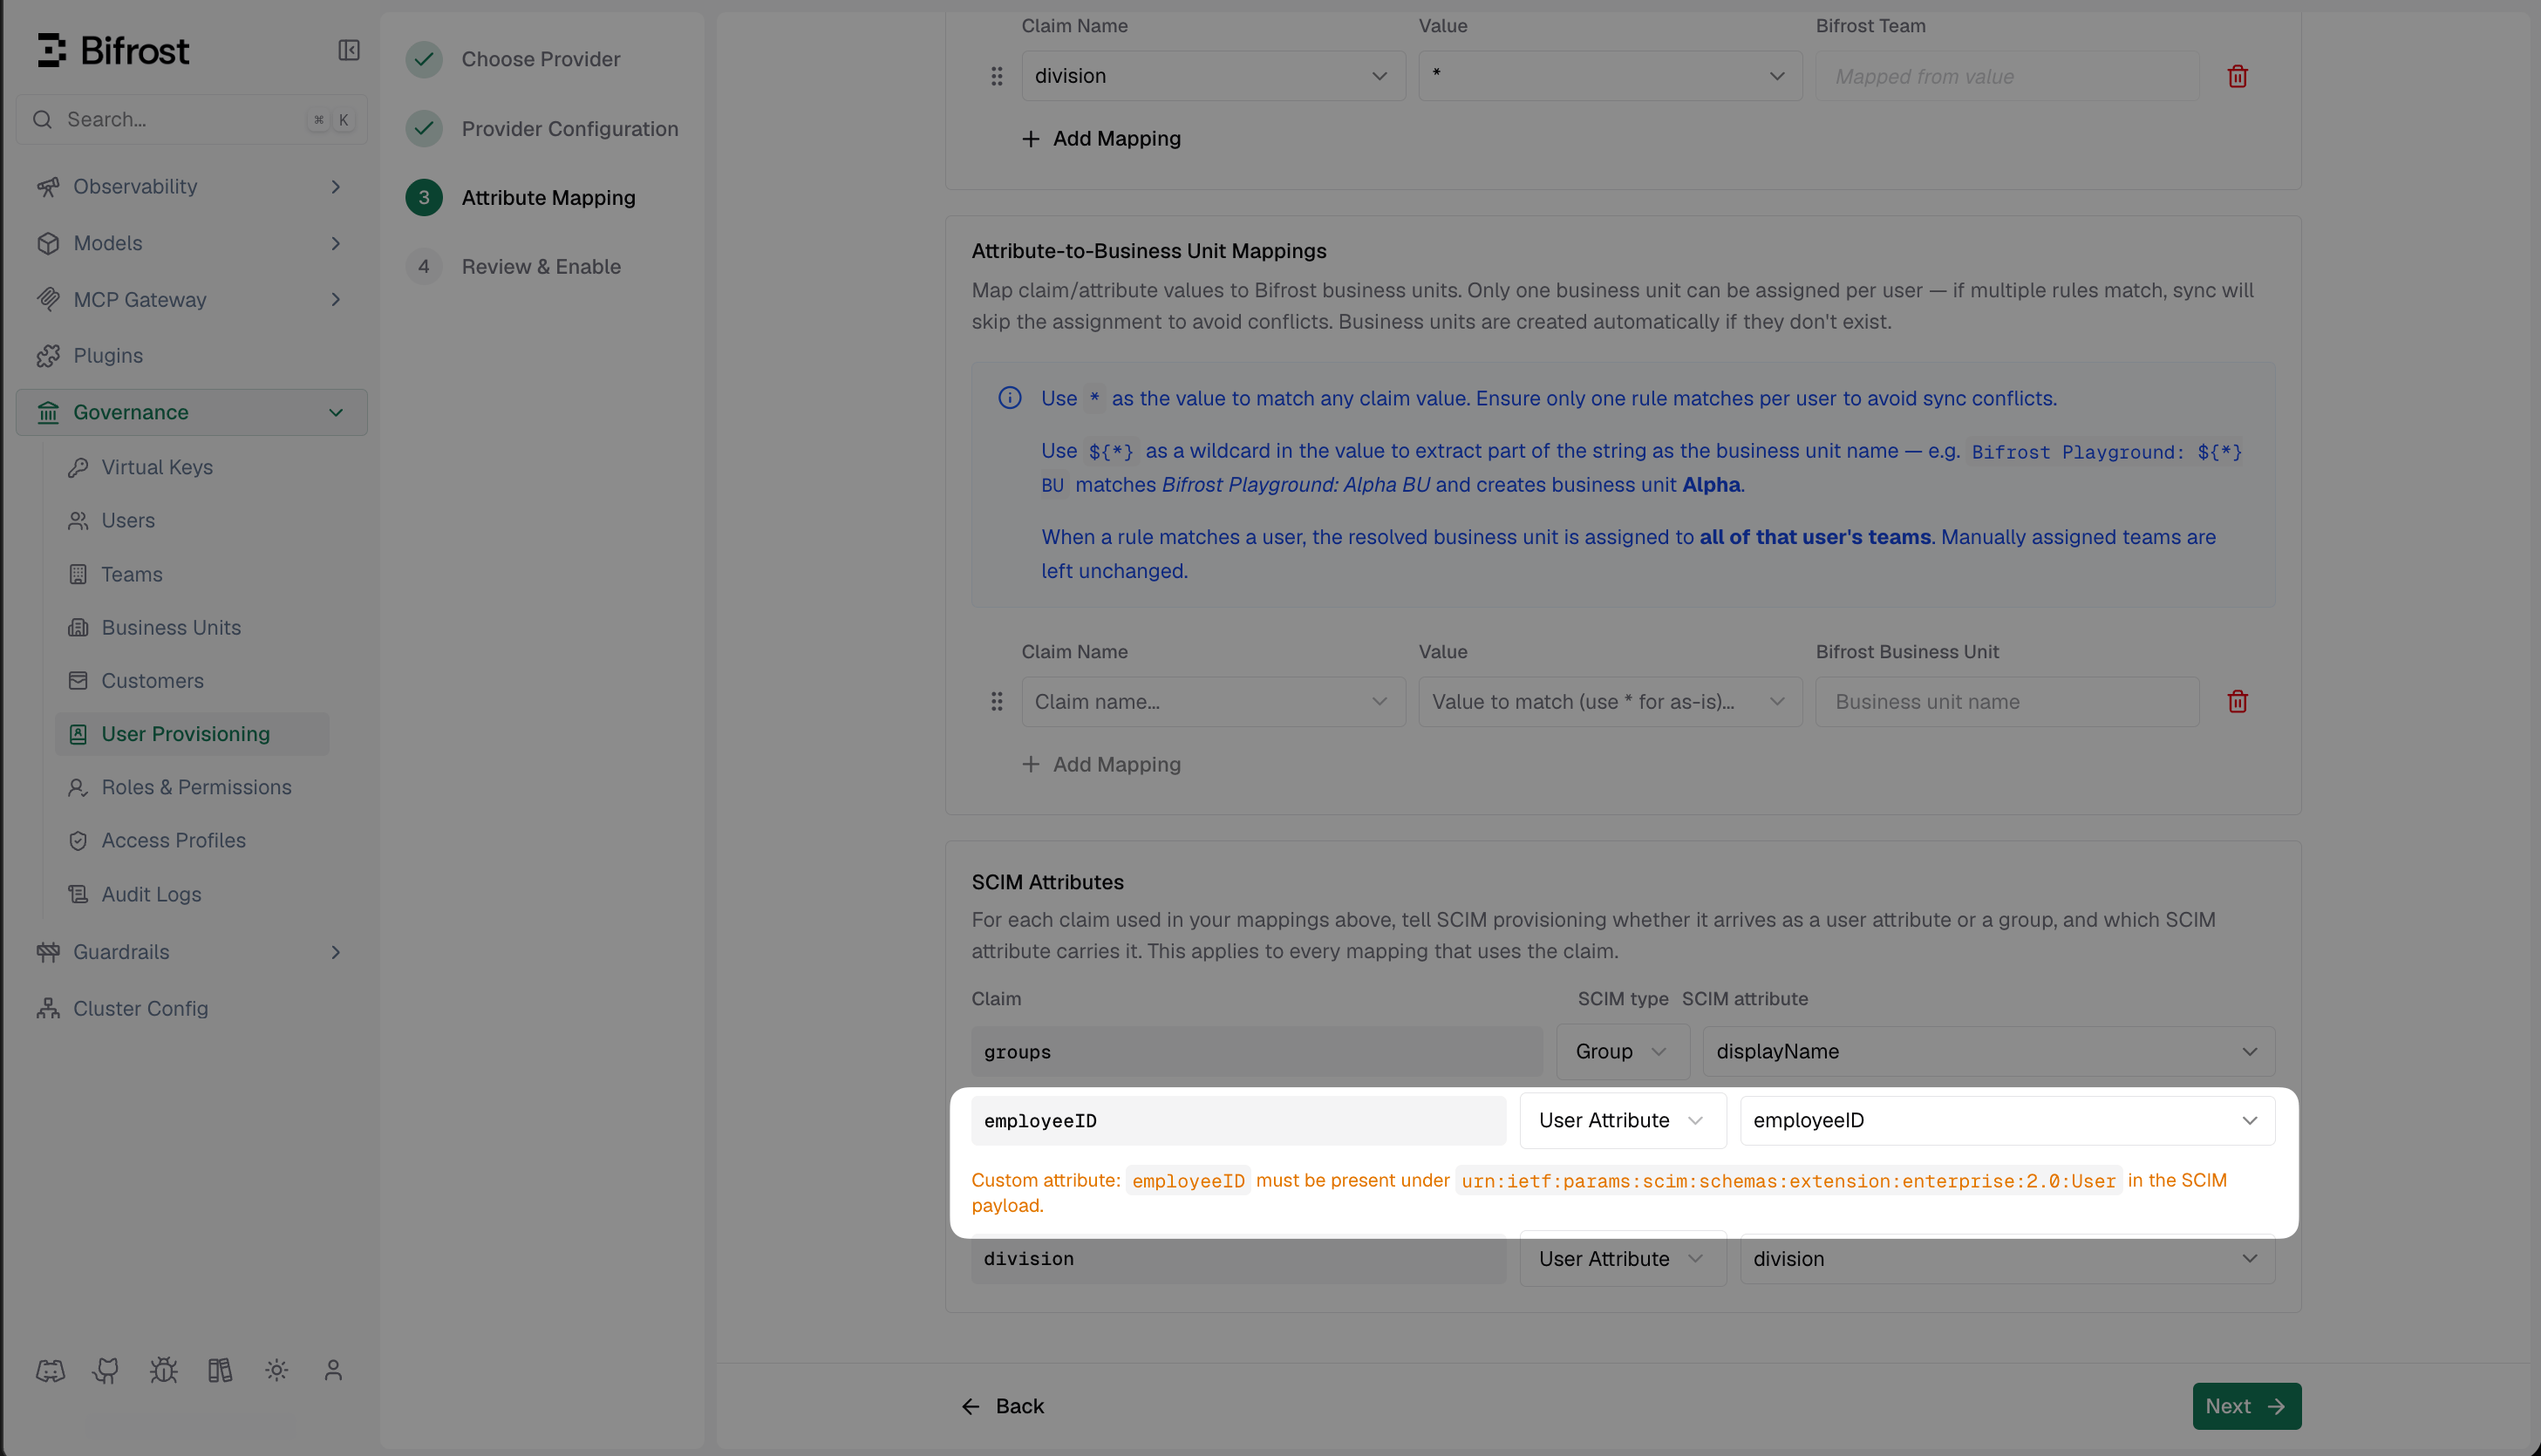 The **External name** in Okta's Profile Editor and the SCIM attribute name in Vikat must match exactly — including case.
***
## Step 4: Assign Users and Push Groups
Go to the **Assignments** tab in the Vikat SCIM app.
Click **Assign** → **Assign to People** or **Assign to Groups** and select the users or groups to sync with Vikat.
The **External name** in Okta's Profile Editor and the SCIM attribute name in Vikat must match exactly — including case.
***
## Step 4: Assign Users and Push Groups
Go to the **Assignments** tab in the Vikat SCIM app.
Click **Assign** → **Assign to People** or **Assign to Groups** and select the users or groups to sync with Vikat.
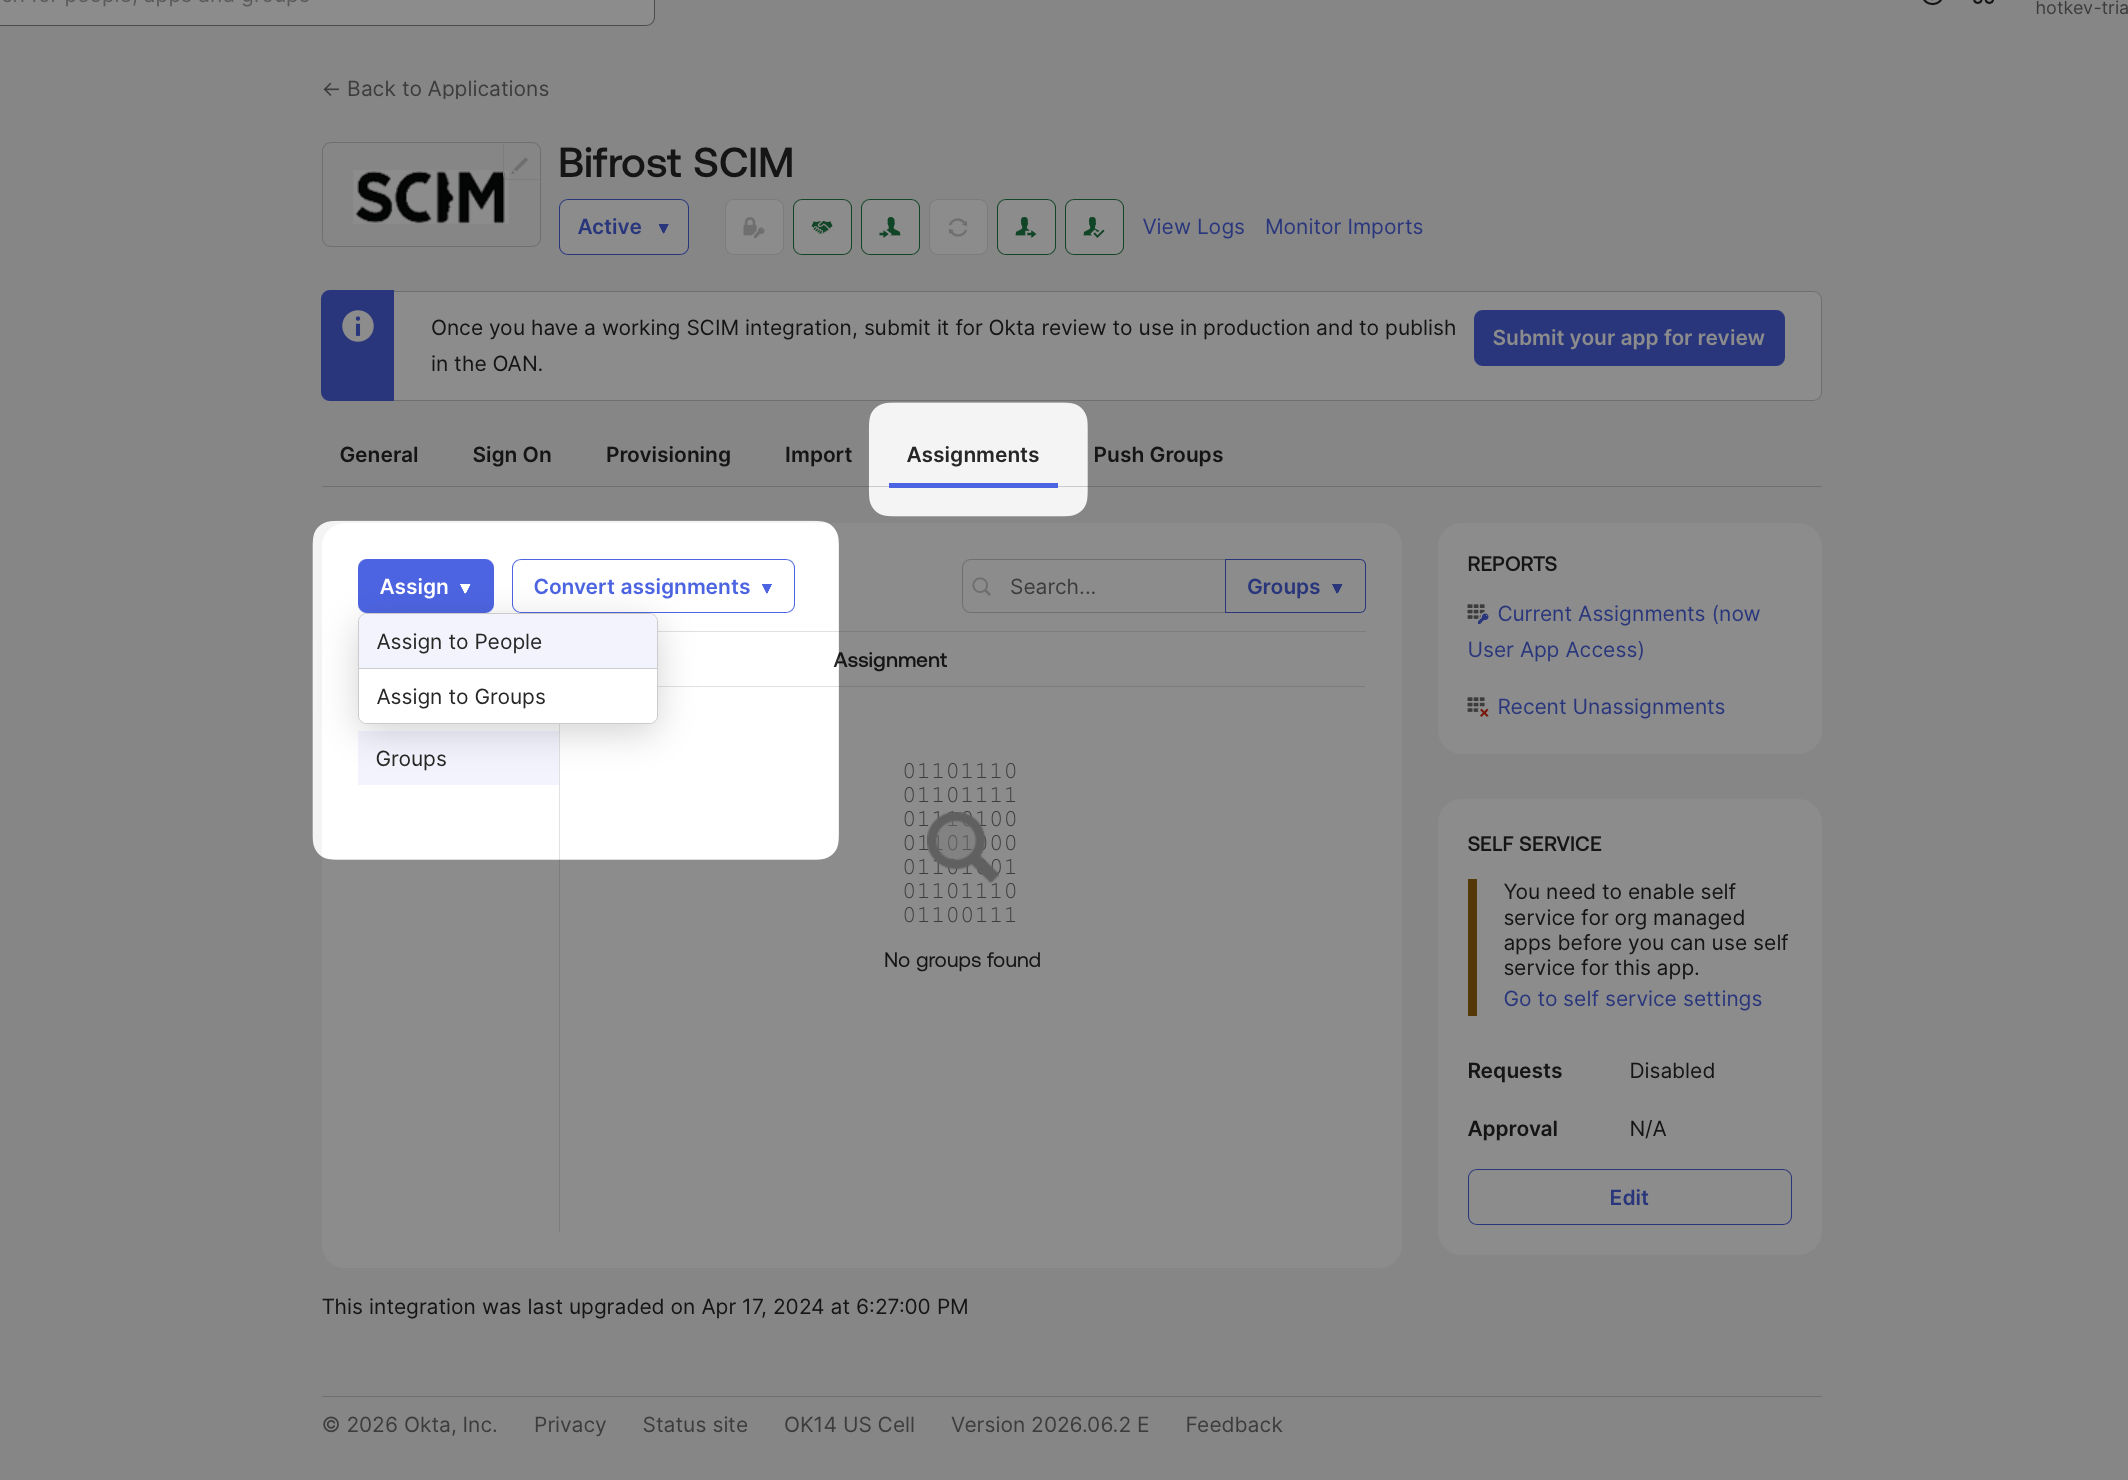 Assigned users are pushed to Vikat immediately. When a user is unassigned or deactivated in Okta, Vikat deactivates them in real time.
If you use group membership to drive Vikat team or business unit assignments, you need to push the groups themselves — not just the users in them.
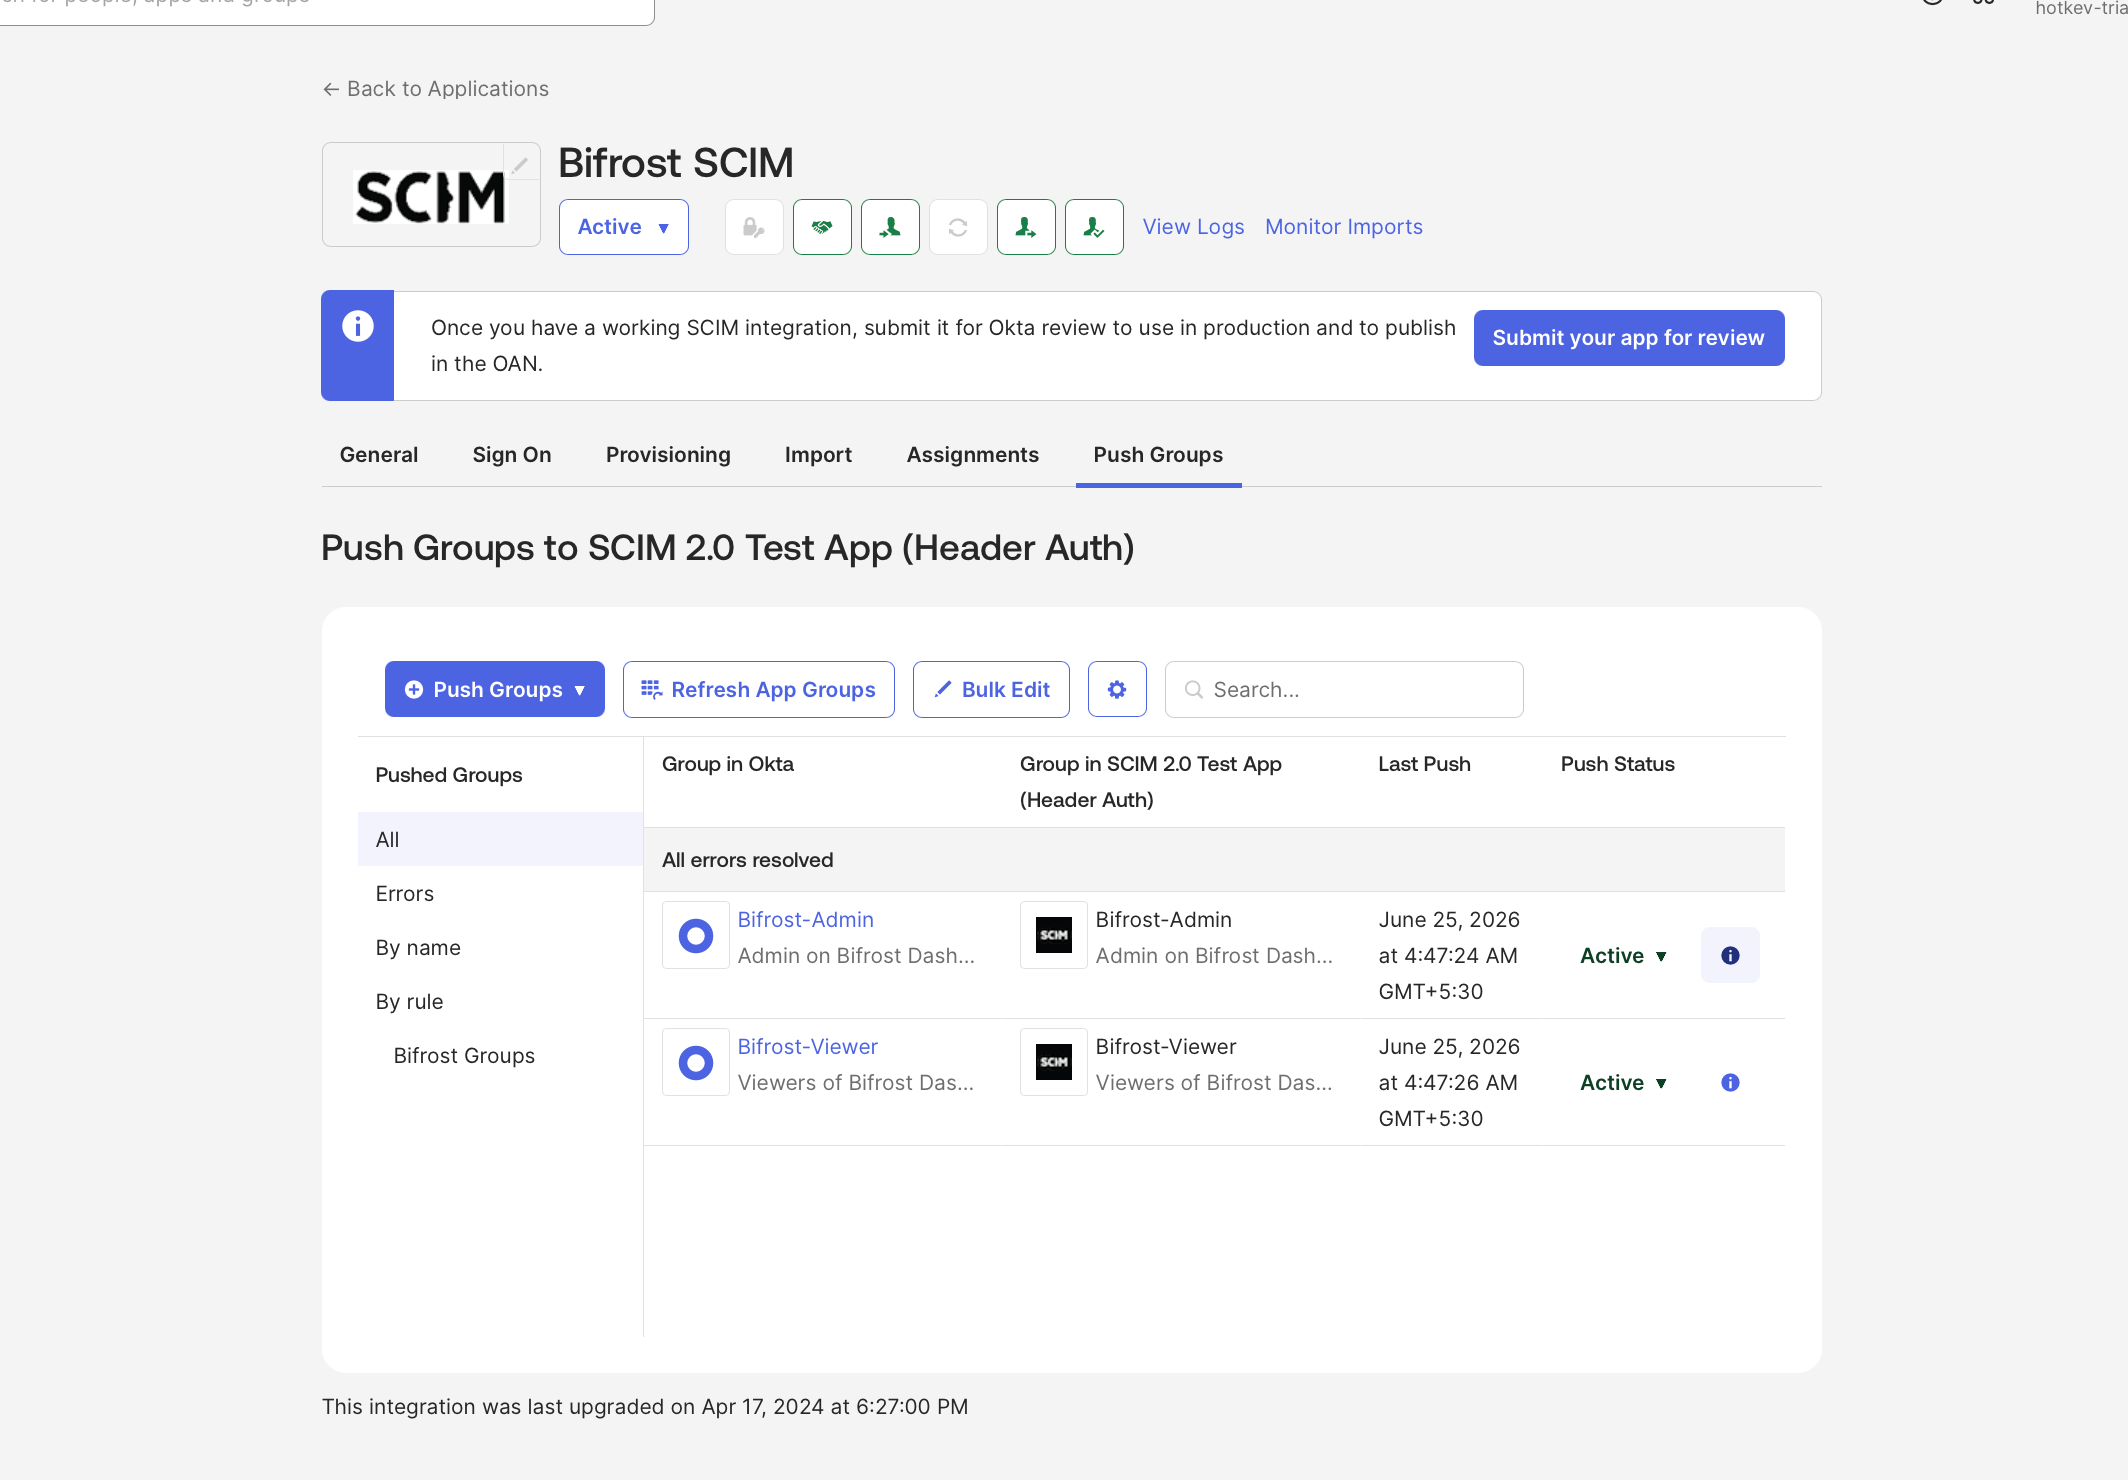
Go to the **Push Groups** tab in the Vikat SCIM app and click **Push Groups**.
You can push groups **by name** (search for specific groups) or **by rule** (create a filter that automatically pushes any matching groups — useful if your groups follow a naming convention like `Vikat-*`).
Assigned users are pushed to Vikat immediately. When a user is unassigned or deactivated in Okta, Vikat deactivates them in real time.
If you use group membership to drive Vikat team or business unit assignments, you need to push the groups themselves — not just the users in them.
Go to the **Push Groups** tab in the Vikat SCIM app and click **Push Groups**.
You can push groups **by name** (search for specific groups) or **by rule** (create a filter that automatically pushes any matching groups — useful if your groups follow a naming convention like `Vikat-*`).
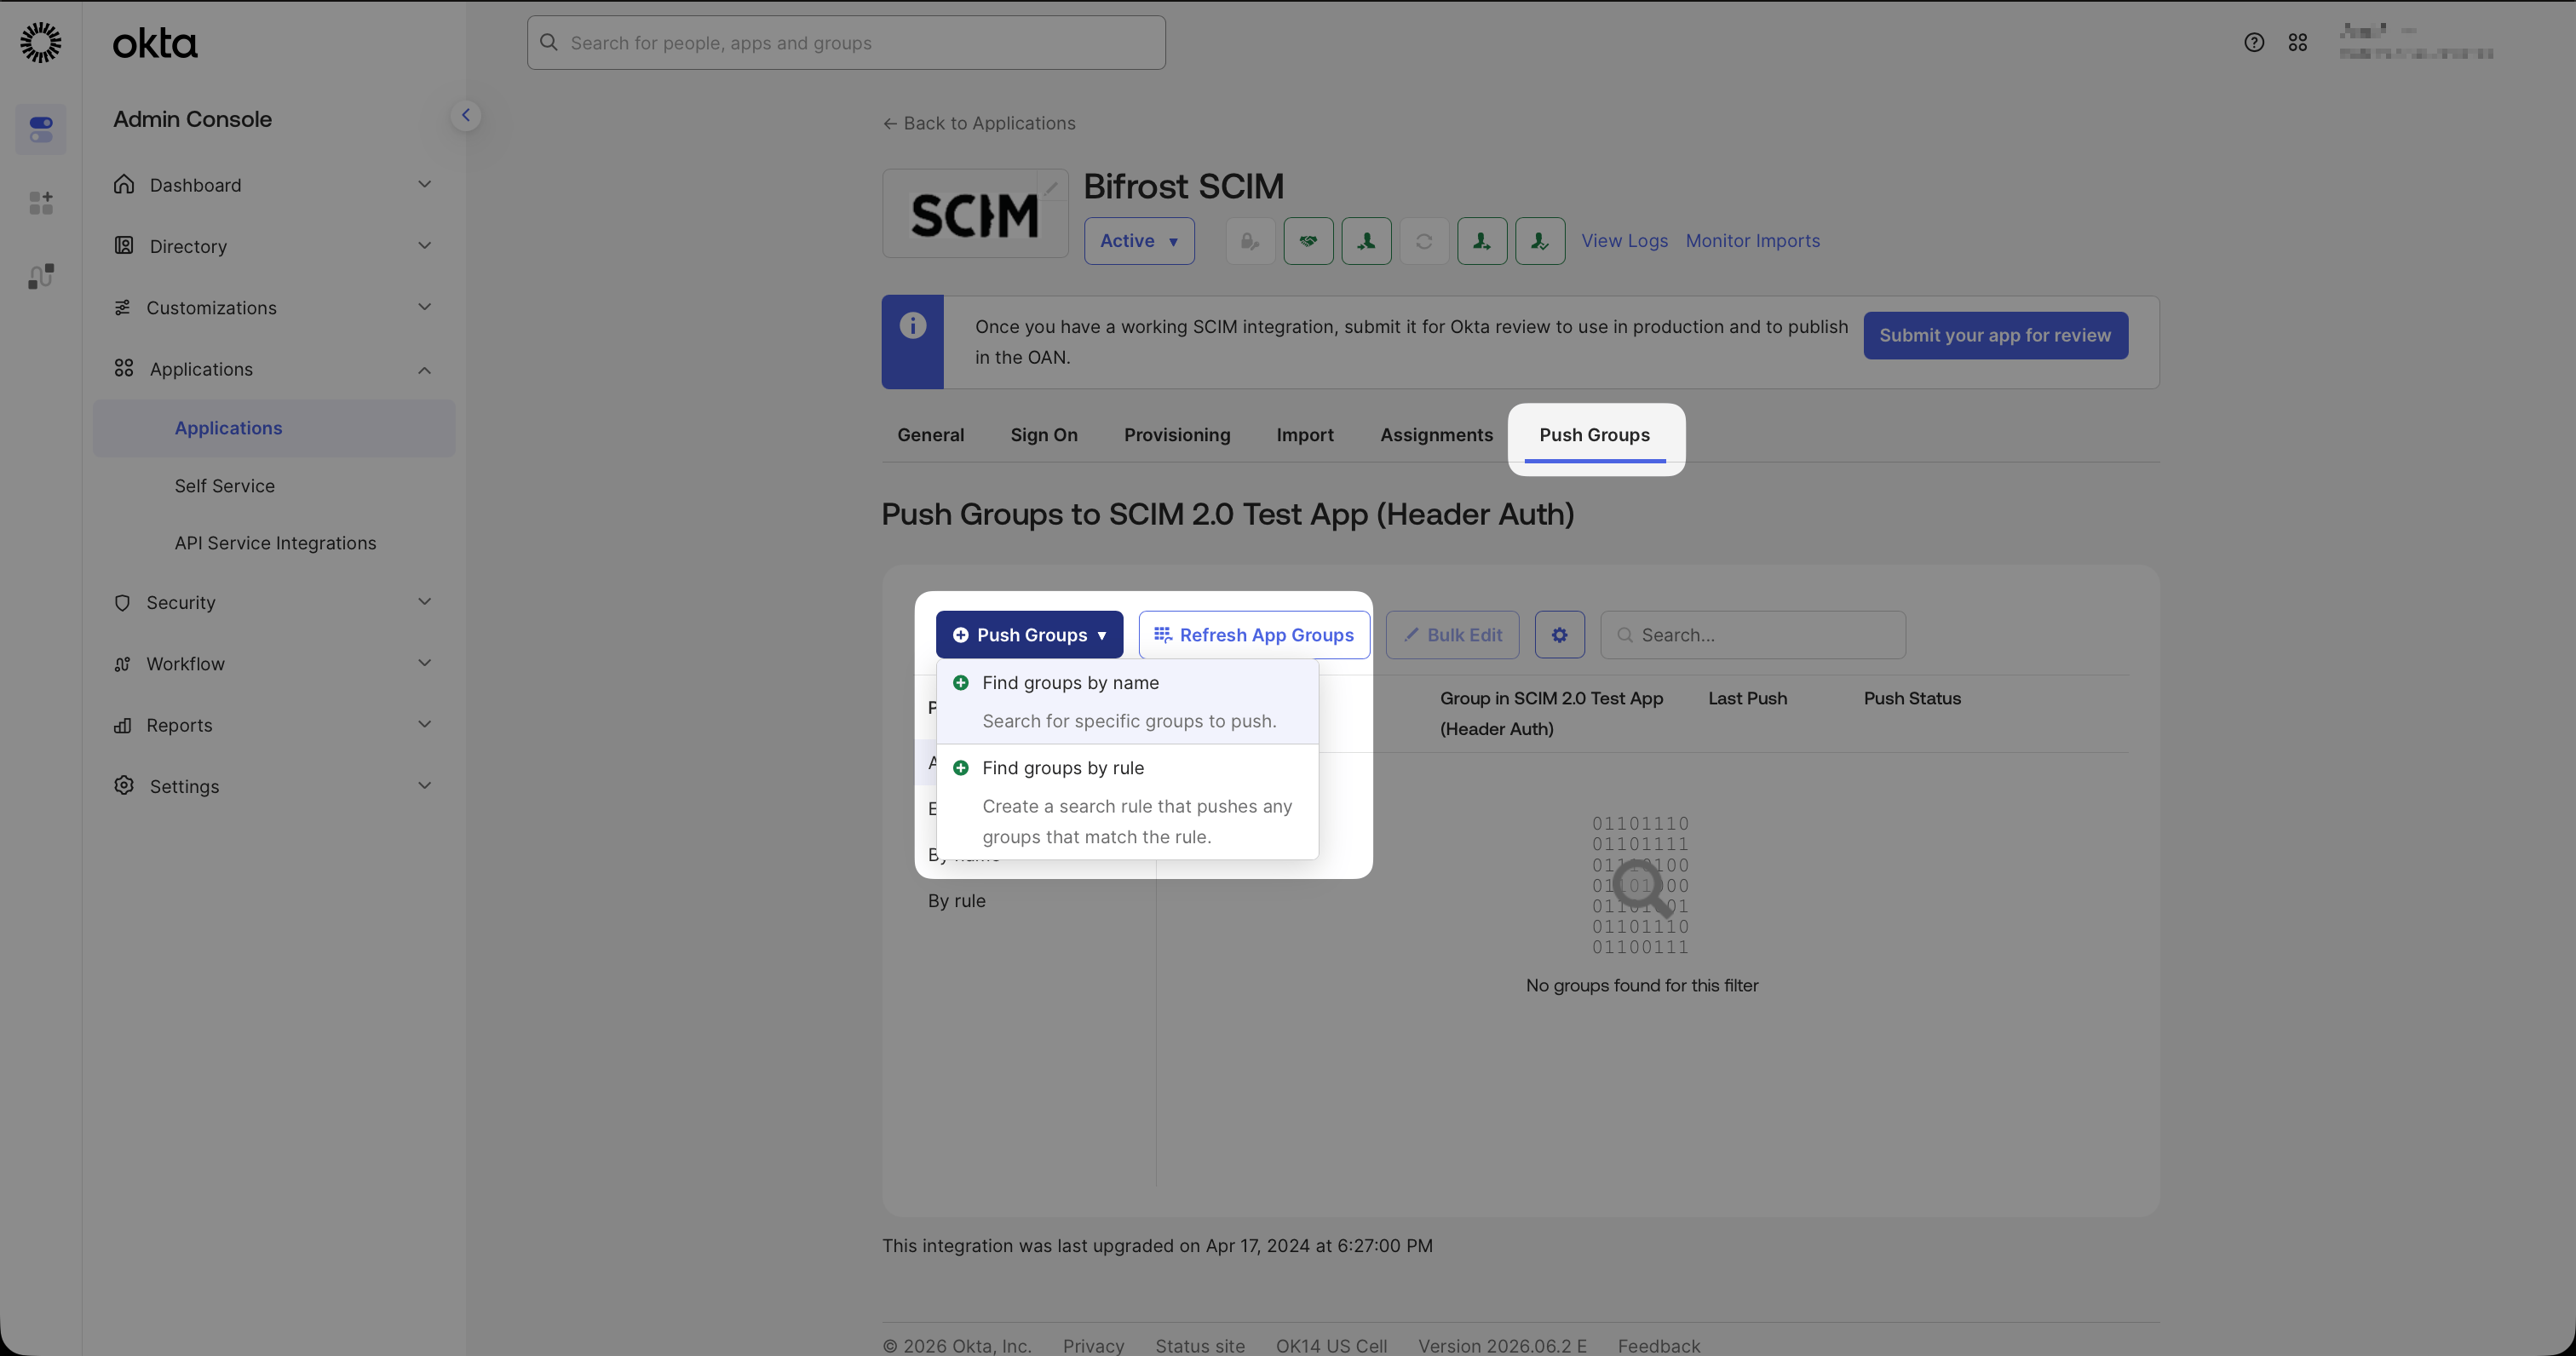
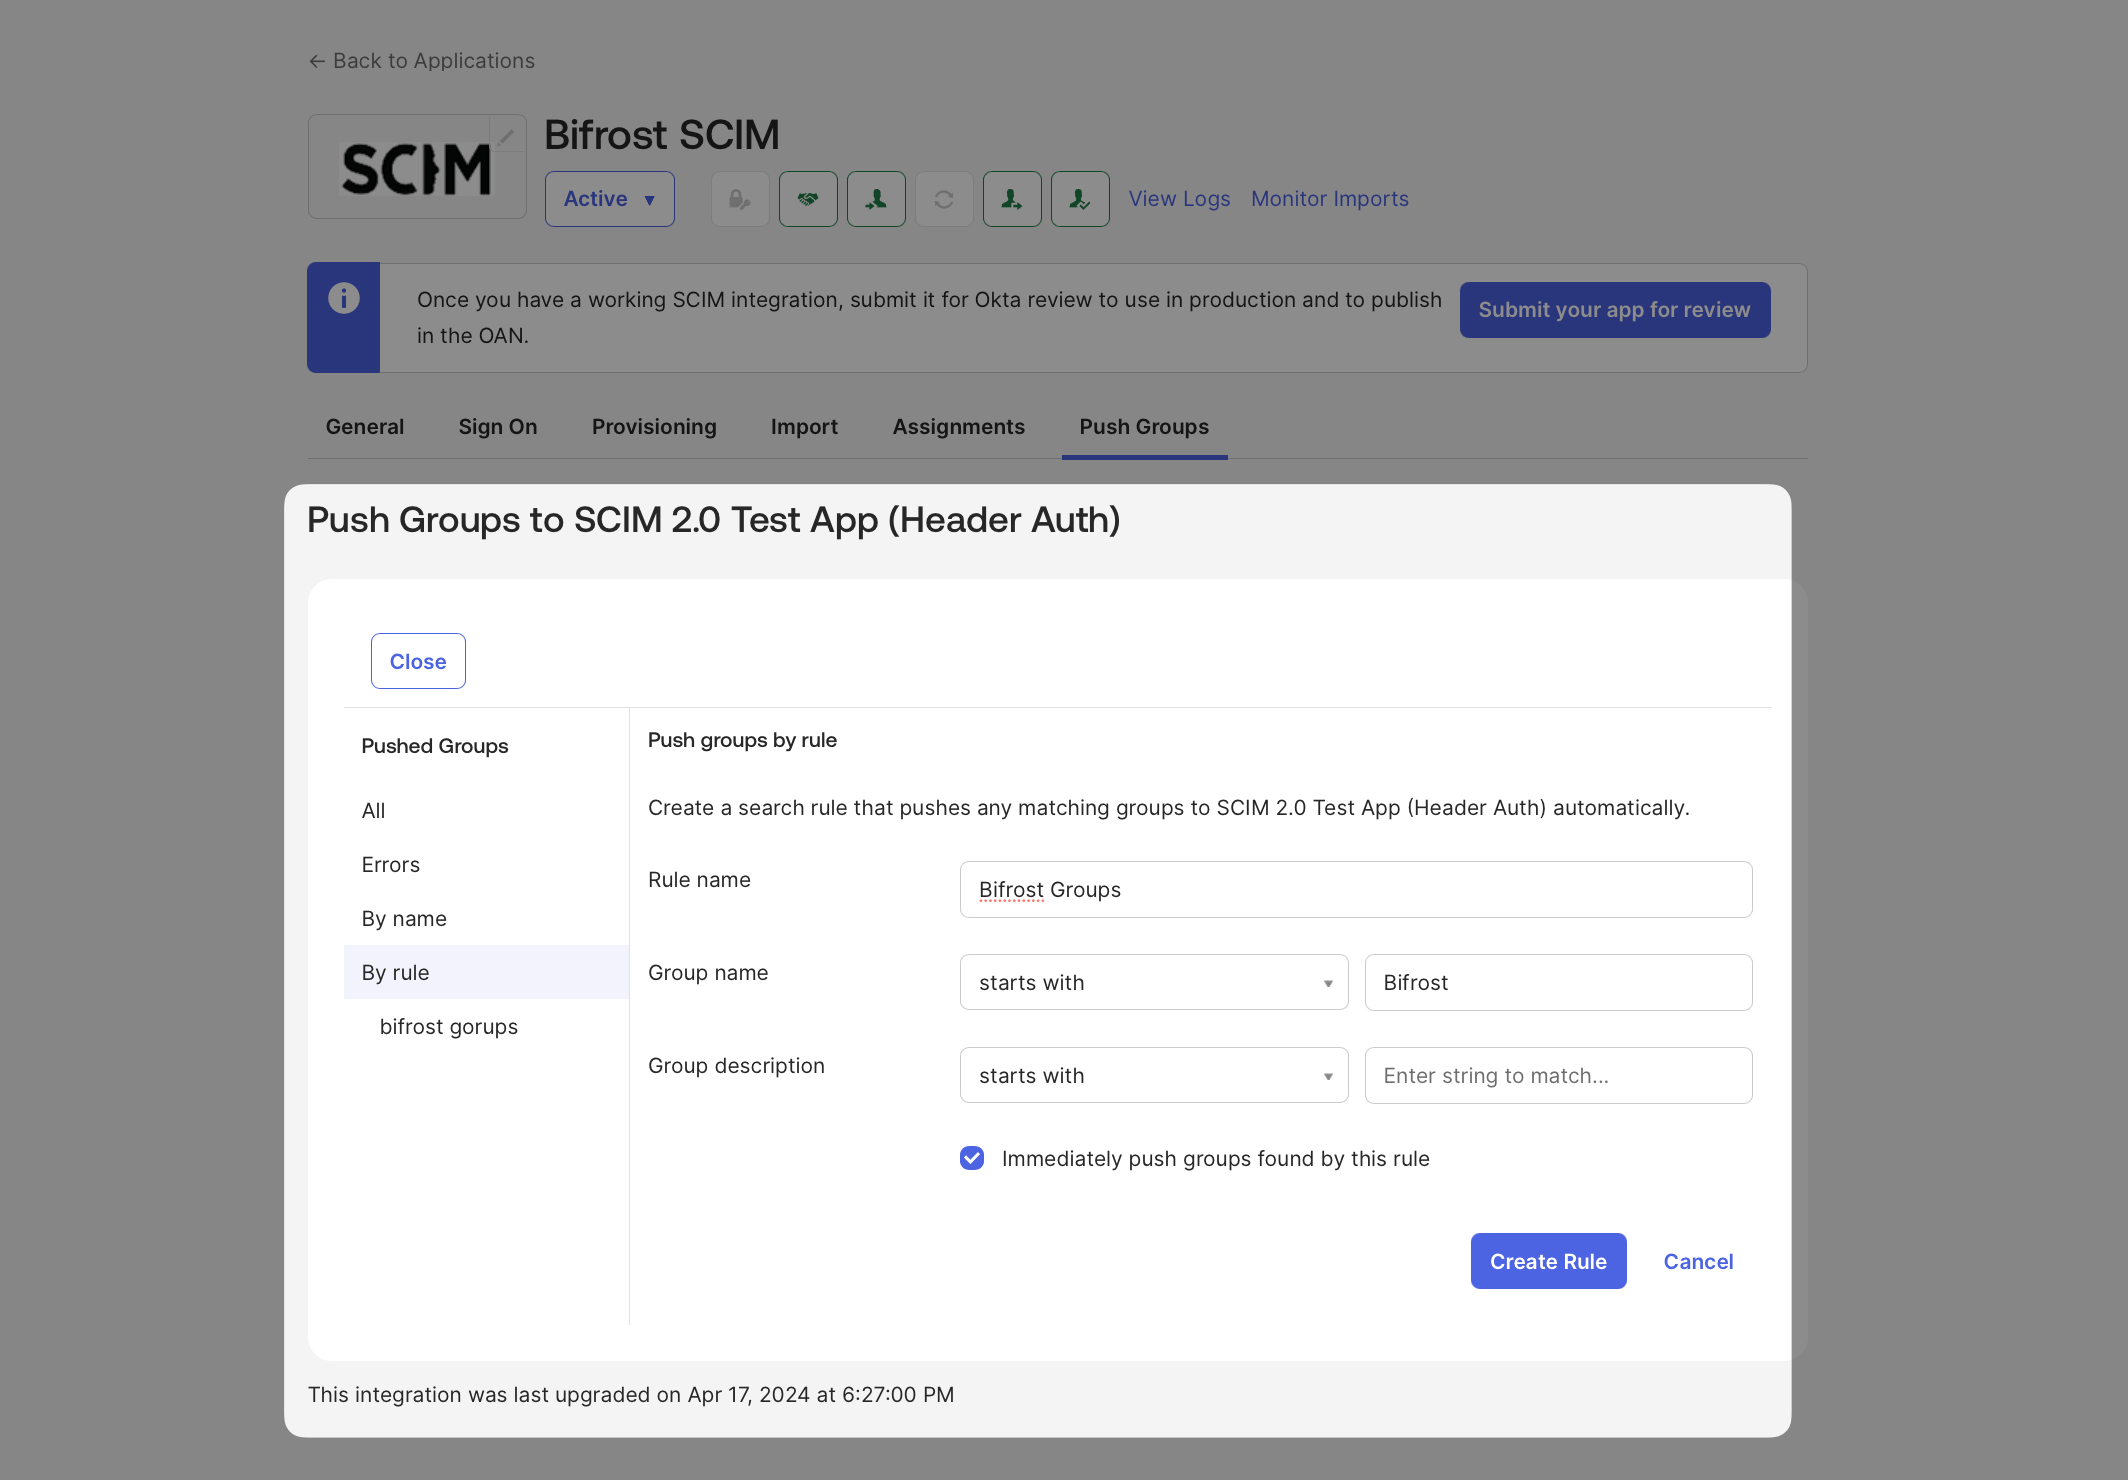 Once groups are pushed and showing as **Active**, Vikat tracks their membership in real time.
 In Vikat, configure **Attribute-to-Team** or **Attribute-to-Business Unit** mappings using the group `displayName` as the match value to automatically assign users to teams or business units based on their group membership.
***
## Step 5: Verify in Vikat
Once assignments and group pushes are active, confirm everything is syncing correctly.
* Go to **Governance** → **Users** to see provisioned users and their assigned roles
* Go to **Governance** → **Teams** to see teams populated from pushed groups
* Go to **Governance** → **Business Units** to see business units resolved from group or attribute mappings
Changes in Okta — new assignments, group membership updates, deactivations — will reflect in Vikat in real time.
***
## How Sync Works
**Real-time push** — Okta pushes user and group changes to Vikat immediately when they occur.
**Background reconciliation** — if you configured an API token in [SSO using OIDC Step 4](./oidc#step-4-copy-your-credentials), Vikat also runs a full reconciliation every 24 hours to catch anything the SCIM push may have missed.
***
## Troubleshooting
**Test API Credentials fails** — verify the SCIM Base URL has no trailing slash and the API token matches exactly what Vikat generated. Rotate the token in Vikat and update Okta if needed.
**Users are pushed but have no role** — SCIM provisions the user record; role assignment comes from attribute mappings in the OIDC provider. Confirm your Attribute-to-Role mappings are set and the relevant claims are present in the JWT.
**Custom attribute is not arriving in Vikat** — confirm the External name in Okta's Profile Editor matches the SCIM attribute name in Vikat exactly (case-sensitive). Also verify the Okta User → Vikat SCIM mapping direction is saved.
**Group membership is not syncing** — ensure groups are added under **Push Groups**, not just **Assignments**. Assignments sync users; Push Groups syncs group membership.
In Vikat, configure **Attribute-to-Team** or **Attribute-to-Business Unit** mappings using the group `displayName` as the match value to automatically assign users to teams or business units based on their group membership.
***
## Step 5: Verify in Vikat
Once assignments and group pushes are active, confirm everything is syncing correctly.
* Go to **Governance** → **Users** to see provisioned users and their assigned roles
* Go to **Governance** → **Teams** to see teams populated from pushed groups
* Go to **Governance** → **Business Units** to see business units resolved from group or attribute mappings
Changes in Okta — new assignments, group membership updates, deactivations — will reflect in Vikat in real time.
***
## How Sync Works
**Real-time push** — Okta pushes user and group changes to Vikat immediately when they occur.
**Background reconciliation** — if you configured an API token in [SSO using OIDC Step 4](./oidc#step-4-copy-your-credentials), Vikat also runs a full reconciliation every 24 hours to catch anything the SCIM push may have missed.
***
## Troubleshooting
**Test API Credentials fails** — verify the SCIM Base URL has no trailing slash and the API token matches exactly what Vikat generated. Rotate the token in Vikat and update Okta if needed.
**Users are pushed but have no role** — SCIM provisions the user record; role assignment comes from attribute mappings in the OIDC provider. Confirm your Attribute-to-Role mappings are set and the relevant claims are present in the JWT.
**Custom attribute is not arriving in Vikat** — confirm the External name in Okta's Profile Editor matches the SCIM attribute name in Vikat exactly (case-sensitive). Also verify the Okta User → Vikat SCIM mapping direction is saved.
**Group membership is not syncing** — ensure groups are added under **Push Groups**, not just **Assignments**. Assignments sync users; Push Groups syncs group membership.